Editing the Hierarchy
Every node in a hierarchical Orgvue dataset has a property that contains a unique ID
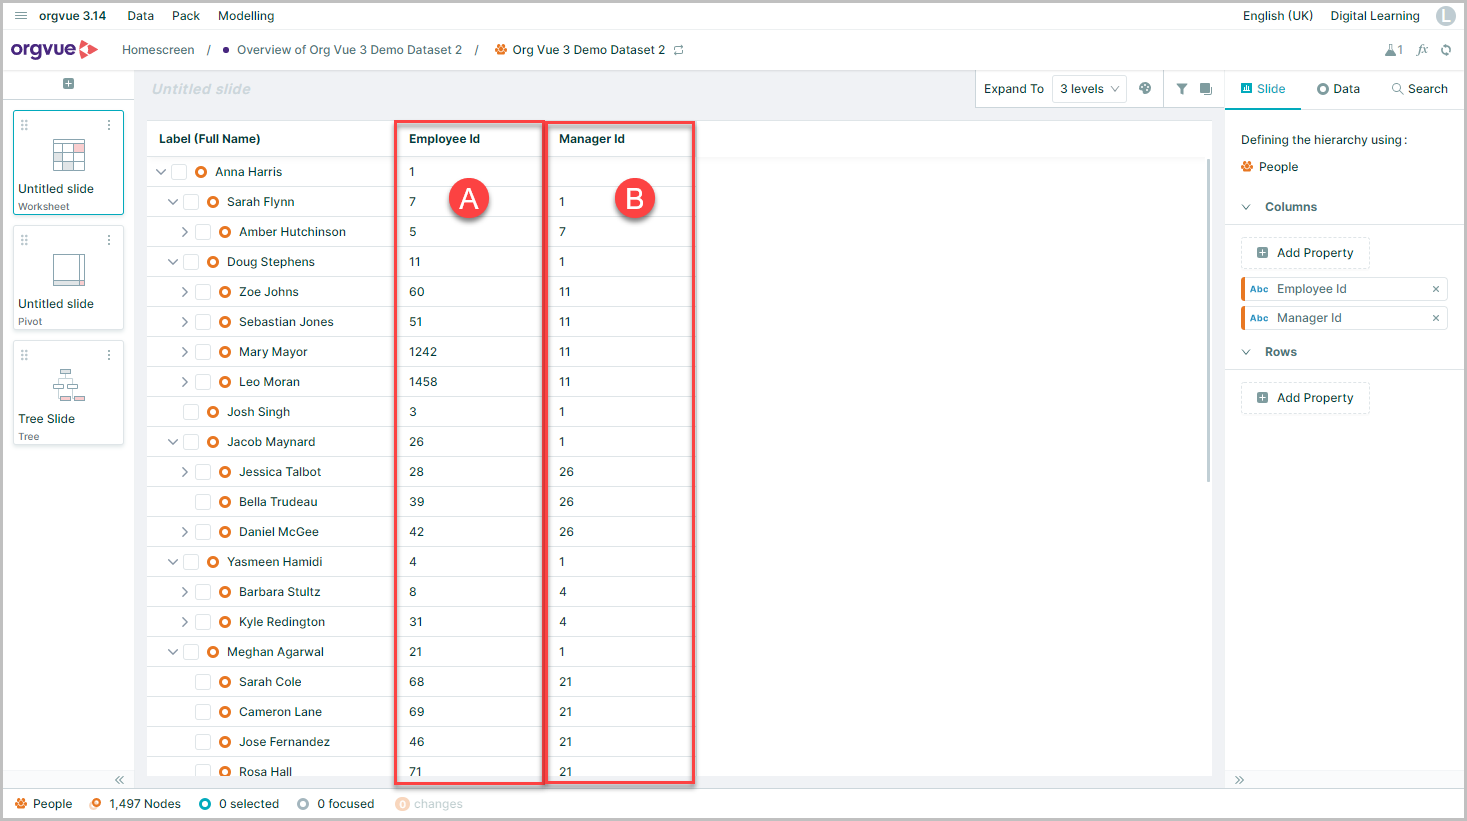
- A. In most cases this will be an employee ID, payroll ID or similar
- B. The hierarchy is constructed by recording the unique ID of every node’s manager or parent node in a second property normally called Parent ID or Manager ID
Any unsaved changes made in the hierarchy may be undone by following the steps detailed in Reverting Node Changes
Reparent Single Node
It is possible to edit the hierarchy, and therefore change the parent of a node within a tree slide
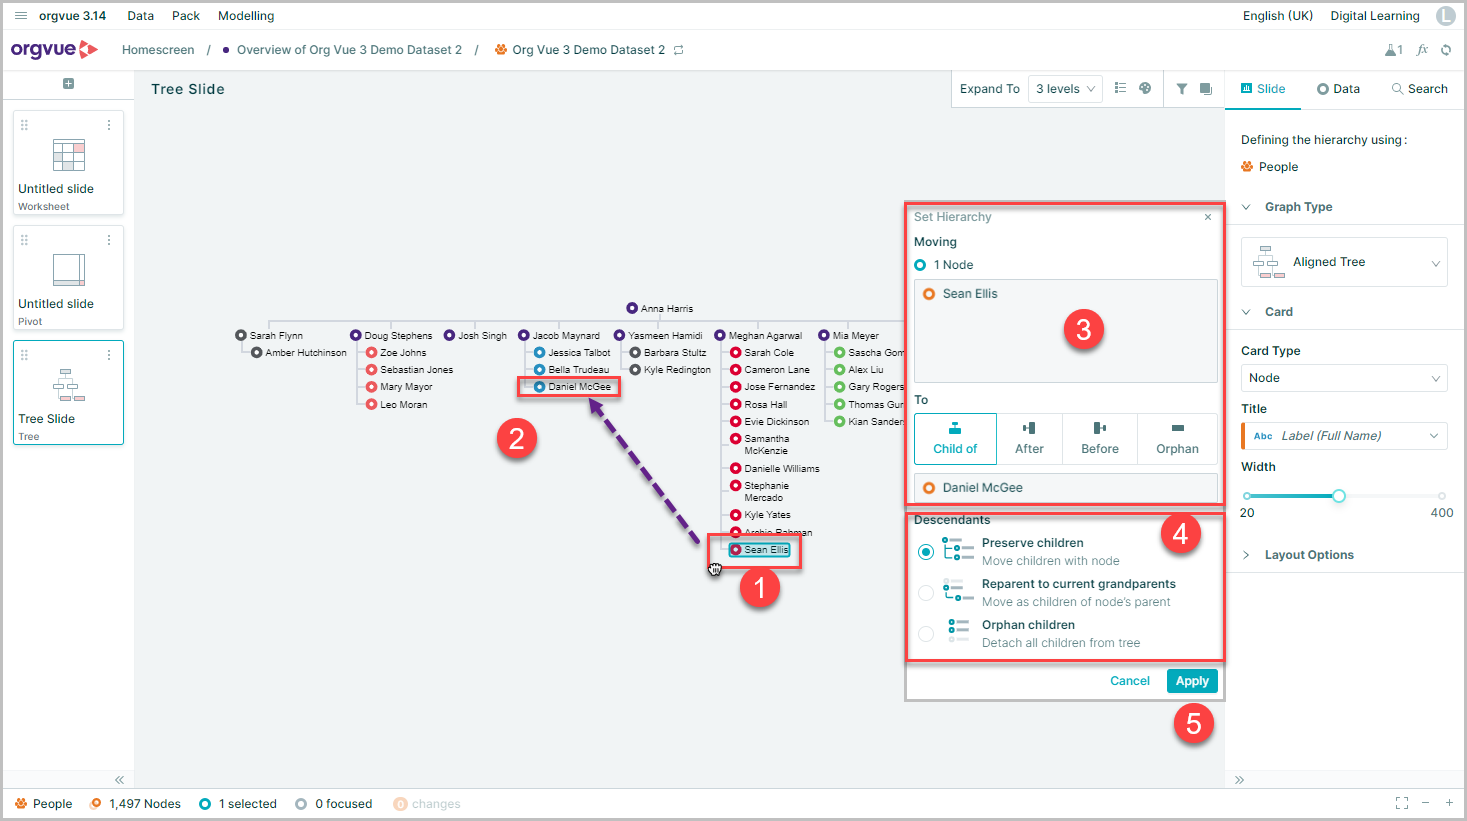
- Selecting a node using the left click of the mouse
- Then dragging the node onto the new parent node
- Will open a pop-up dialogue window which will confirm the move of the node
- It will also allow you to choose what action to take for any descendants of the moved node
- Clicking Apply will change your Tree Slide to reflect the moved node
The options for descendants are:
- Preserve Children: This option will move any descendants of the moved node with it
- Reparent to current grandparents: This option changes the parents of any immediate descendants to the current grandparents and preserves any hierarchy at levels below
- Orphan Children: With this option any descendants are removed from the tree allowing you to reparent them as required
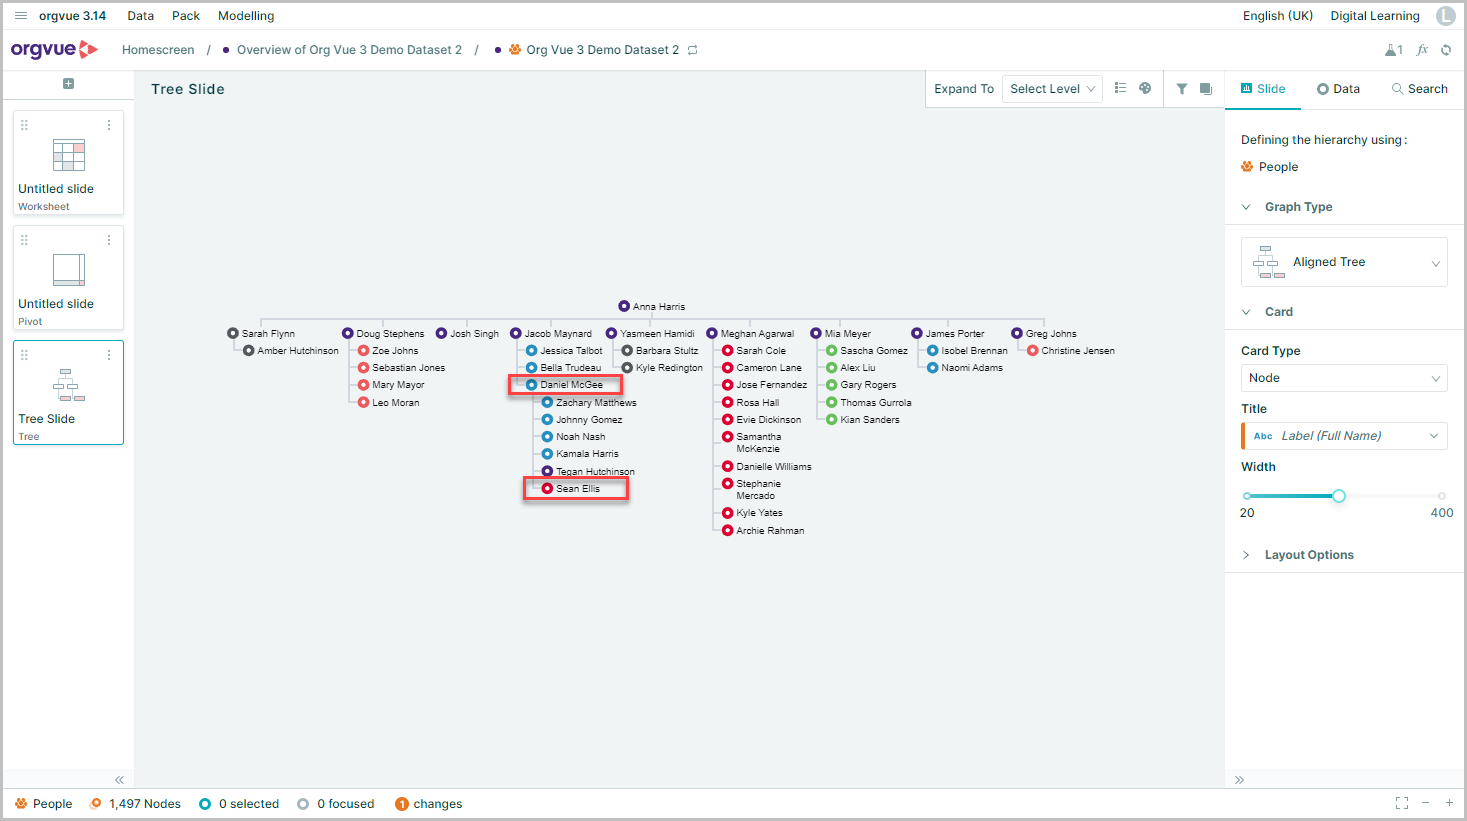
The moved node will now show as reporting to its new parent
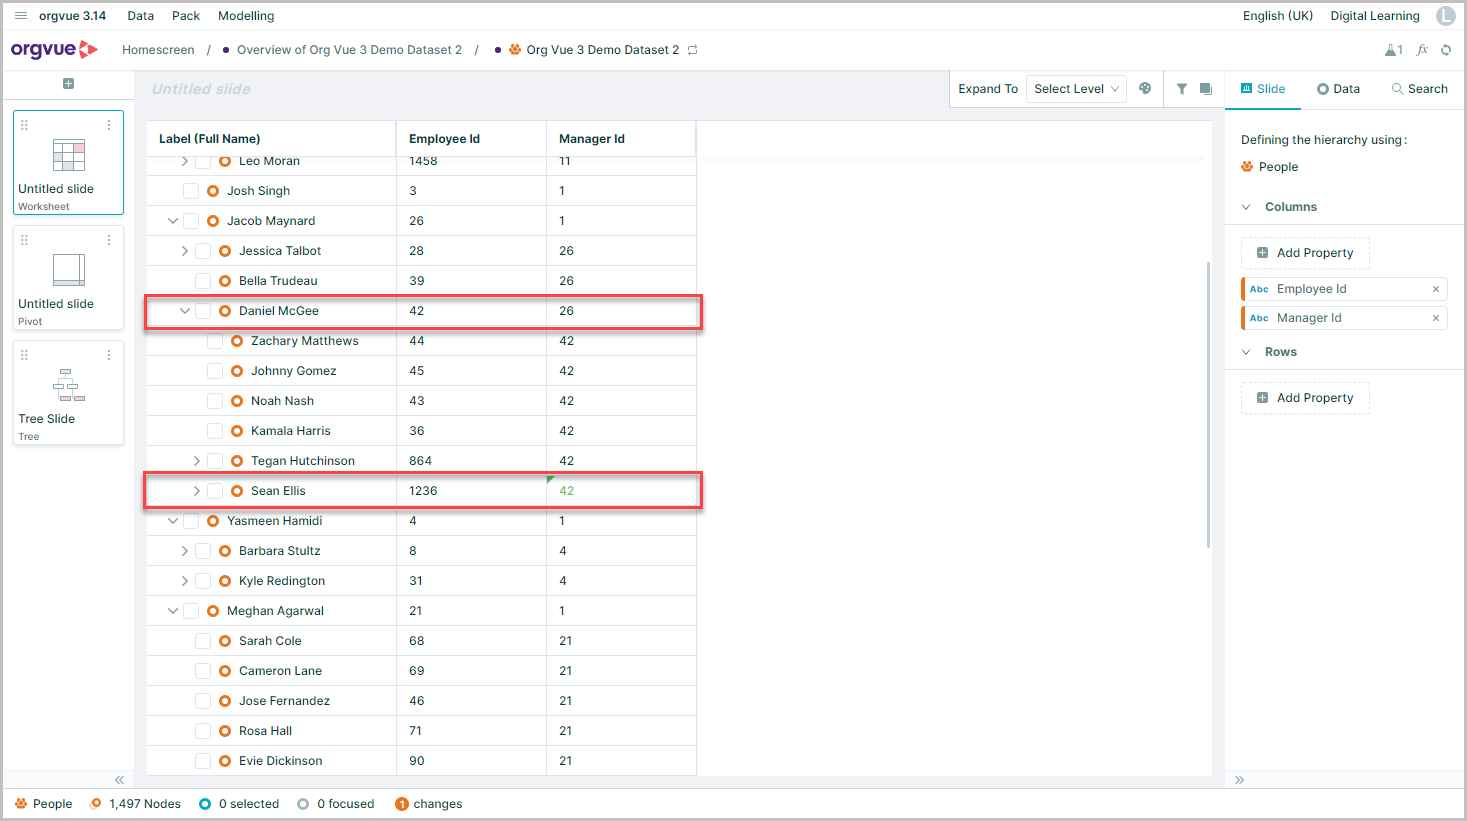
Any changes made on the tree view using the drag and drop method will also be visible on the worksheet slide showing the employee and manager ID properties
The changed manager ID value is shown in green font indicating an unsaved change
Reparent Multiple Nodes
In addition to editing single nodes in the hierarchy, it is also possible to edit multiple nodes and therefore change the parent of several nodes within a tree slide at the same time
To reparent multiple nodes:
- Select the required nodes
- The node summary in the footer will then display the number of nodes selected
- To reparent the selected nodes, left click and drag the selected nodes icon from the footer and drop them onto the new parent node
- A pop-up dialogue will then appear confirming the move
- Select the action to take for any descendants
- Clicking ‘Apply’ will result in the nodes being moved to the new parent node

Orphan Node
As well as changing the manager ID of a node, you can also move a node out of the hierarchy so that it no-longer has a manager node
This action is referred to as ‘Orphaning a node’
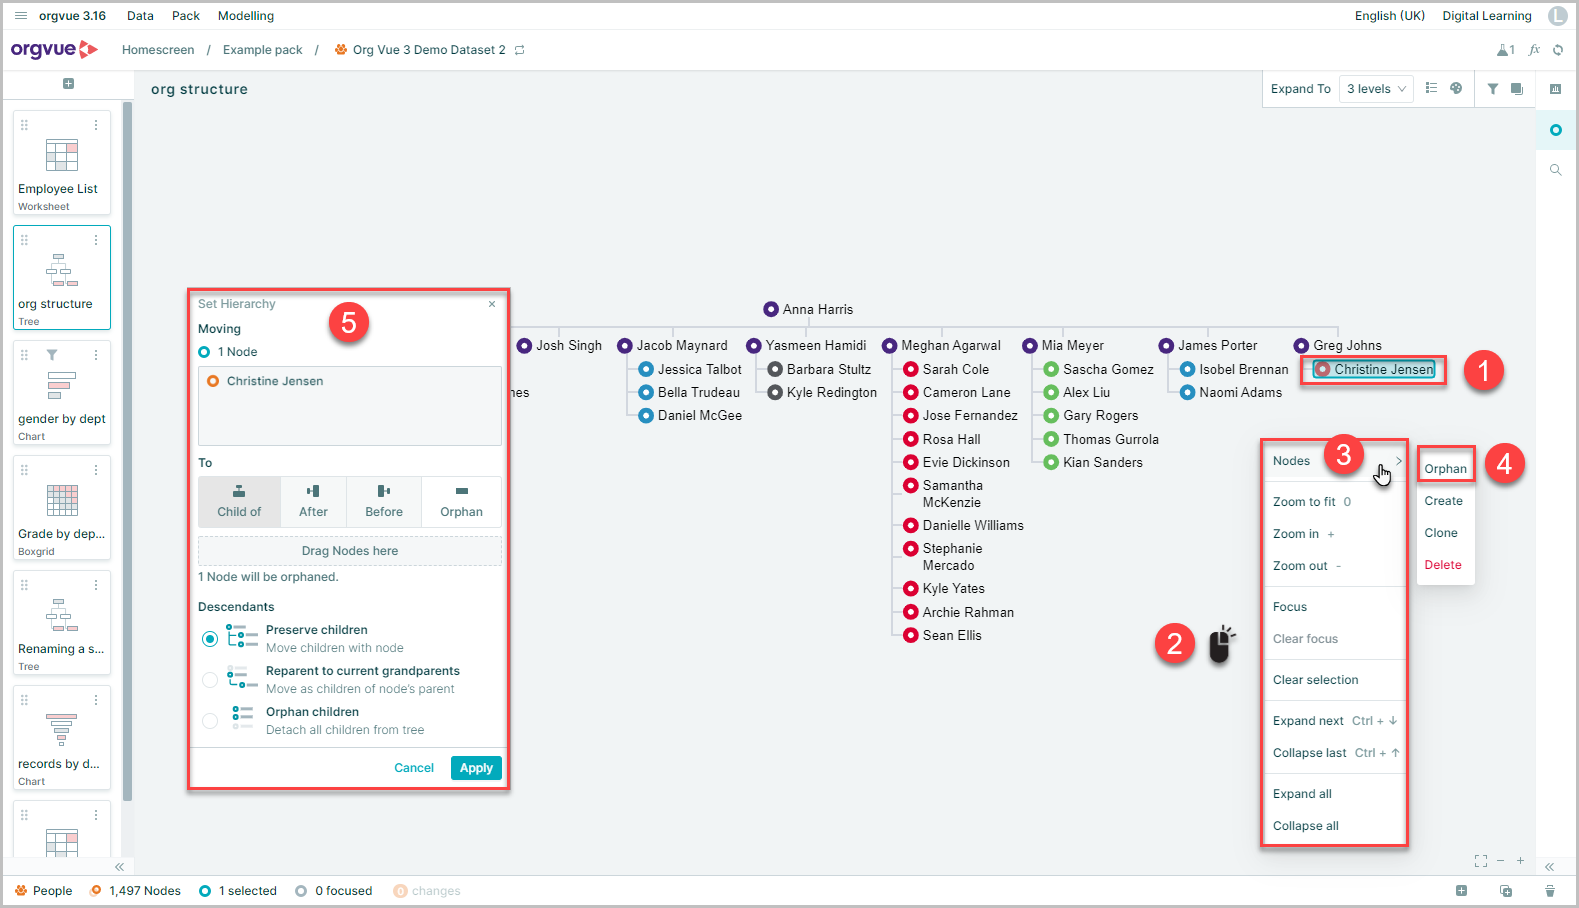
As with re parenting a node, when a node is orphaned, a dialogue box will allow you to choose what action to apply to any descendants
To orphan a node:
- Select it on the tree slide
- Right click to open the menu
- Hover over
Nodeson menu to open sub menu - Choose
Orphan - Then chose the desired action for any descendants and click ‘Apply’ on the confirmation pop-up
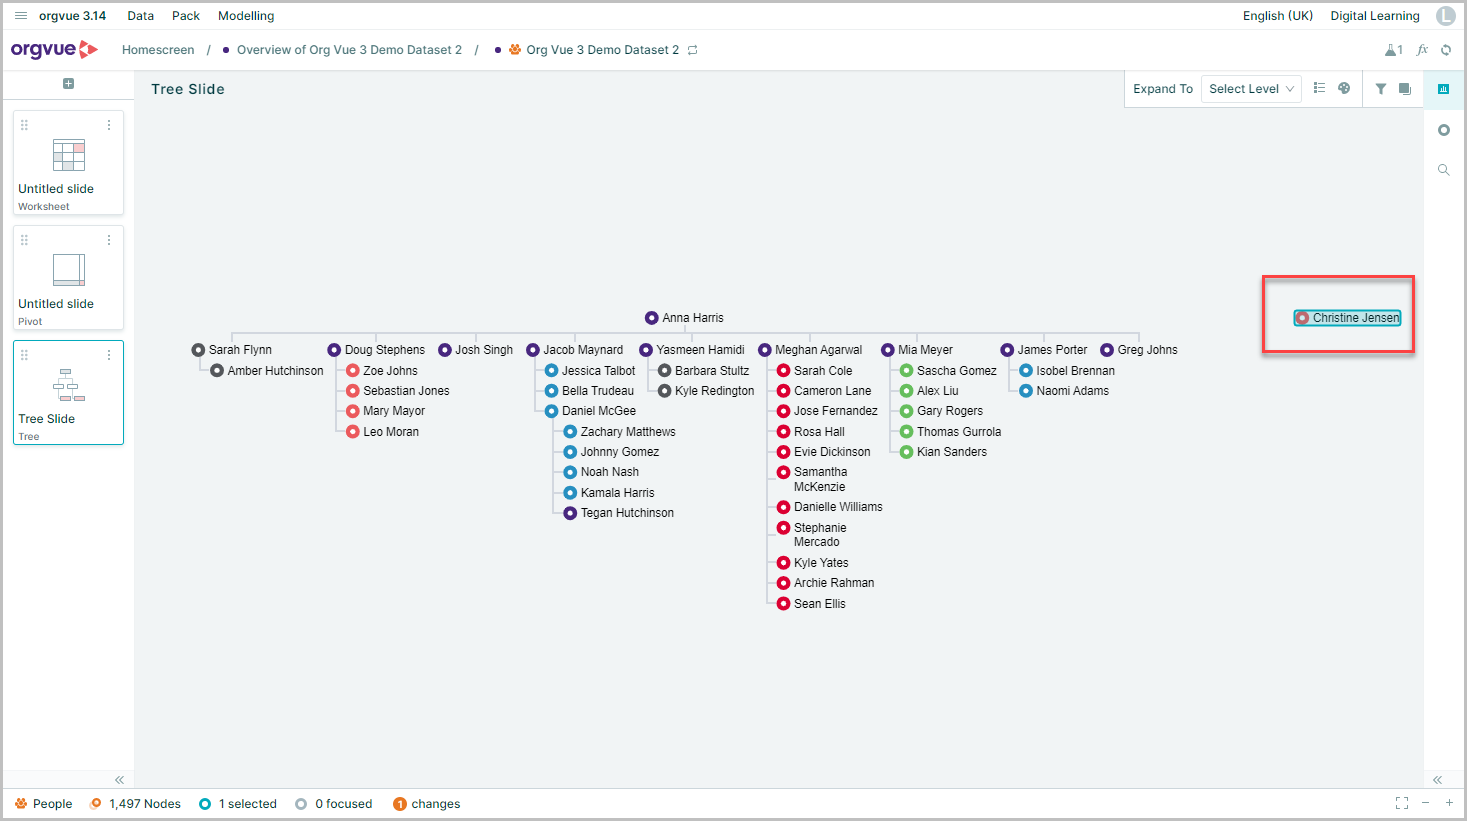
The tree will change to show the selected node separated from the main hierarchy
Create Node
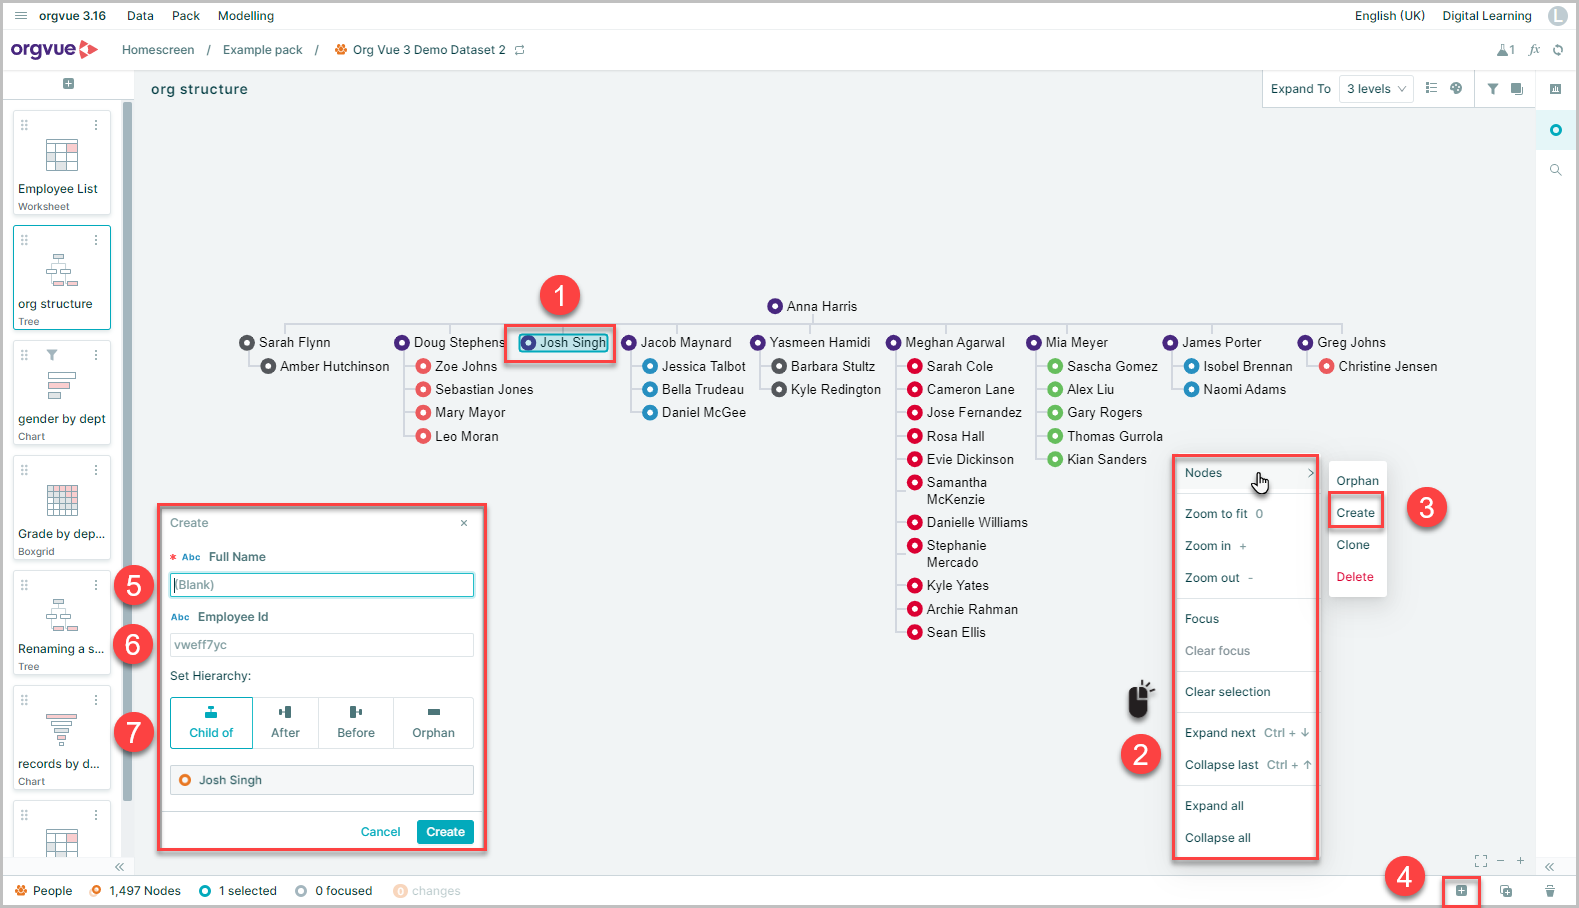
As well as editing existing nodes, it is also possible to add new nodes to your dataset from the tree view slide by:
- Selecting any existing node
- Right-clicking to open the navigation menu
- Select
Create Nodewill open the Create Node pop-up window - The Create Node window can also be opened by clicking the
+button located at the bottom of the Data Tab
The Create Node pop-up contains the following fields:
- Label Field: Enter a value to display for the created node
- Employee ID: Orgvue will automatically generate a unique ID for new node, but this can be over typed if required
- Set Hierarchy: Options here are for you to decide where the created node should appear in your hierarchy in relation to the selected node
To complete the creation of a new node, select the Create button and the new node will appear within your tree slide
To save the newly created node in your dataset see Data Save for more details
Clone Node
An alternative to creating nodes when adding nodes to your hierarchy is to clone an existing node or nodes
The benefit to this approach is that you may clone a single node multiple times or even clone a whole team structure at once
When cloning nodes Orgvue will automatically assign a unique ID and this may be updated as required
All other property values will be cloned unless the property has been tagged noclone in the Settings property manager which will be left blank in the cloned nodes
There are three ways to clone a node:
Right Click
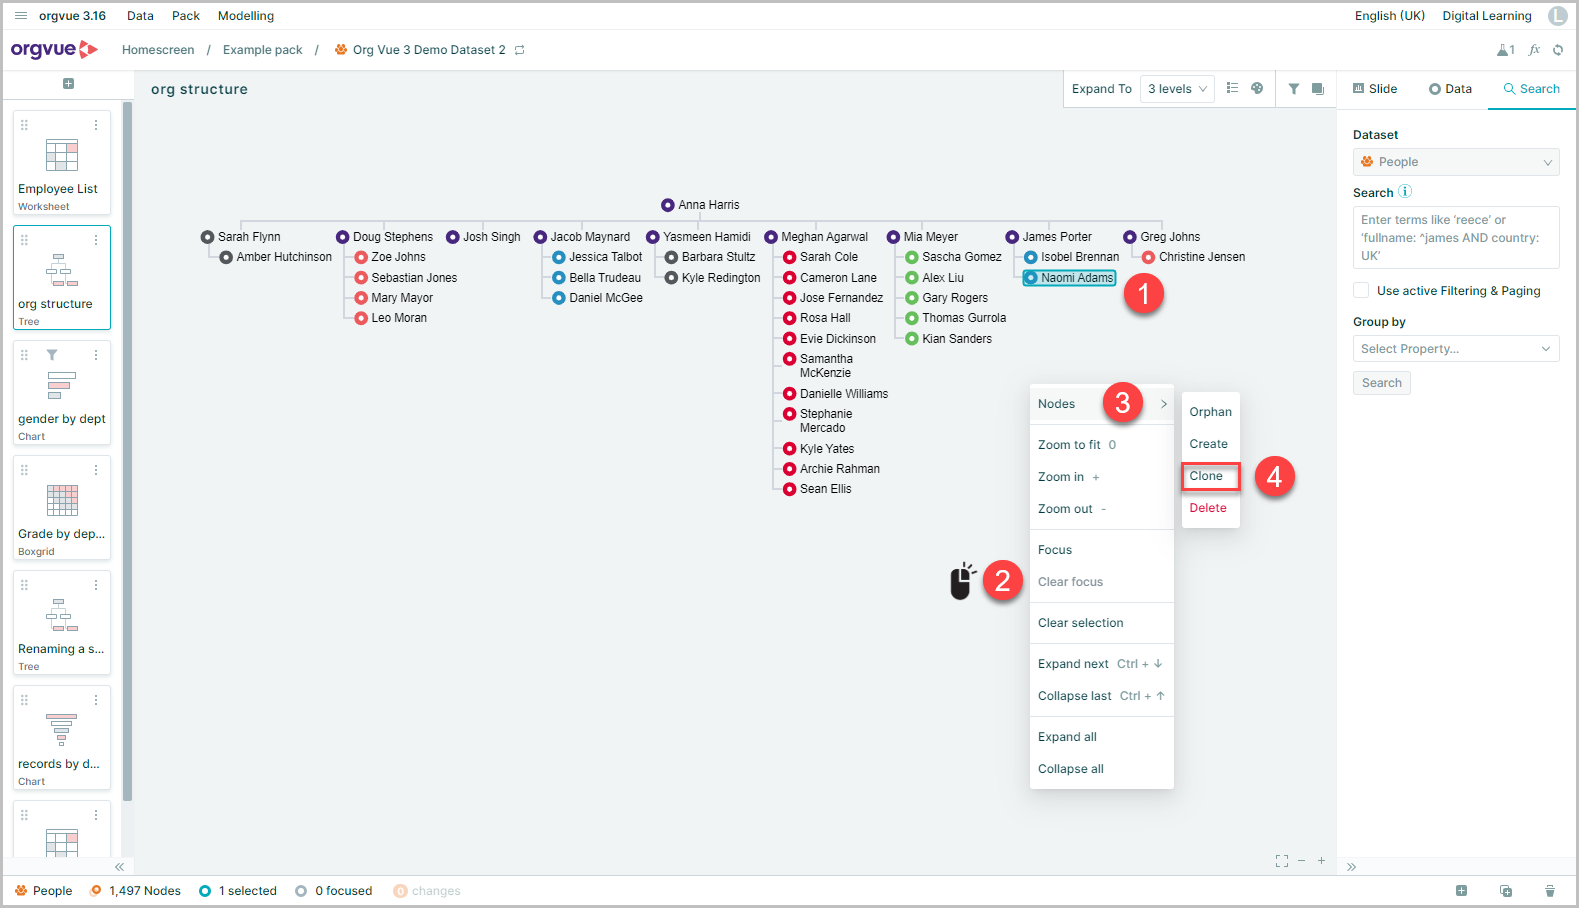
- Select the node(s) to be cloned
- Right-Click on a blank area of the canvas to open the menu
- Hover over
Nodeson menu to open sub menu - Select
Clone Node
Drag onto Clone Button
Nodes may be cloned by dragging onto the clone button on either:
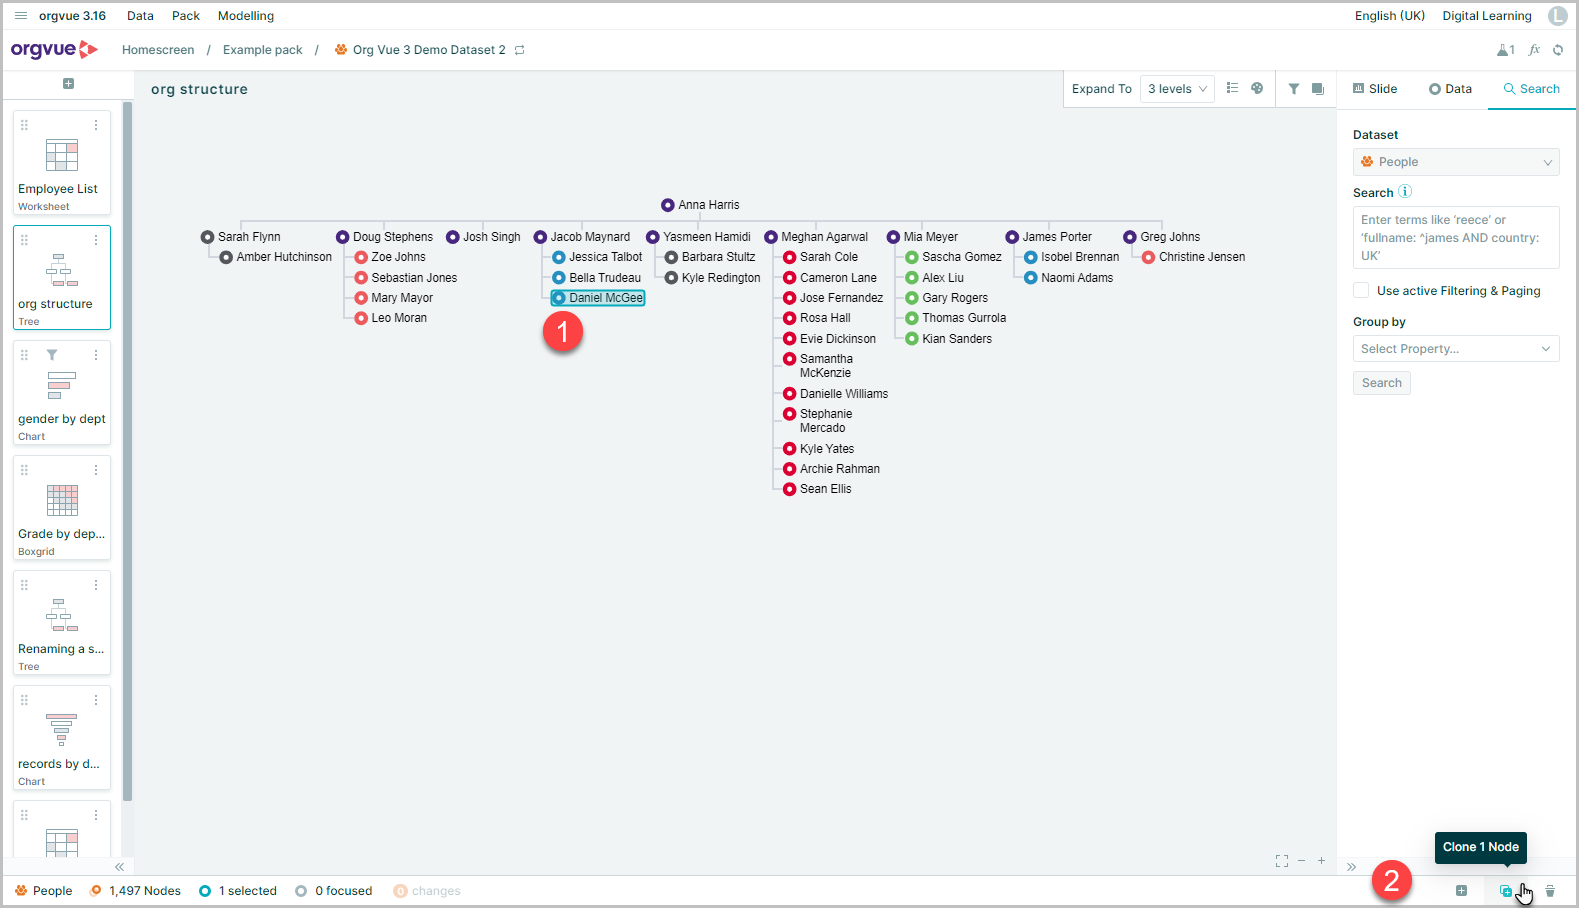
On a Tree Slide
Node(s) may be cloned on a Tree Slide by:
- Select the node(s) to be cloned
- Drag the selected node(s) onto the clone button on the footer
On a Crosstab Slide
Node(s) may be cloned on a Crosstab slide by:

- Selecting a node block
- Dragging and dropping onto the clone button
- Selecting the number of Clones per node
- Select the
Clonebutton to confirm the clone of the nodes
Select the Clone Button
- Select the node(s) to be cloned
- Select the Clone Node button on the footer
All three options will then open the clone node window which shows:
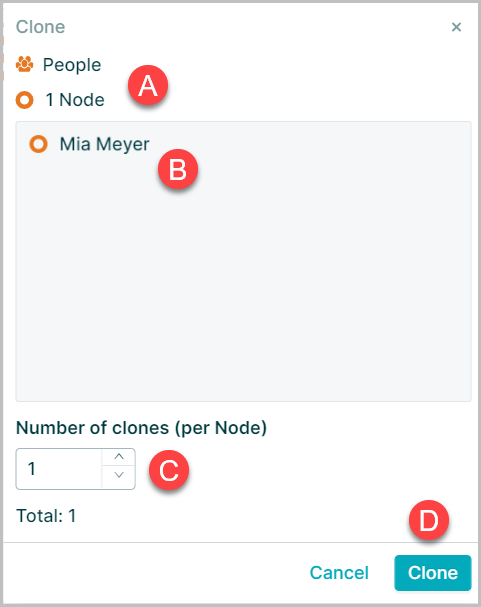
- A. The total number of nodes selected for cloning
- B. The nodes to be cloned
- C. The number of clones to be created per selected node with option to increase this
- D. The
Clonebutton completes the clone process
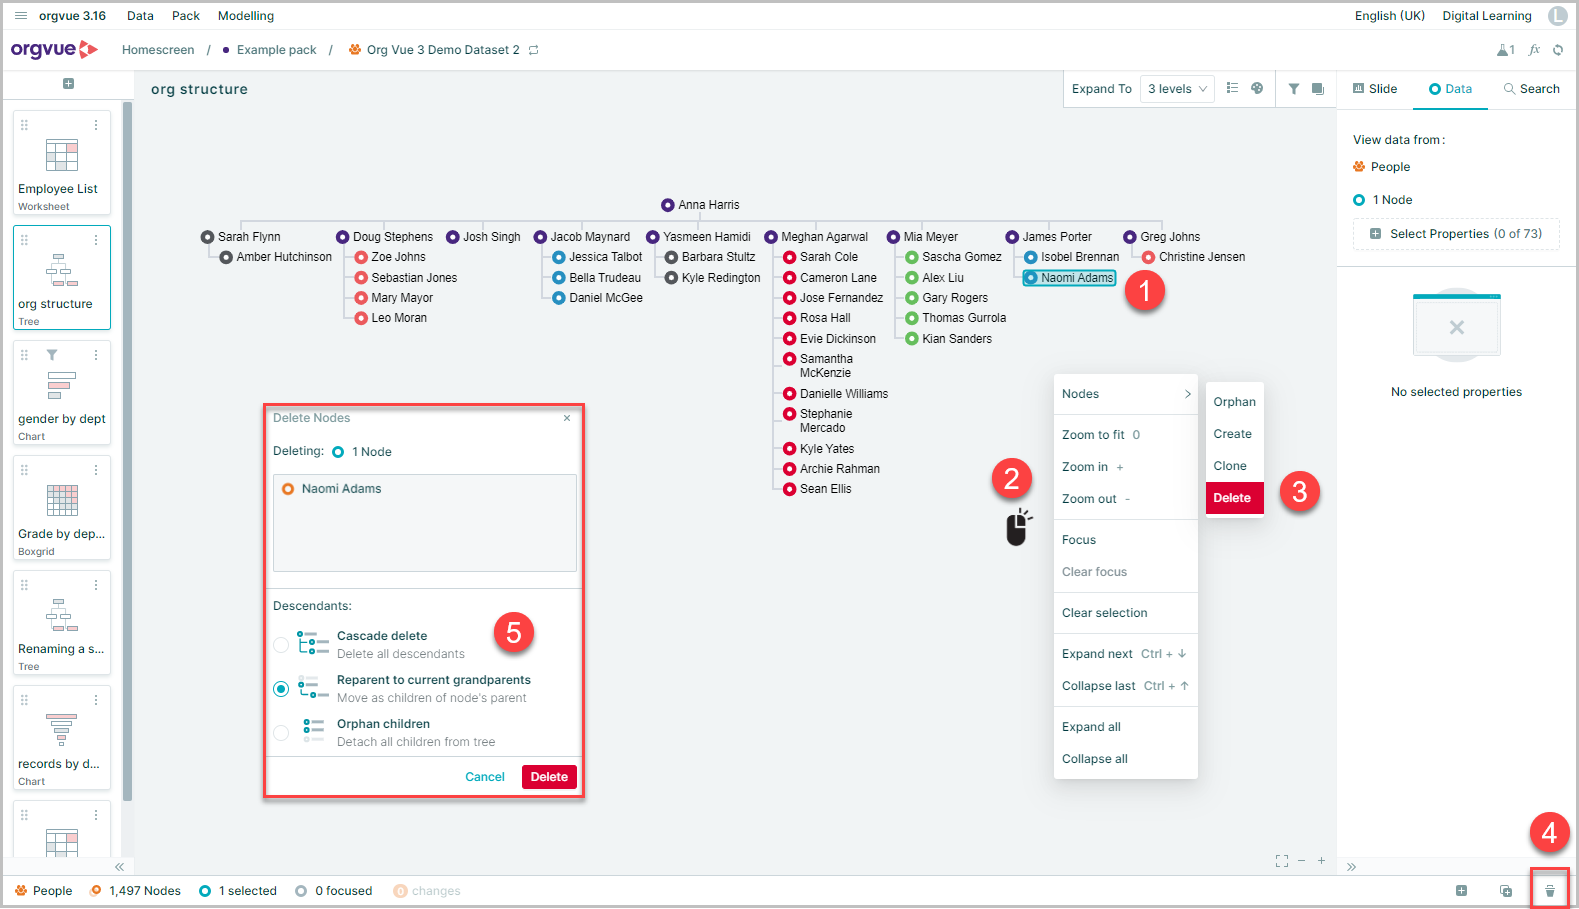
Delete Node
Nodes can also be deleted from your dataset from the tree slide by:
- Selecting any existing node(s)
- Right-clicking to open the navigation menu
- Selecting Delete Node will open the Delete Node pop-up window
- The Delete Node pop-up can also be accessed using the dustbin icon at the bottom of the Data Tab
- Select the required action for any descendants and then click delete on the pop-up window to complete the deletion
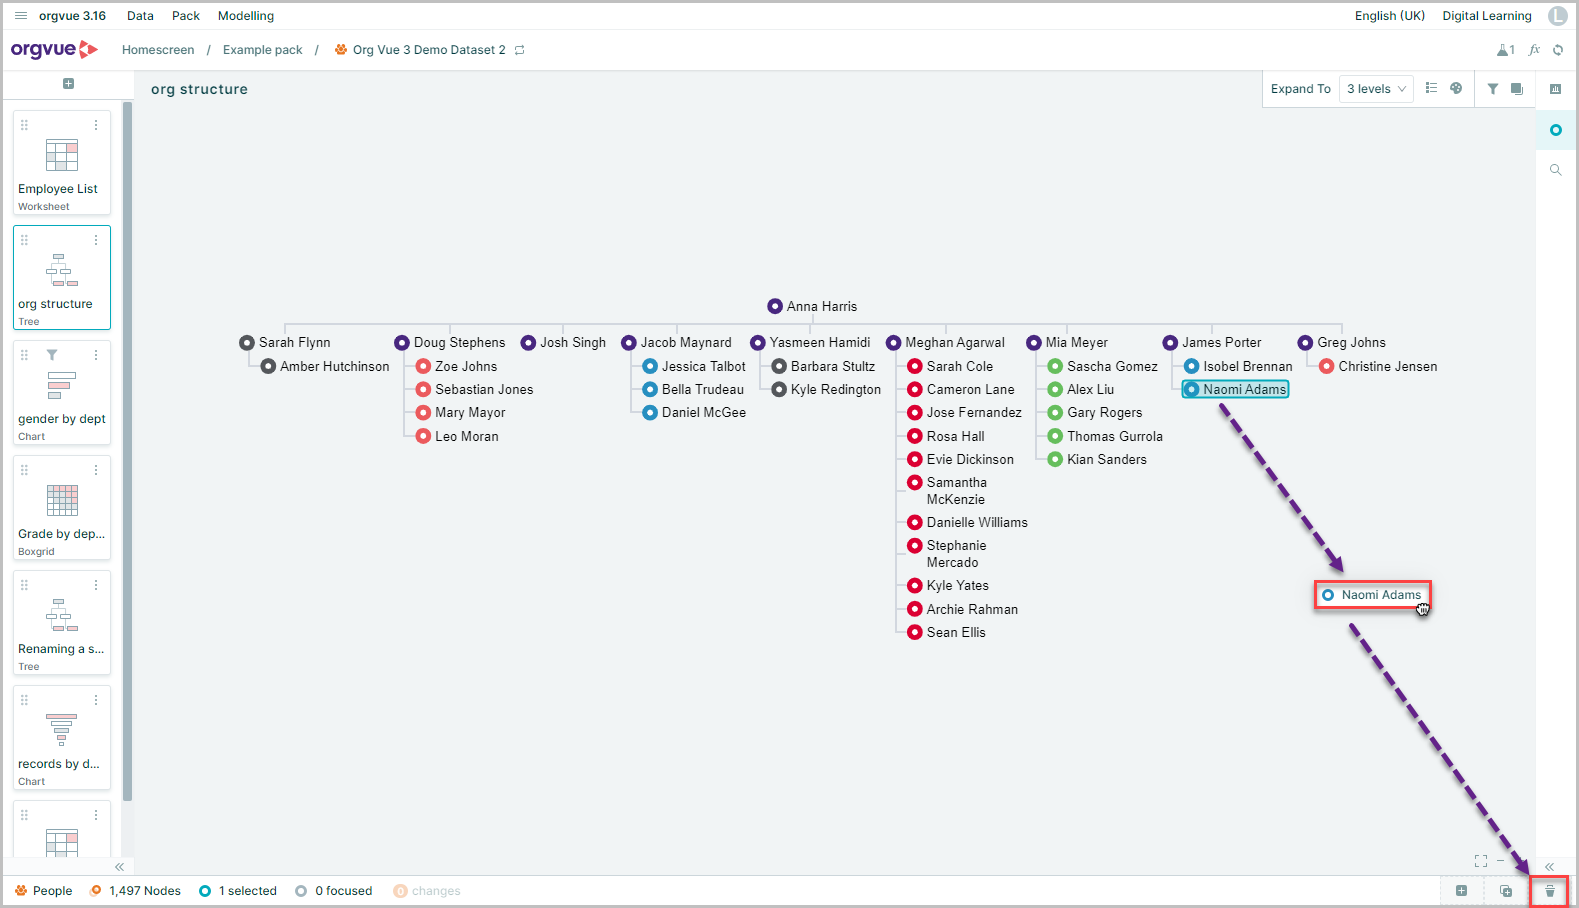
It is also possible to delete nodes from either a tree or crosstab slide by dragging the node onto the delete button of the Footer bar
Delete from Tree slide
Delete from Crosstab slide