
Views and Drafts
To view a video explaining the difference between Views and Drafts click the thumbnail to open the video in a new browser tab
Views
A View allows you to securely share specific records and properties with other users
Using the create views wizard it is possible to create a view of the original dataset and select which records and properties to include in that view
An example of the need to create a view may be that you wish to share a view of the data that contains no financial detail
Therefore, the properties current salary and current bonus would be unselected from the view
If any non-expression text properties have been tagged with the term aggregate within the settings application, then it is also possible to choose which nodes (records) are included in the view based on the tagged property
For more details on tags see Tags in Settings User Guide
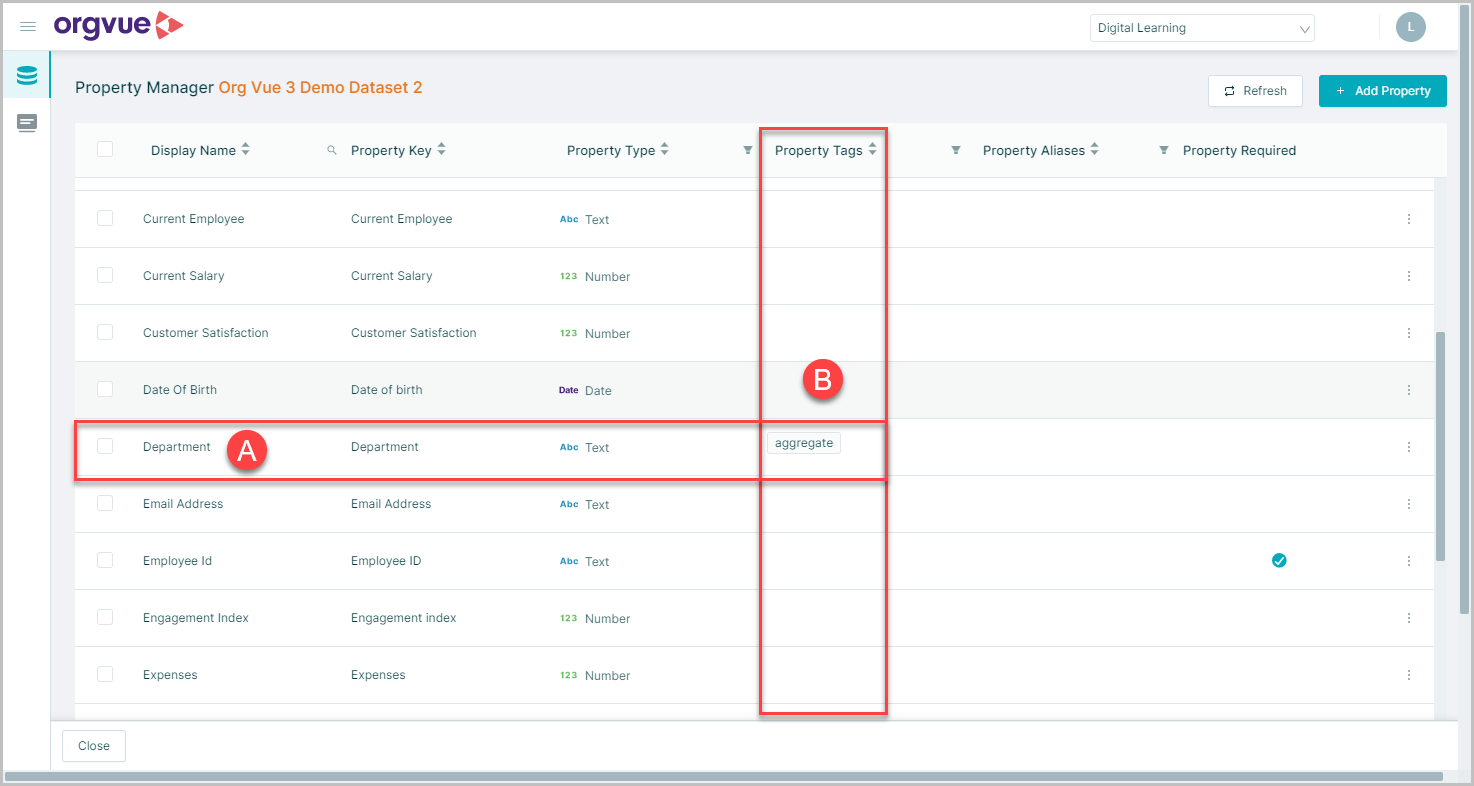
- A. If the property
Department - B. Has been tagged
aggregate
Then it would be possible to select just the node records from the Finance and Project Delivery departments
Note the
aggregatetag can only be used with non-expression Text properties to filter Views
Creating a View
To view a video on creating a view click the thumbnail to open the video in a new browser tab
The process of creating a view is conducted using the wizard which guides you through the steps required
Note: In order to create a view, you must be the owner of the relevant dataset or have an
Adminuser profile
It is also possible to grant users permission to create views and drafts by the use of the Manage permission in the settings screen for the required dataset
- e.g. adding the role
hrto themanagepermission of a dataset will allow any user with the role ofhrto create a view and draft from that dataset
See the Permissions section of the Settings User Guide, for more details on adding permissions
To start the wizard:
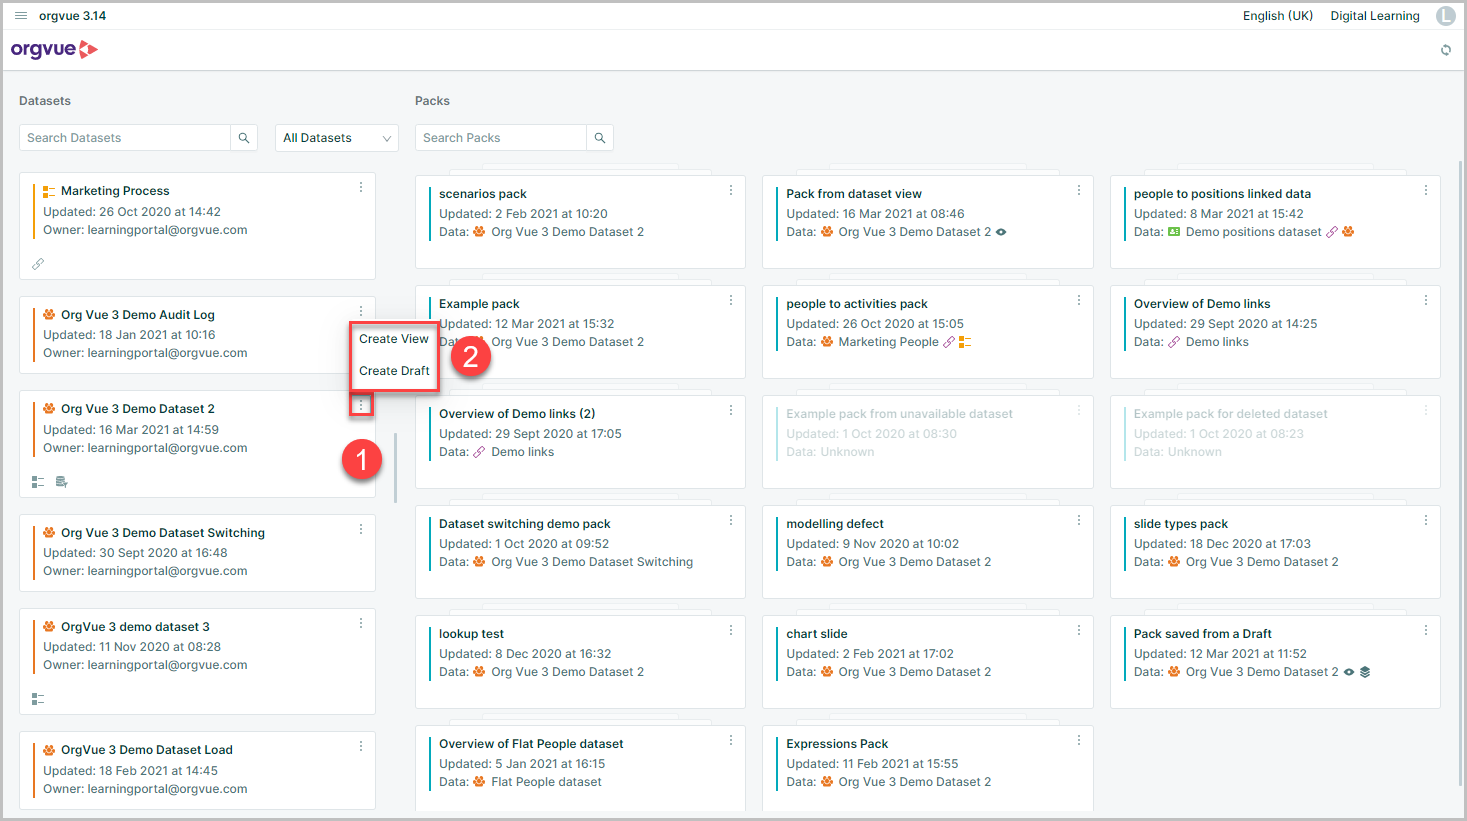
- Click the more details button on the dataset you wish to create the view from
- Select
Create View
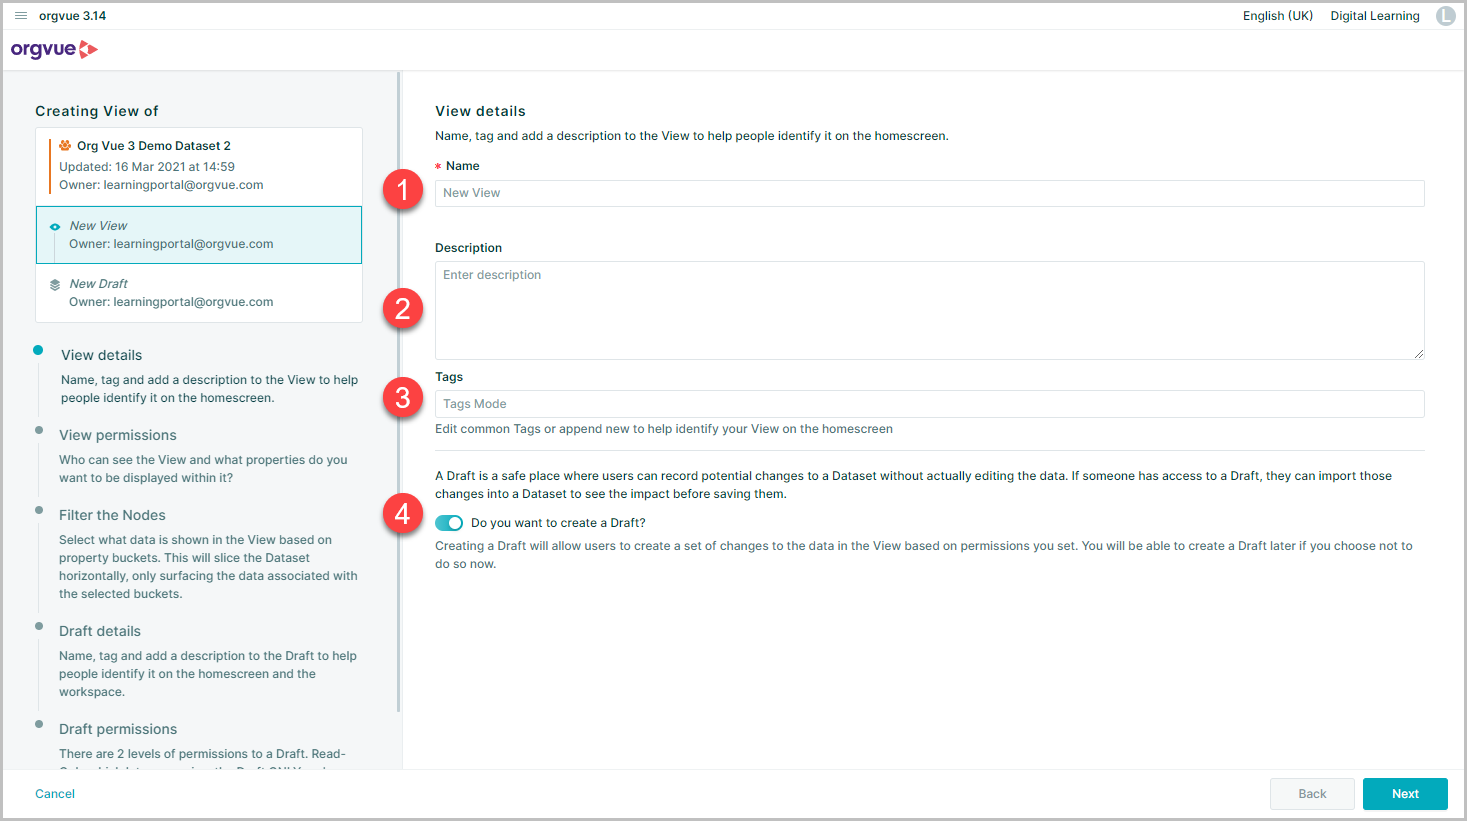
View Details
The first screen on the view creation wizard has the following fields to be completed:
- Name: This is a mandatory field, and you can enter a name for your view which will identify it on the home screen
- Description: Optional field to enter notes or longer description of the view
- Tags: Optional field to also aid searching and or identification of the view
- Draft Toggle Switch: Choose to also create a draft as well as a view
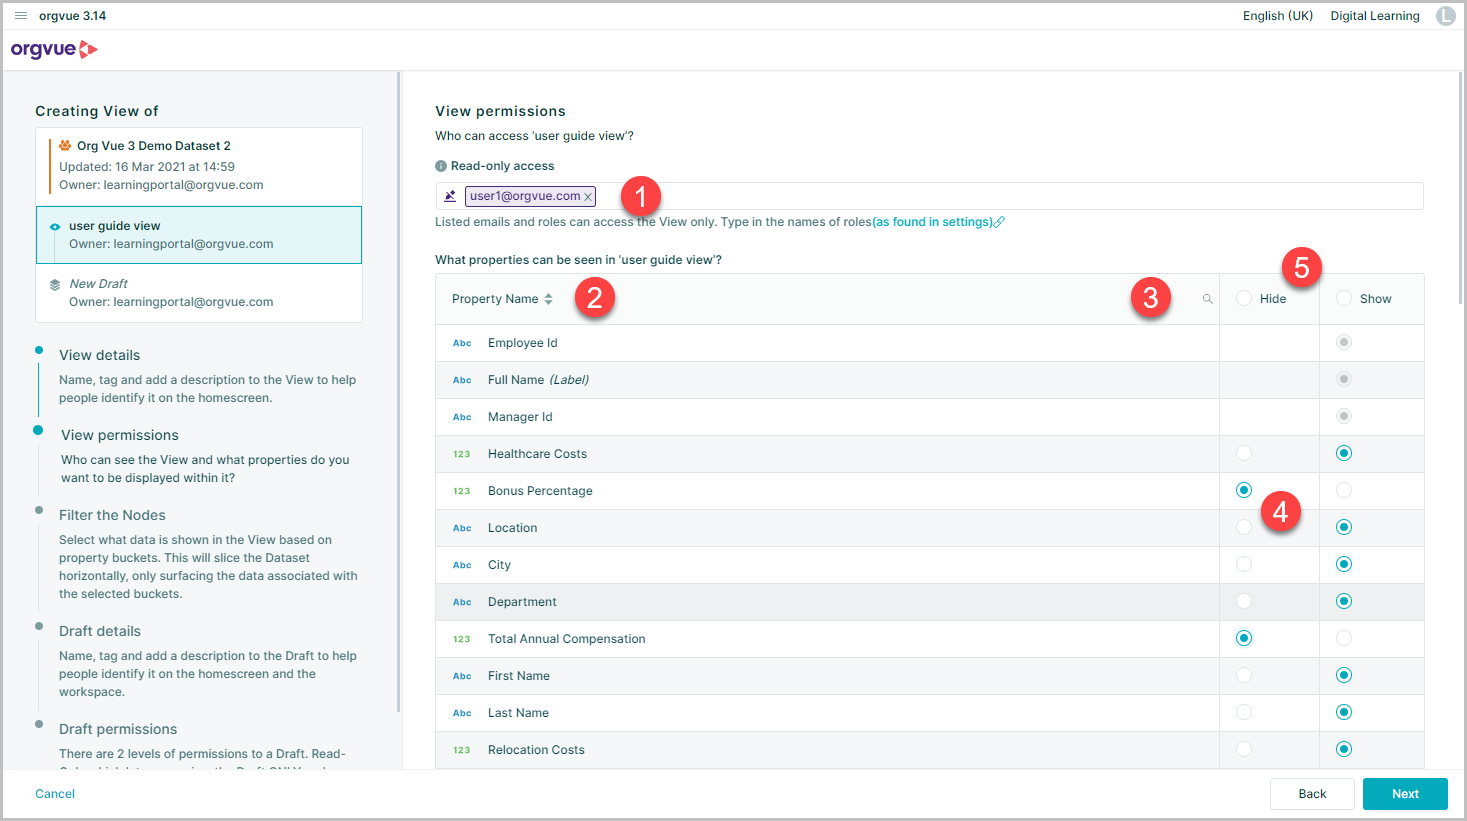
View Permissions
The second screen is where you need to enter the permissions for who can access the view and also decide what properties they can see:
- Enter details of who can access the view, permissions can be entered either as user roles or individual emails of existing users
- Option to sort Property list 'A-Z' or 'Z-A'
- The search function can be used to find the required property
- Click the
Hidebutton for any property that you do not wish to include in your view - Clicking the
HideorShowbuttons in the header bar will set all properties to hide or show
Note: A view will always be a read only. If you need to allow changes to be made, then this will be done in the draft created alongside the view Note: By default, all properties in the base dataset will be set to
Show
Once created view permissions may be edited / updated via either:
- Selecting the Manage option from the dataset card on Landing Page
- From the View Metadata screen in settings
Filter the Nodes
On the next screen you have the option to filter the data in the view, if you have tagged any properties aggregate
In the example shown:
- The
LocationandDepartmentproperties have been tagged, so they appear in the drop-down selection box for properties to filter on - Once you have added the properties to filter on, you can select which property buckets to include in your view
- The number of nodes included in the view from the base dataset are shown
- Option to
Show Ghost Nodes in the ViewShowing ghost nodes will display the parents of the nodes in the view which will keep the hierarchy together
- Set what properties can be shown for Ghost Nodes. Users will be able to see data associated with these nodes, but will not be able to edit them
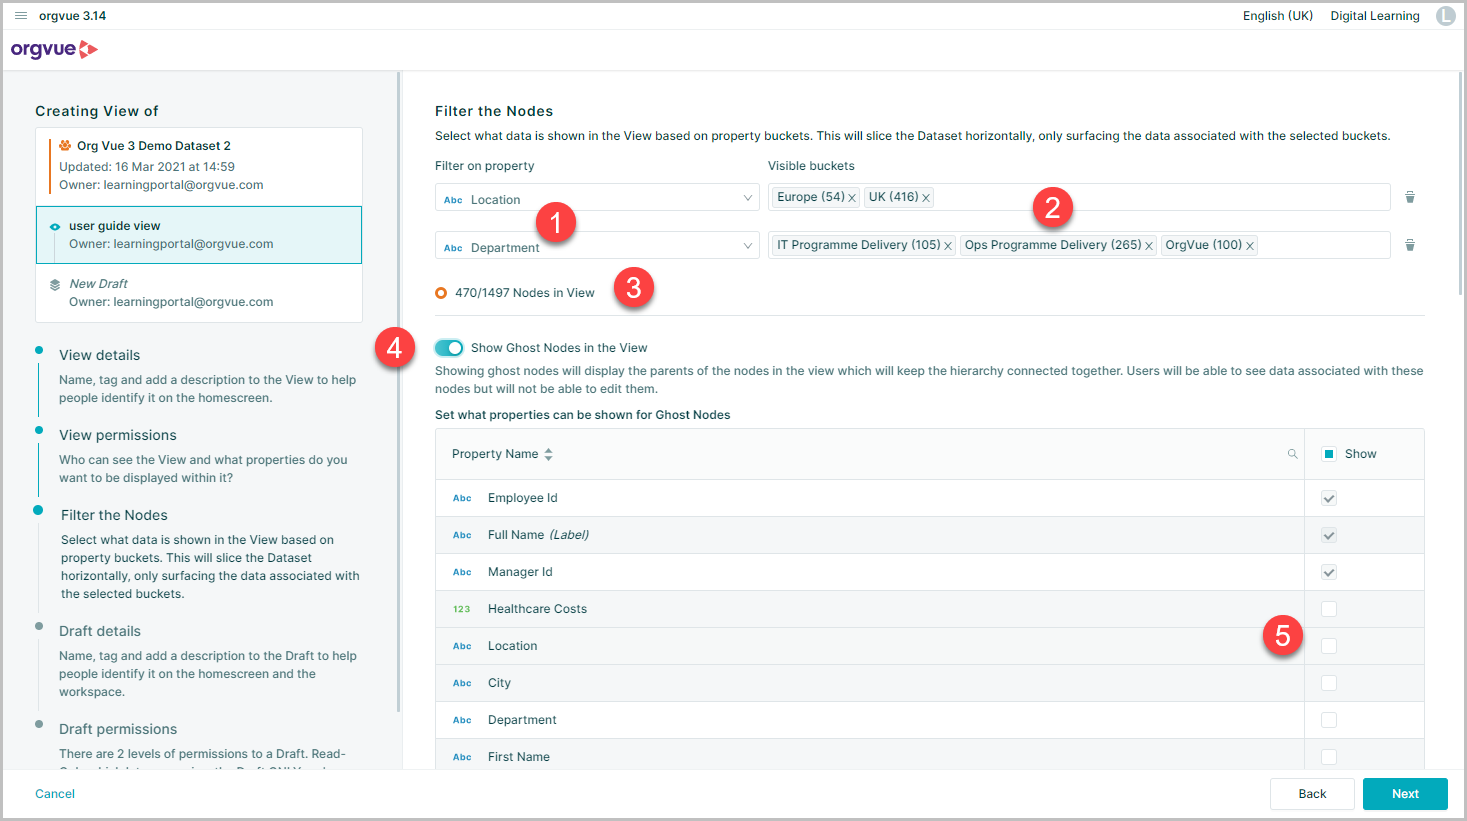
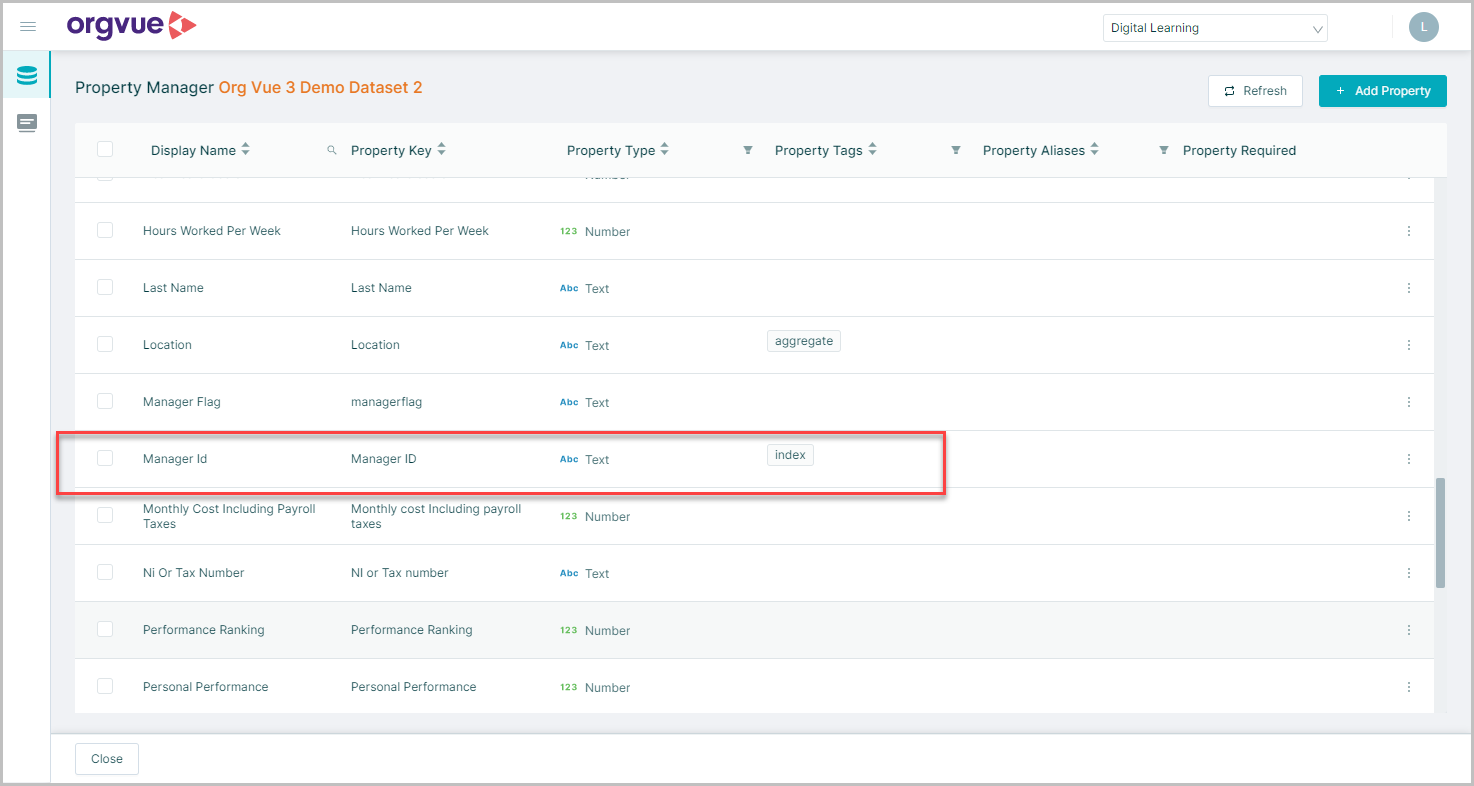
To enable ghost nodes in a view the Parent ID must be tagged index within settings for the dataset
For more details on tags see Tags in Settings User Guide
If you have not chosen to also create a draft in the wizard, then clicking the create button will finalize the view creation process
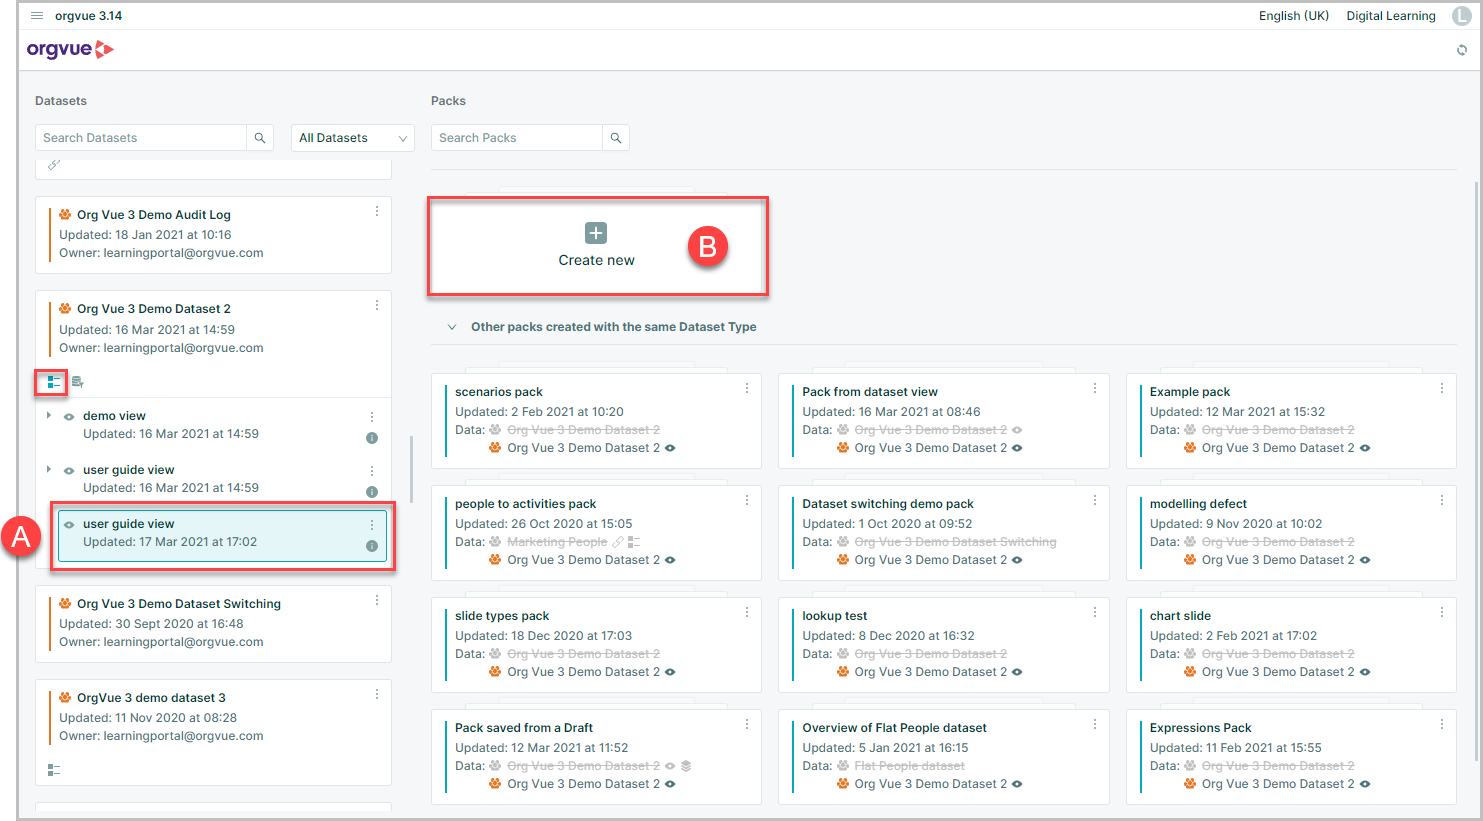
You will then be returned to the homescreen where:
- A. Your newly created view will show attached to the base dataset
- B. It is then possible to create a new pack to view the data within the view
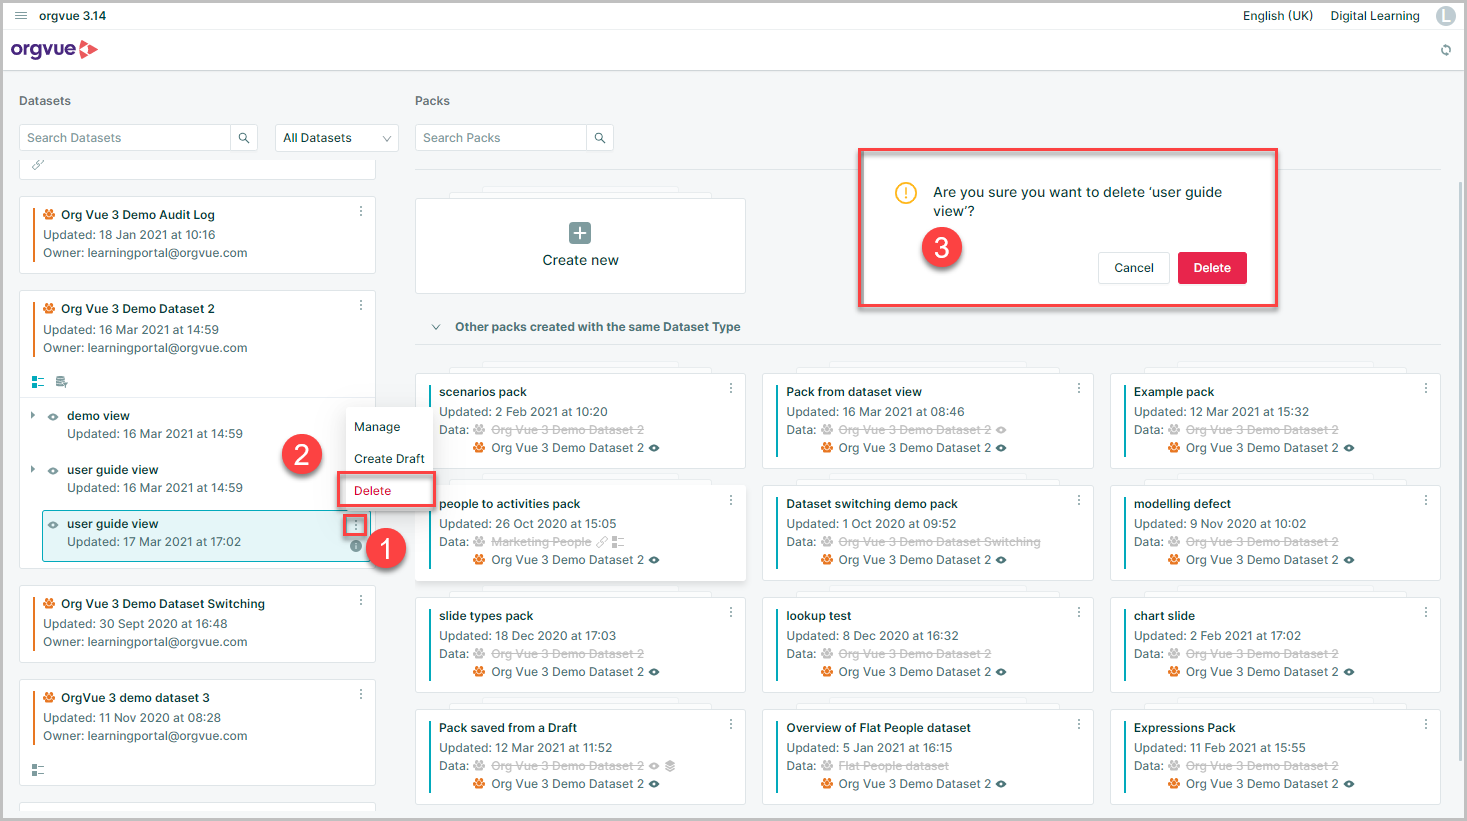
Deleting A View
Any views no longer required may be deleted from the homescreen. This does not affect the base dataset that they were created from
To delete the view:
- Click the more details menu shown on the view
- Select
Delete - A confirmation message will be displayed click delete to confirm the deletion
Drafts
The Drafts function allows you to collaborate on multiple scenarios and alternative options for organization designs
A Draft is a safe place where users can record potential changes to a Dataset without actually editing the data
If someone has access to a Draft, they can import those changes into a Dataset to see the impact before saving them
It is possible to create a draft either:
- From a view so that it only contains the specified nodes and properties in the view
- Or it may be created directly from a dataset and would therefore contain all nodes and properties
Note: It is not possible to create a draft for a linked dataset
Creating a Draft
To create a Draft:
A. Select the
Do you want to create a Draft?toggle switch while creating a view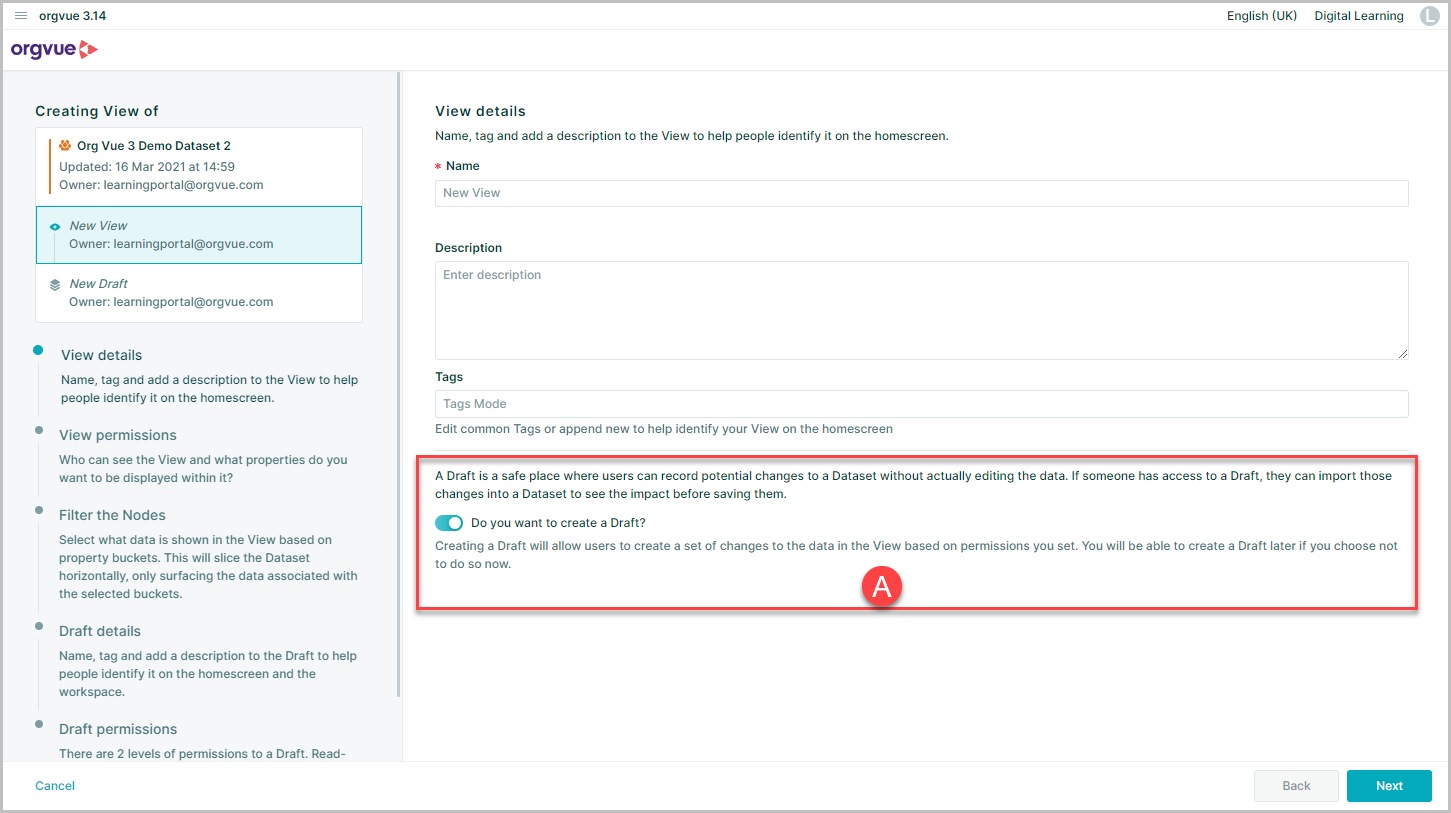
B. After creating a view, select the
Create Draftoption from the more detail menu on the View when shown on homescreen- C. Select the
Create Draftoption from the more details menu on a dataset from the homescreen
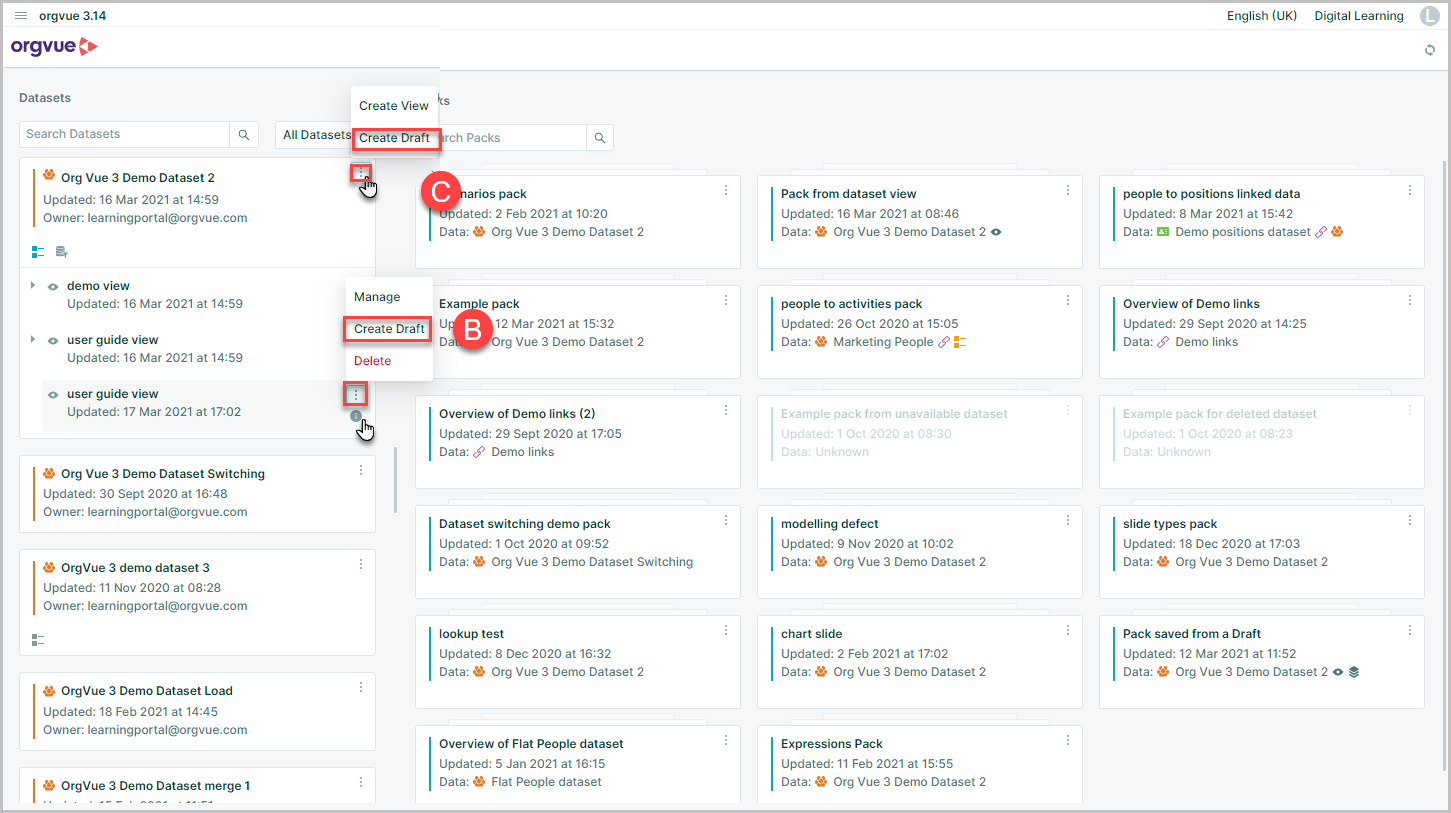
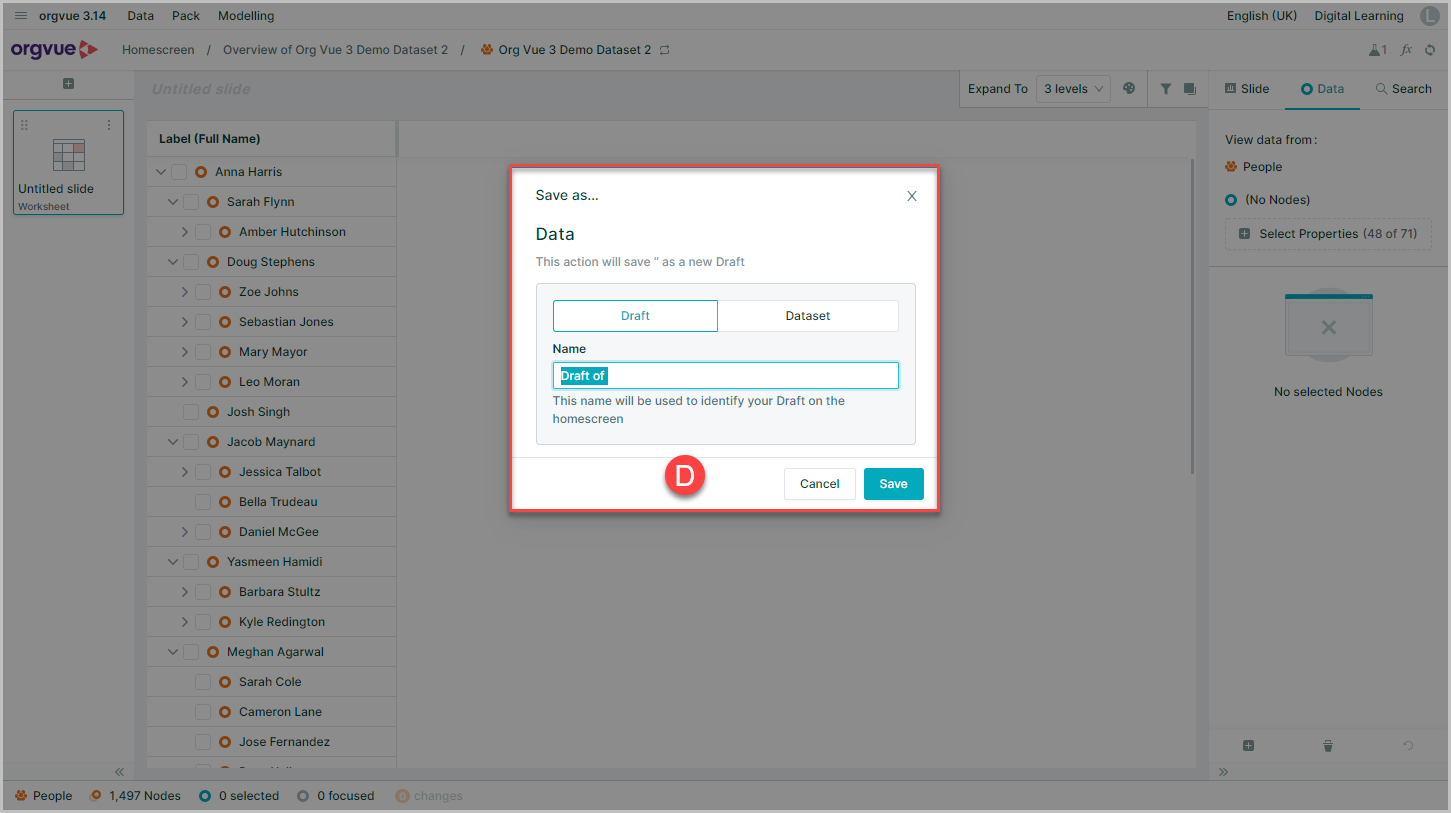
- D. While working in a dataset use the Data Save as... option and select
Draft
Note using the Data Save as... option does not open the Create Draft Wizard. To set permissions for this draft use the Manage option
Selecting options A, B or C above will open the Create Draft wizard
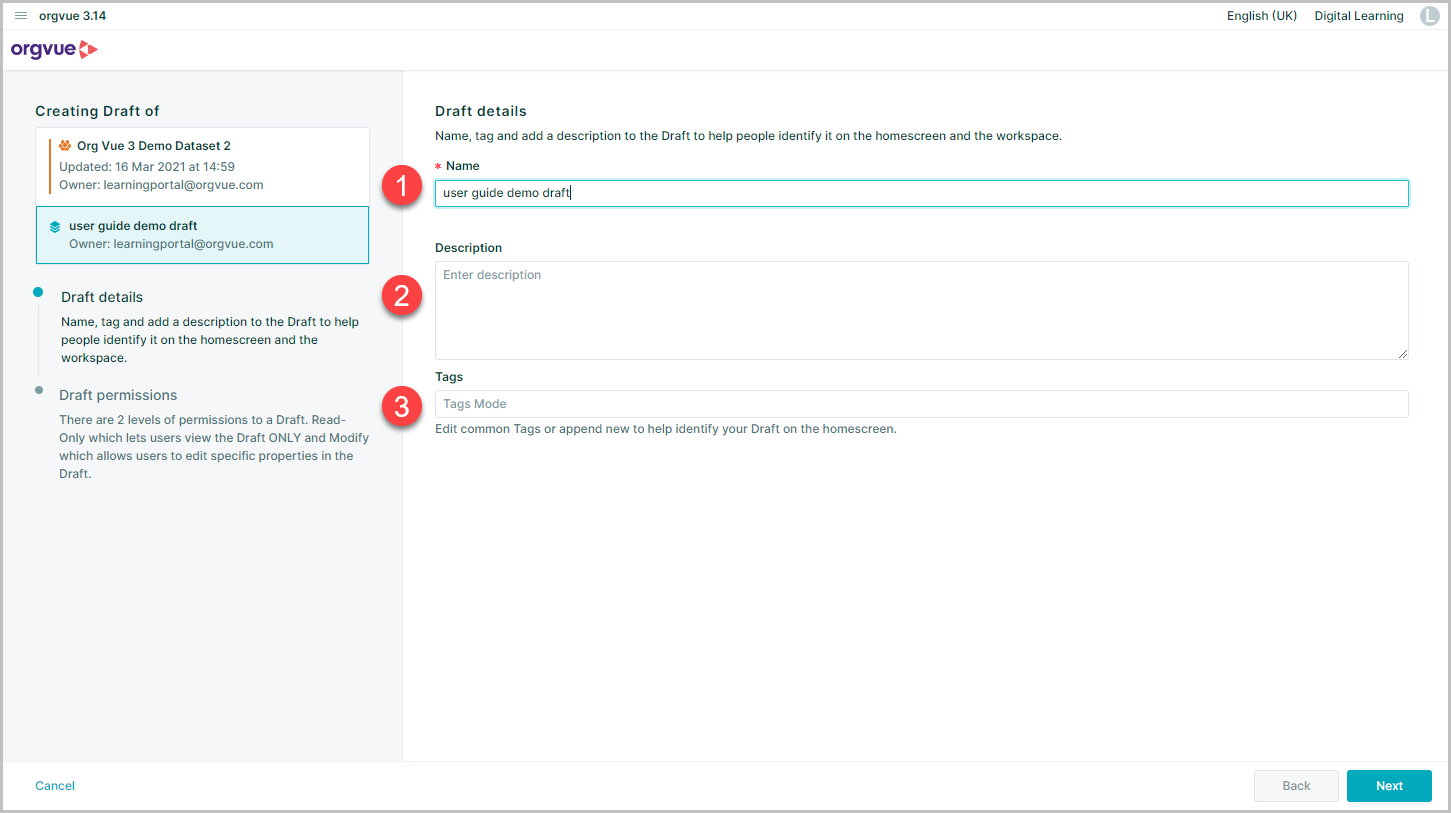
Draft Details
The first screen on the Draft creation wizard has the following fields to be completed:
- Name: This is a mandatory field, and you can enter a name for your Draft which will identify it on the home screen
- Description: Optional field to enter notes or longer description of the Draft
- Tags: Optional field to also aid searching and or identification of the Draft
Draft Permissions
The final screen of the draft creation wizard has the following fields to be completed:
- View permissions: Who can view this draft? Enter User emails or roles
- Modify permissions: Who can modify this draft? Enter User emails or roles
For more detail on Roles see Roles in Settings User Guide
- Add Nodes: Toggle switch to control the permissions of draft modifiers to Add nodes to draft
- Delete Nodes: Toggle switch to control the permissions of draft modifiers to delete nodes from draft
- Specify which properties in the draft may be edited by selecting the properties in the list. This setting is useful if the only requirement in the scenario is to edit the hierarchy without Draft modifiers being able to amend other details e.g. salary
Note: By default, only the label field, ID and parent ID fields will be initially modifiable
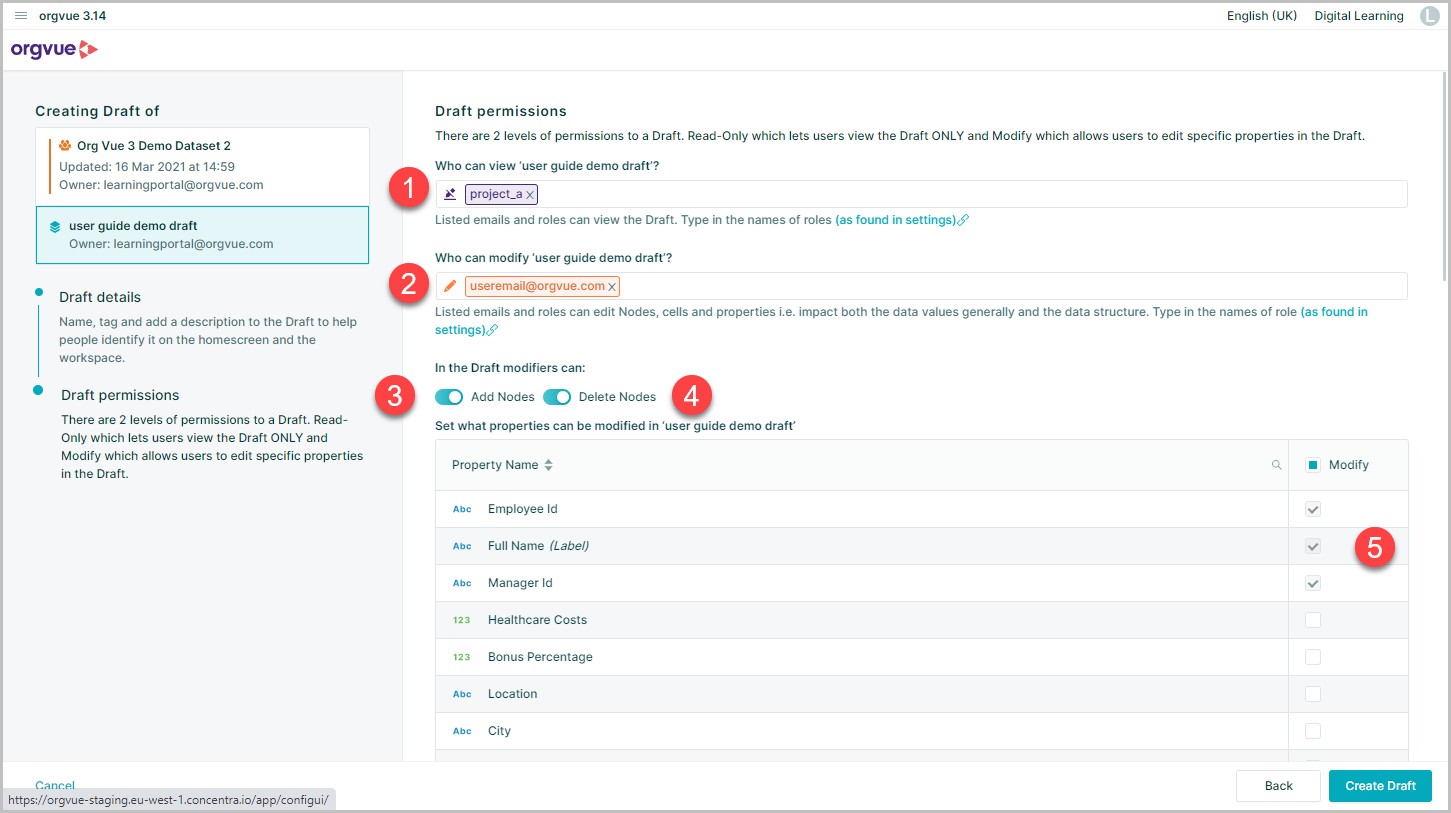
Once all required properties have been selected, click the create button to finish the process
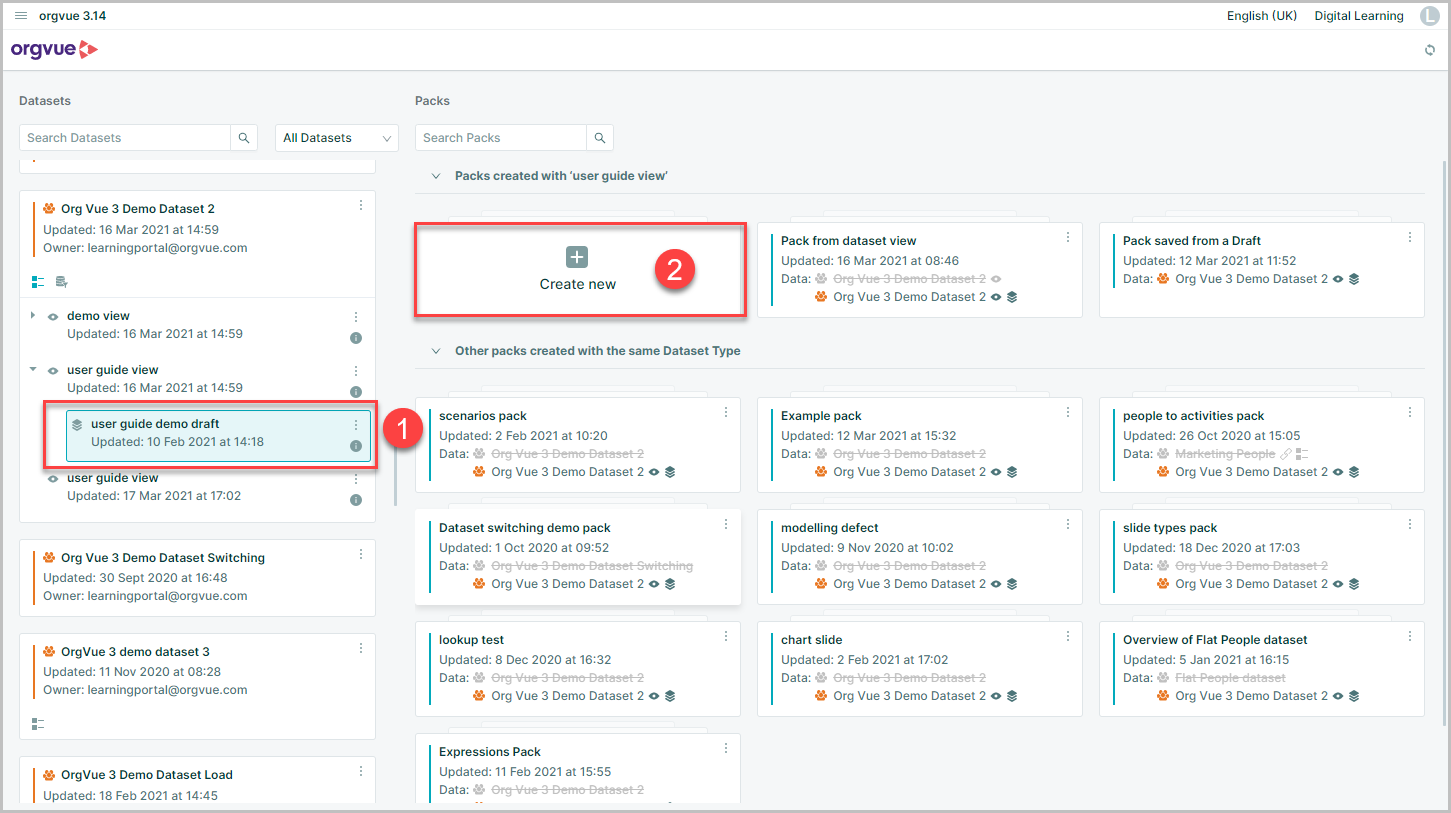
You will then be returned to the homescreen where the newly created draft will be shown attached to either the base dataset or the view depending on the option selected
- Selecting the draft
- Then selecting
Create newwill open the dataset to allow permitted users to modify the data in line with scenario being modelled
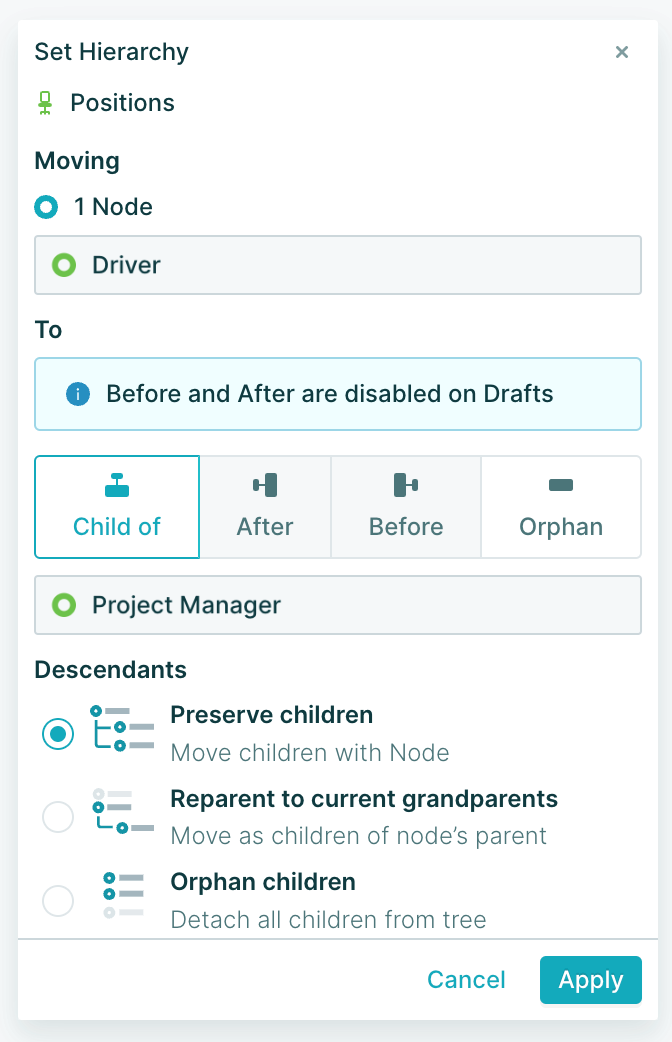
Scenario modelling in a Draft
To model scenarios within a draft, open a new pack and follow the steps detailed in Edit the Hierarchy to make changes without editing the base dataset
Note: It is not possible to edit the order of records within a draft. Therefore, the options of
BeforeandAfteron the Set Hierarchy modal are not available
Once the required changes have been made to the scenario, the Data Save option will save the changes made in the draft
It is also possible to create multiple drafts to model different scenarios, this can be achieved by using the Data Save as... function from the draft
Baseline Dataset changes to a Draft
When working with Drafts and baseline datasets it is important to understand the impact on the Draft of any changes made to the baseline dataset
The table below outlines a number of example changes being made to the baseline dataset and the resulting impact on the draft
| Change Type | Example Baseline Dataset Action | Draft Impact |
|---|---|---|
| Add Nodes | Node added to baseline dataset | Node will appear in draft if they fall within the filtered population |
| Add Nodes | Node added to baseline with same unique ID as node already added to draft | All values for node in draft will be overwritten by values in baseline dataset |
| Delete Nodes | Node deleted from baseline | Node will be deleted from draft regardless of any modelled changes |
| Update Nodes | Node Parent ID updated in baseline | Node Parent ID will be updated in Draft |
| Update Nodes | Node Parent ID updated in baseline and Department updated in Draft | Node Parent ID will be updated in Draft and Department update retained in Draft |
| Update Nodes | Node Parent ID updated in Draft and Baseline | Draft Parent ID retained and baseline change ignored |
Importing a Draft
Once all required scenarios have been modelled in drafts, it is then possible to apply the modelled changes back to the base dataset
Note: To import a draft you must have edit permission over the dataset
This process is called importing a draft
To import a draft, open the dataset that you wish to import the draft into:
- Select Modelling from menu bar
- Select Import Draft from Menu

This will open a pop window detailing all drafts available to import
- Select the required draft to import
- Click apply

Once the draft has been imported, all the modelled changes it contained will be applied to the base dataset that you are importing into, and a summary will be shown in the Data Node Summary
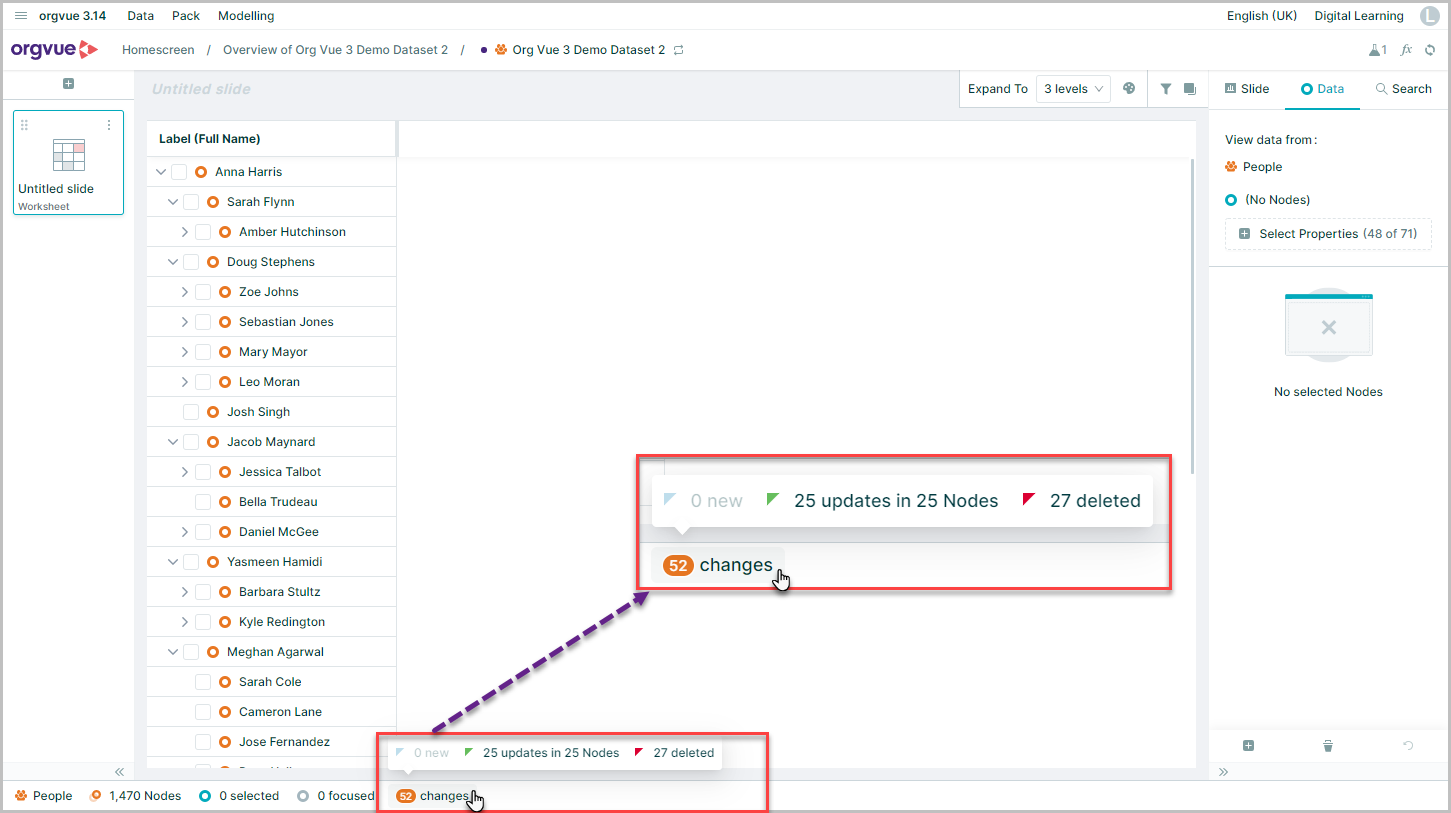
When importing a Draft into a baseline dataset the Data Node Summary will only reflect changes where there is a difference between the Draft being imported and the baseline dataset. Therefore if changes have been made to the baseline dataset prior to importing a draft that mirror any of the draft changes they will not appear
It is still possible at this stage to review and/or reject these changes using the Data Node Summary and following the steps in Reverting Node Changes
It is also possible to import multiple drafts so that the sum of all the changes are applied to the base data
When you have finished importing drafts use Data Save to save the changes to your dataset
Converting a Branch to a Draft
A branch is a scenario modelling method from a previous Orgvue version. This method has been replaced by a draft
It is possible to open branches created in a previous version of Orgvue and therefore convert them to a draft
Any dataset that has a branch associated with it will display the branch symbol
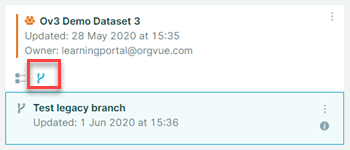
Opening this branch as a new pack will open as Read Only showing the changes in the Data Node Summary that had been modelled in the branch
To convert this branch into a draft use Data Save as... and choose to save as a draft
The draft will then be available to continue scenario modelling
Deleting a Draft
Drafts will still remain available after they have been imported to a dataset as it is possible to import to multiple datasets if required
Therefore it is good practice to delete the draft once it has been imported to all target datasets and create a new draft for futher change modelling
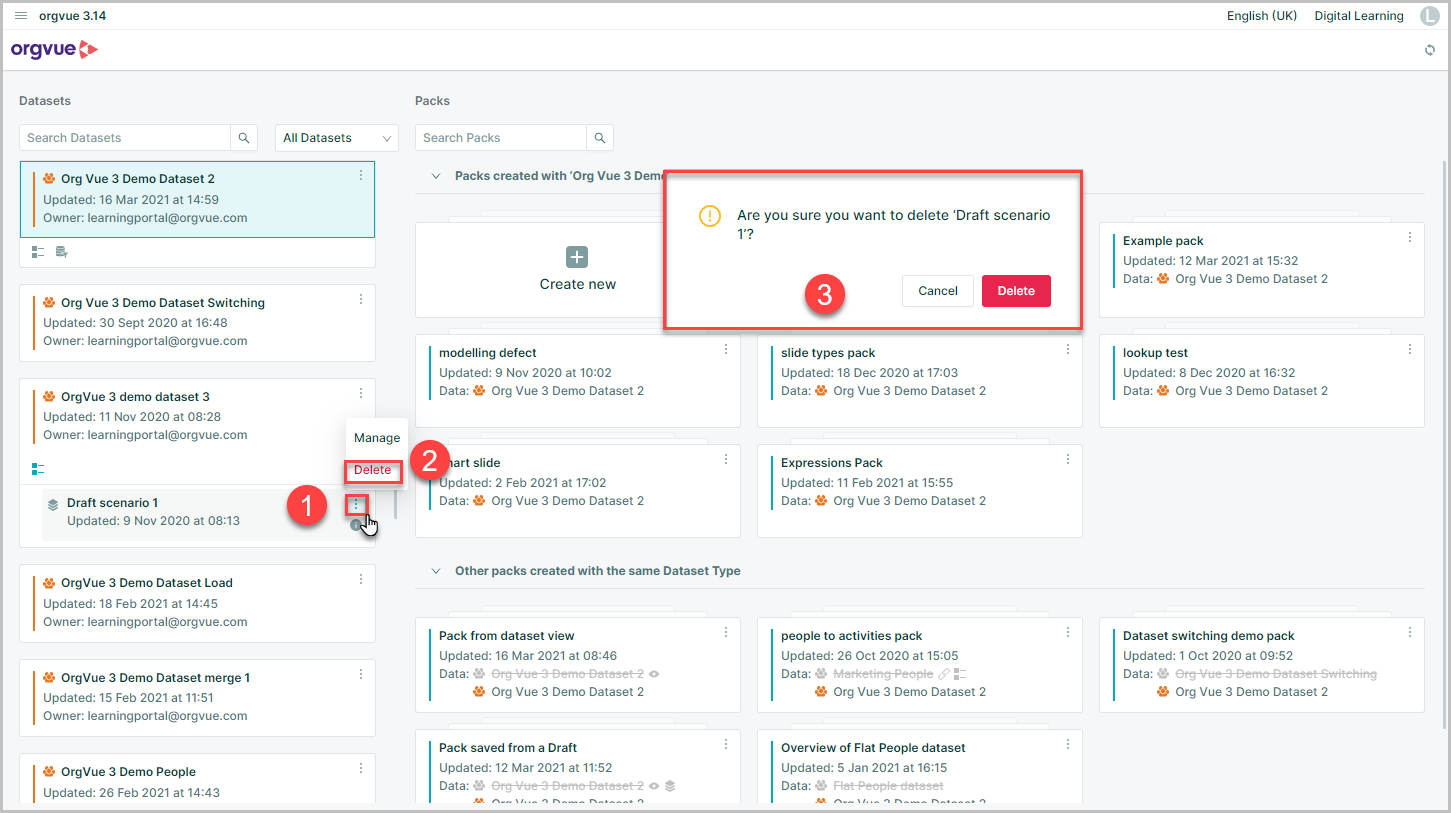
To delete a draft:
- Select the draft, then click the more details menu
- Select the Delete Draft option
- A confirmation message will be displayed, click
Deleteto confirm the deletion
Manage Views and Drafts
Existing views and drafts can be managed to enable you to edit :
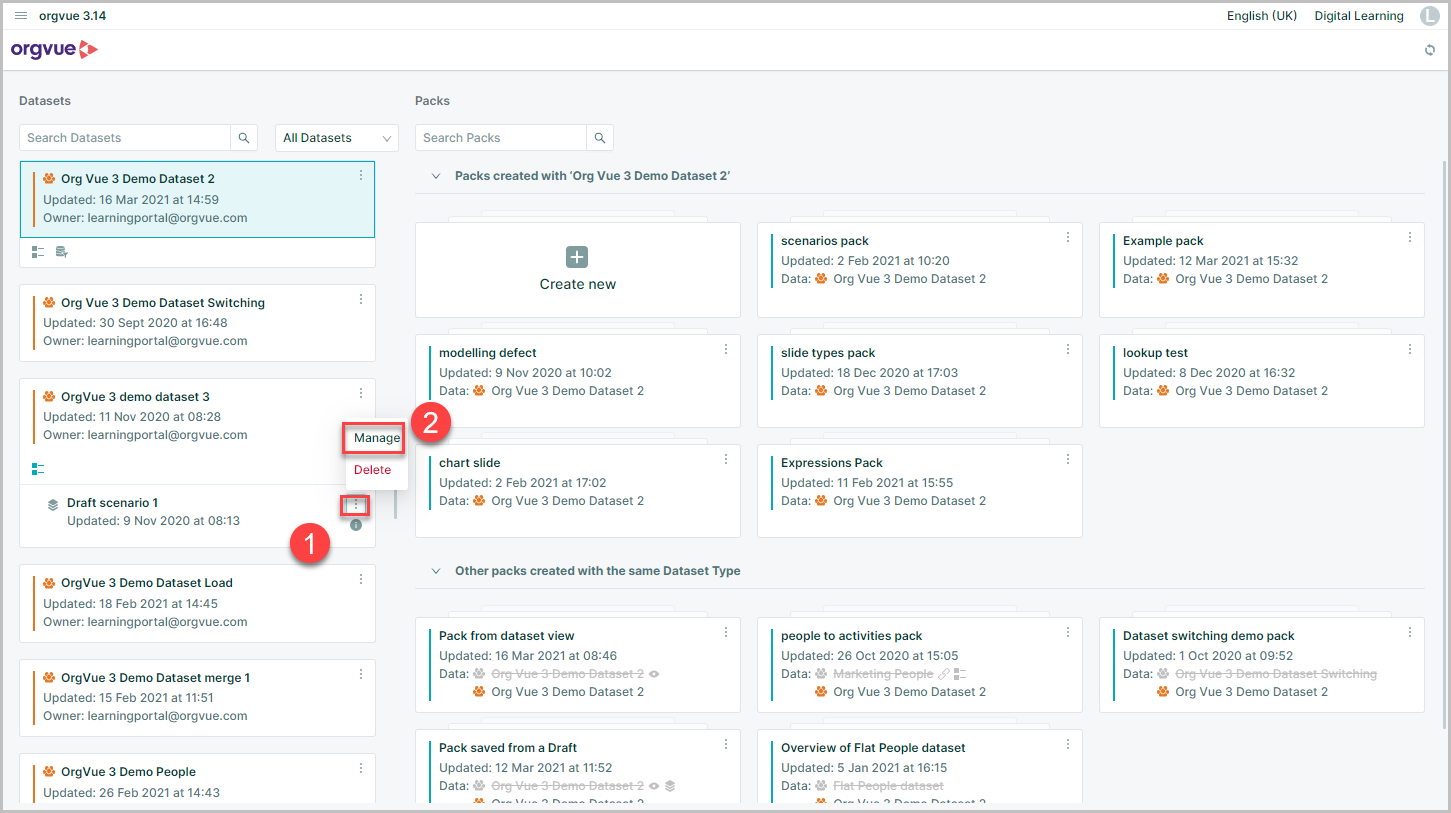
To manage a view or draft:
- Select the more details button on the required item
- Then select the
Manageoption to open the views and draft wizard to make further changes
Note: The option to Manage a View should be used if the changes have been made to the underlying base dataset. For example when adding a property to the underlying dataset the property will not be visible in the view unless added via the
manageoption
It is also possible to access the View Metadata or Draft Metadata screens in Setting to make changes if required