
User management
Admin Only
The Users tab displays a list of user accounts for the tenant
It allows Tenant Admins to manage the user accounts within the tenant
Users List
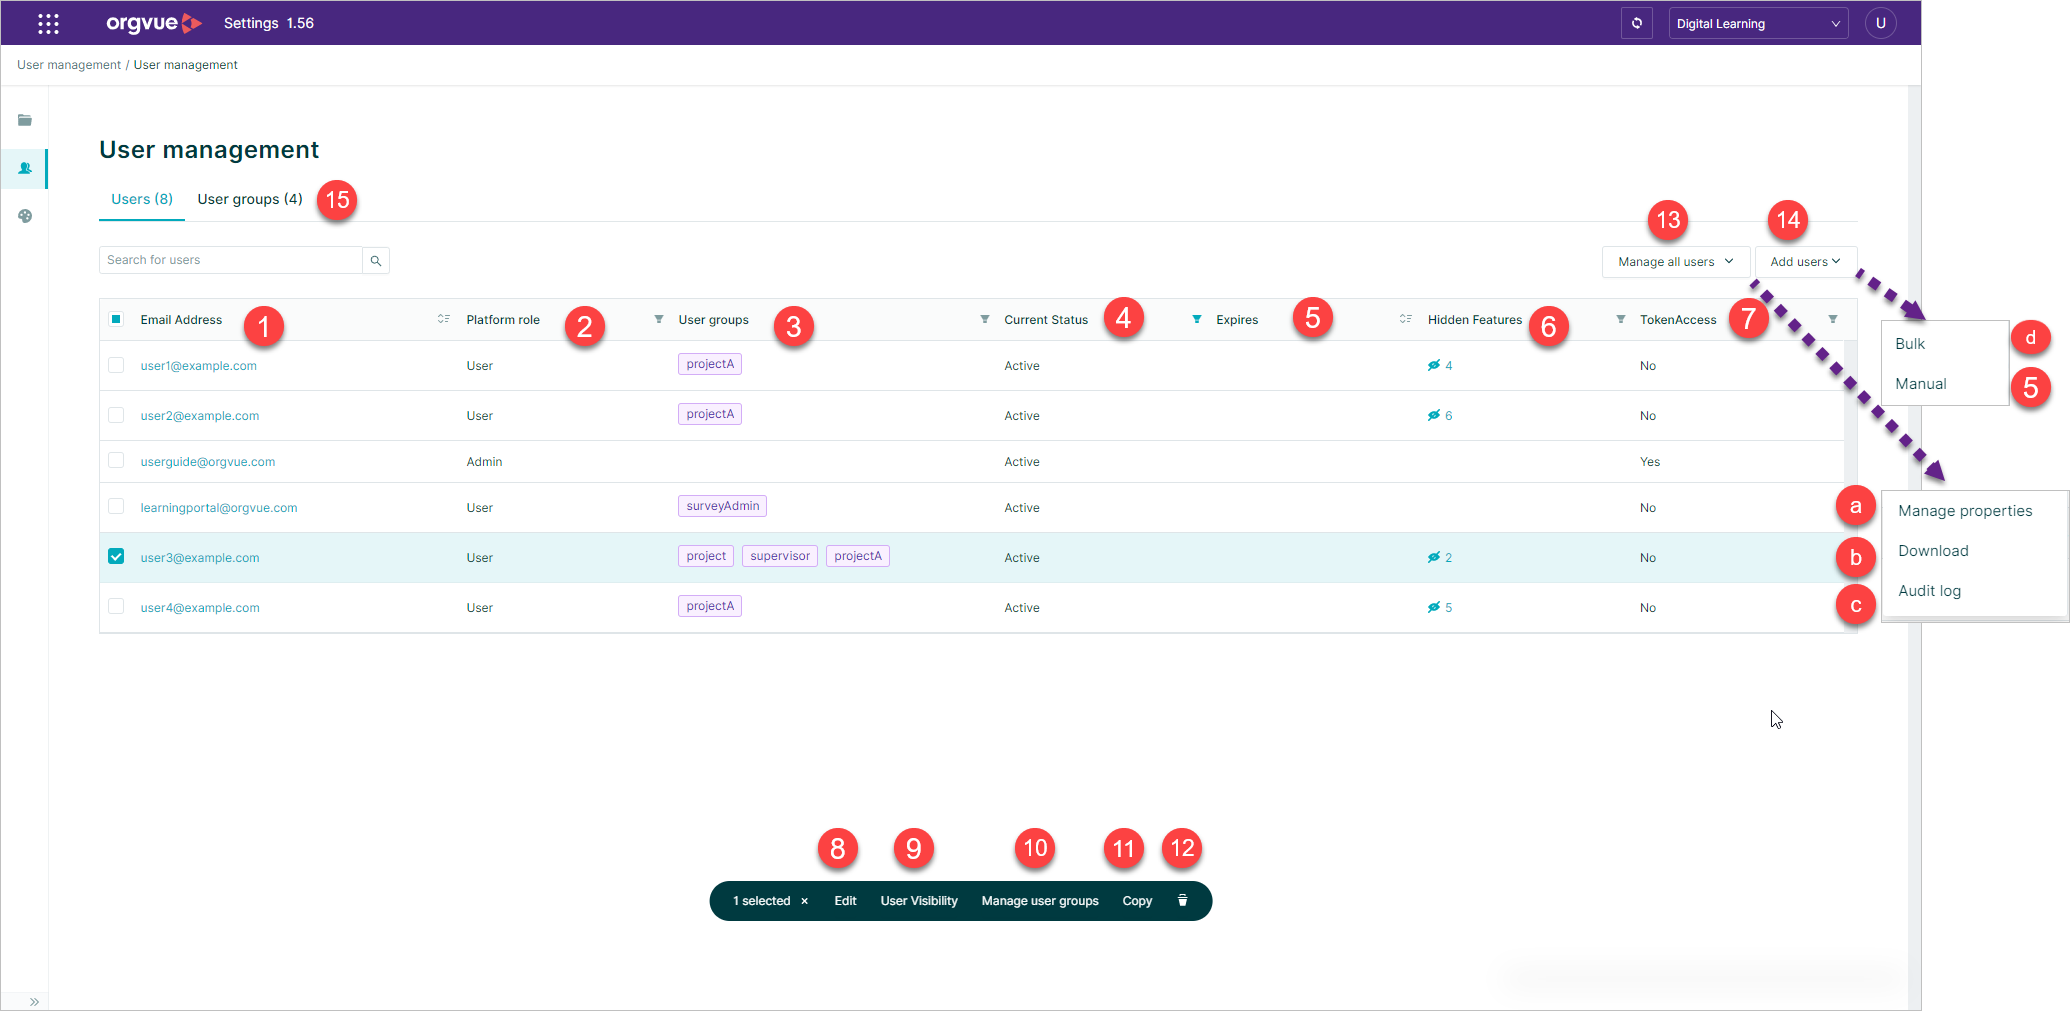
Selecting the Users icon displays the users list containing:
- Email Address
- Platform Roles
- User groups
- Current Status: Set as either
ActiveorInactivebased on value ofEnabledboolean property - Expiry Date
- Hidden Features
- Additional Properties
- Edit Users*
- User Visibility*
- Manage user groups: Coming Soon
- Copy
- Delete User*
- Manage all users options
- a. Manage Properties
- b. Download User List
- c. Users Audit Log
- Add users options
- User Groups
* These options are only available once a user(s) record is selected
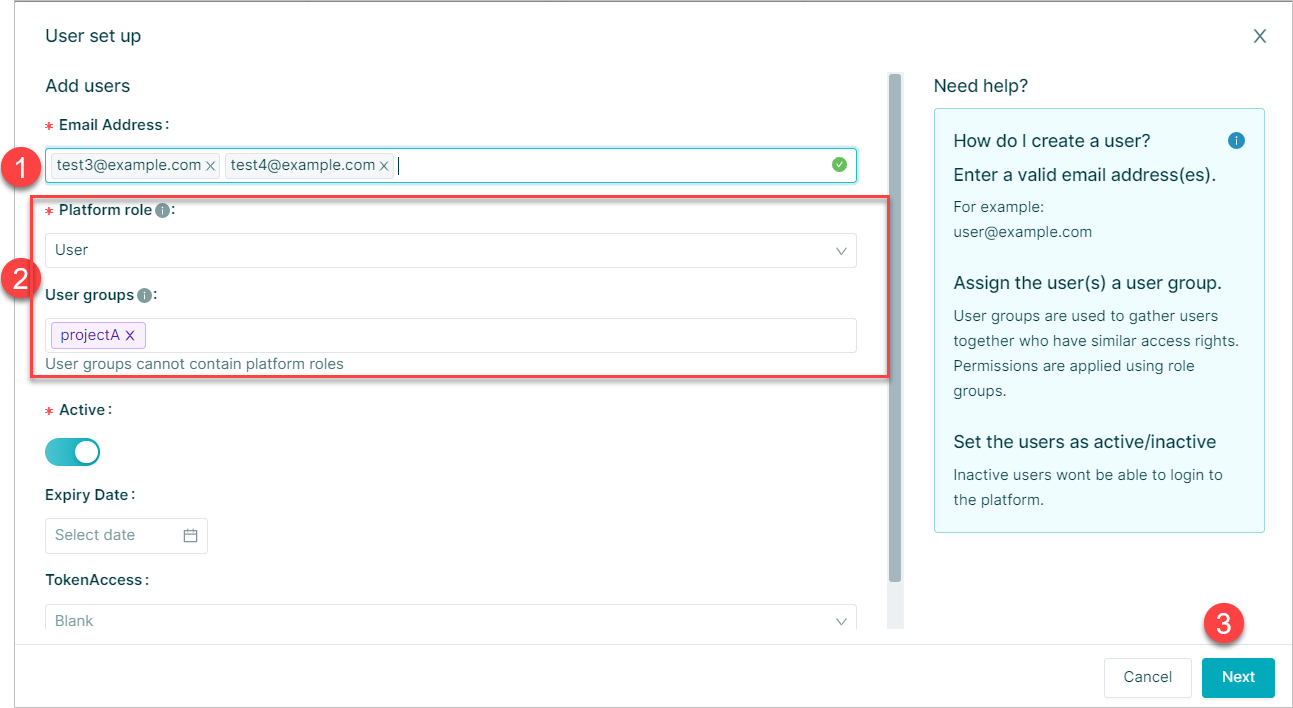
Add a User
To add a new user to the tenant, click the + Add User button
This will open a dialogue box to enter the new user details:
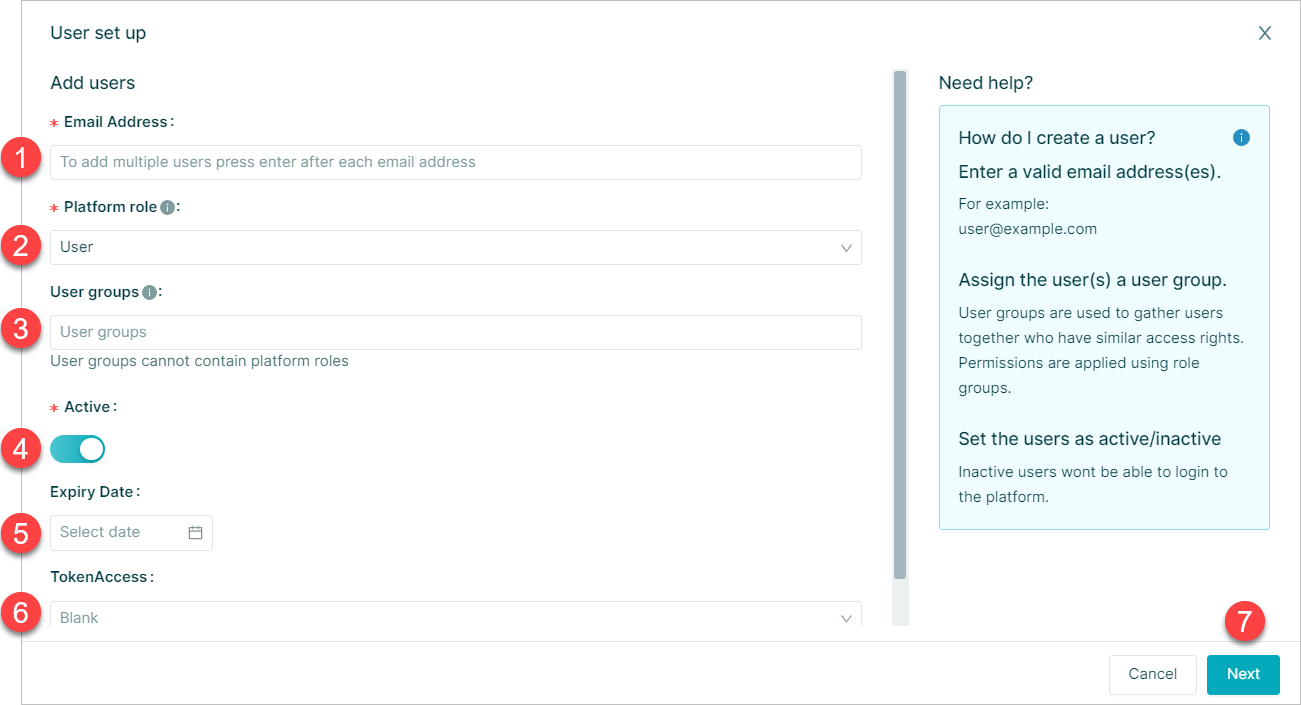
- Email address
- Platform Roles - Select either
UserorAdmin - User Groups in addition to any custom roles. See Roles for more detail
- Active – Toggle switch to set
OnorOff - Expiry Date – ability to set a future date to expire user account
- TokenAccess - Optional Boolean field set to either True, False or left blank. Only required if user account will be used with Hub data refresh process. See Token Access for more details
Nextto progress to the user visibility screen
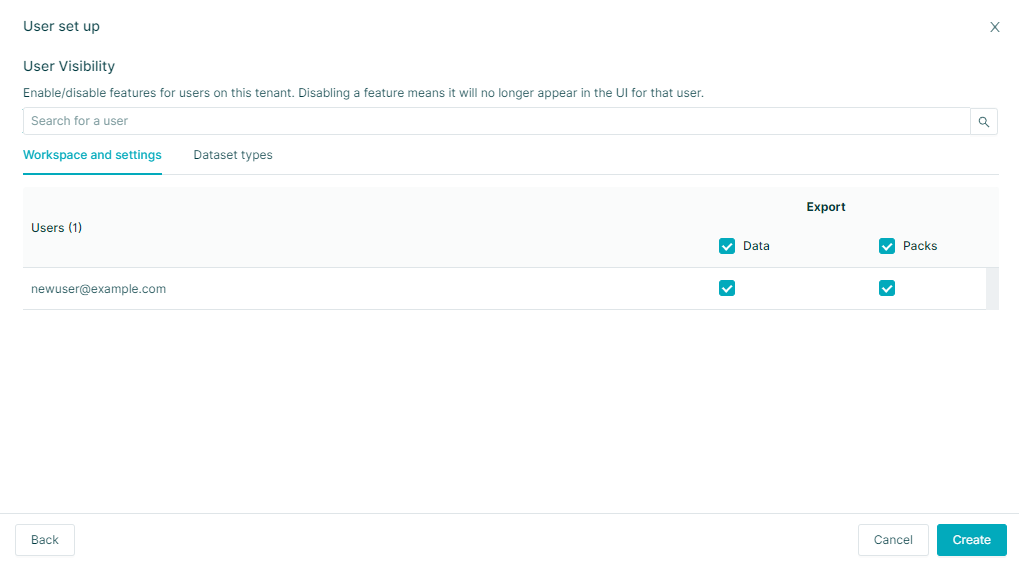
This screen allows the Admin to enable/disable features for users being added to this tenant.
Disabling a feature means it will no longer appear in the UI for that user
See User Visibility for further details of these options
Select Create to complete the add user process
Once a user account is enabled Orgvue will send an email to activate the account as detailed in Getting started on Orgvue
Duplicate User
In addition to Adding a user it is also possible to duplicate an existing user
This process has the benefit of ensuring the user accounts being added have the same access as the account being duplicated
To duplicate a user select the Copy button on the user dashboard
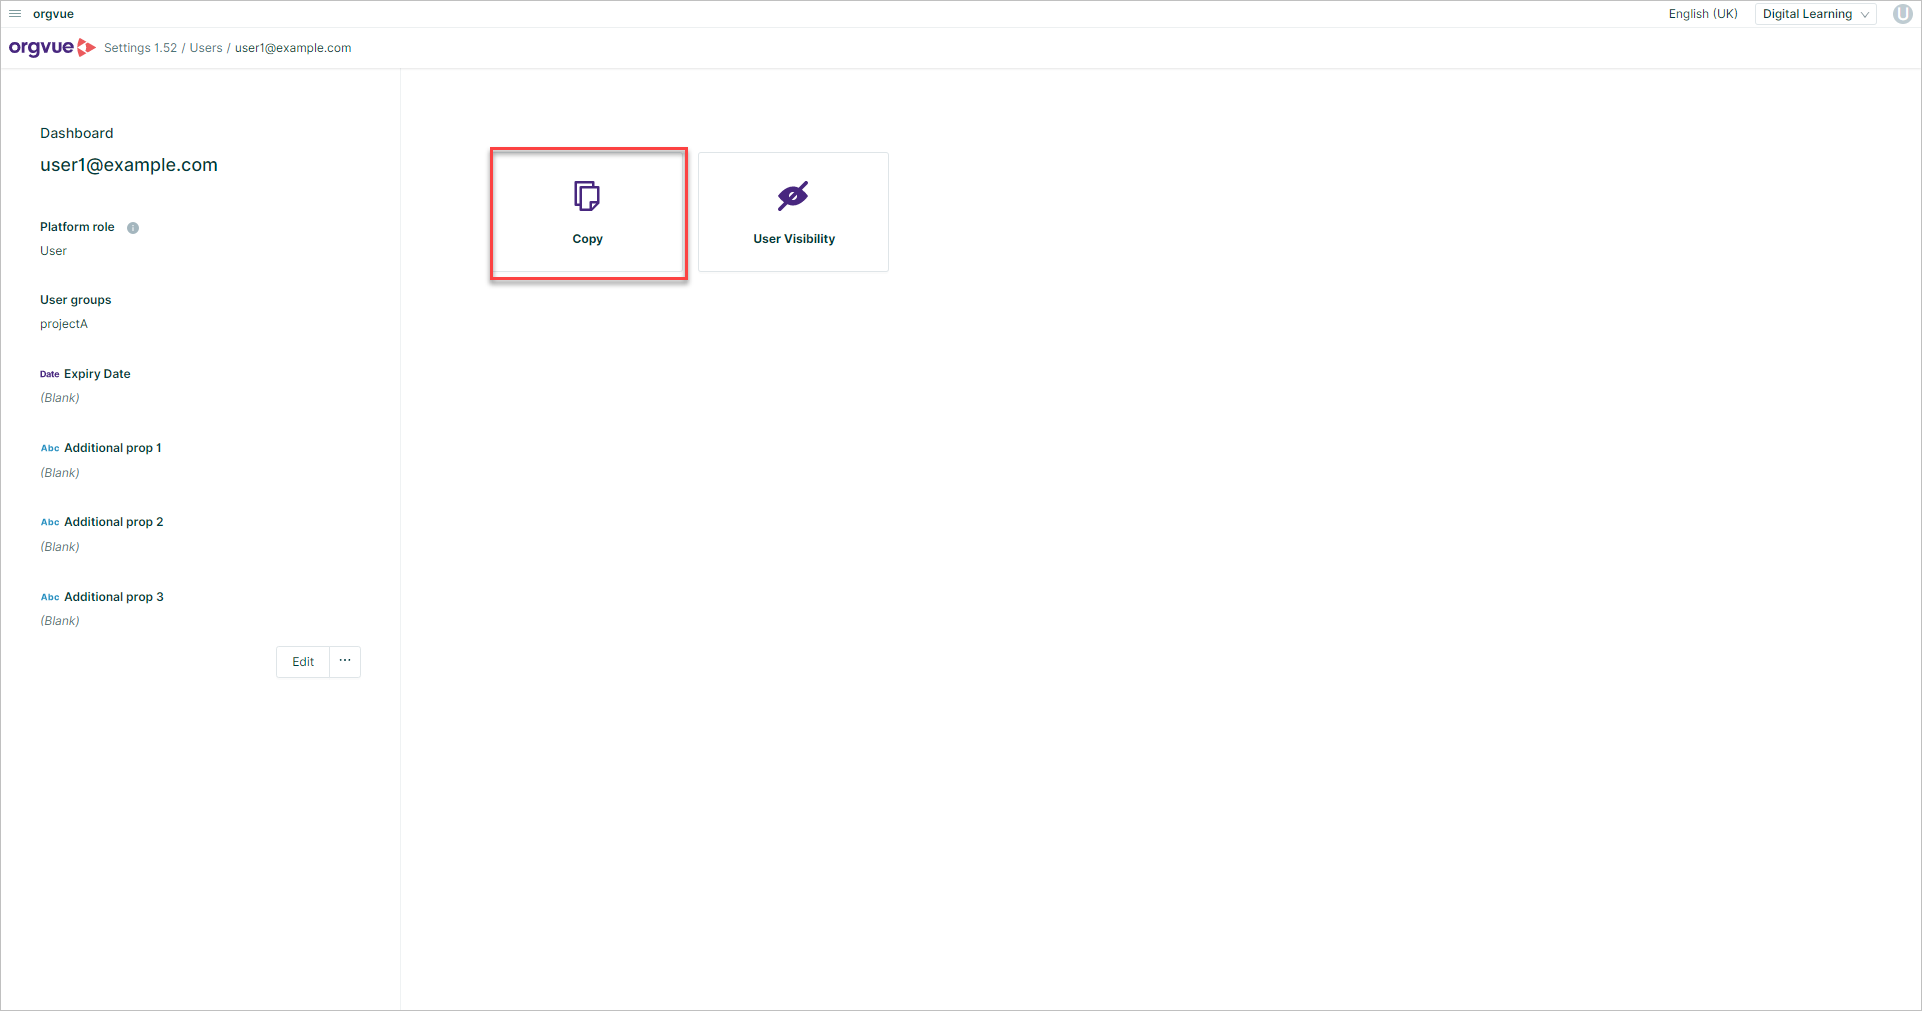
This will open the User Set Up window as shown when using the + add User button
- Enter the email address for the new user. To add multiple users press enter after each email address
- Platform Role and User groups will be pre-populated from the duplicated user but may be edited
- Select
Nextto progress to the user visibility screen
The user visibility screen contains
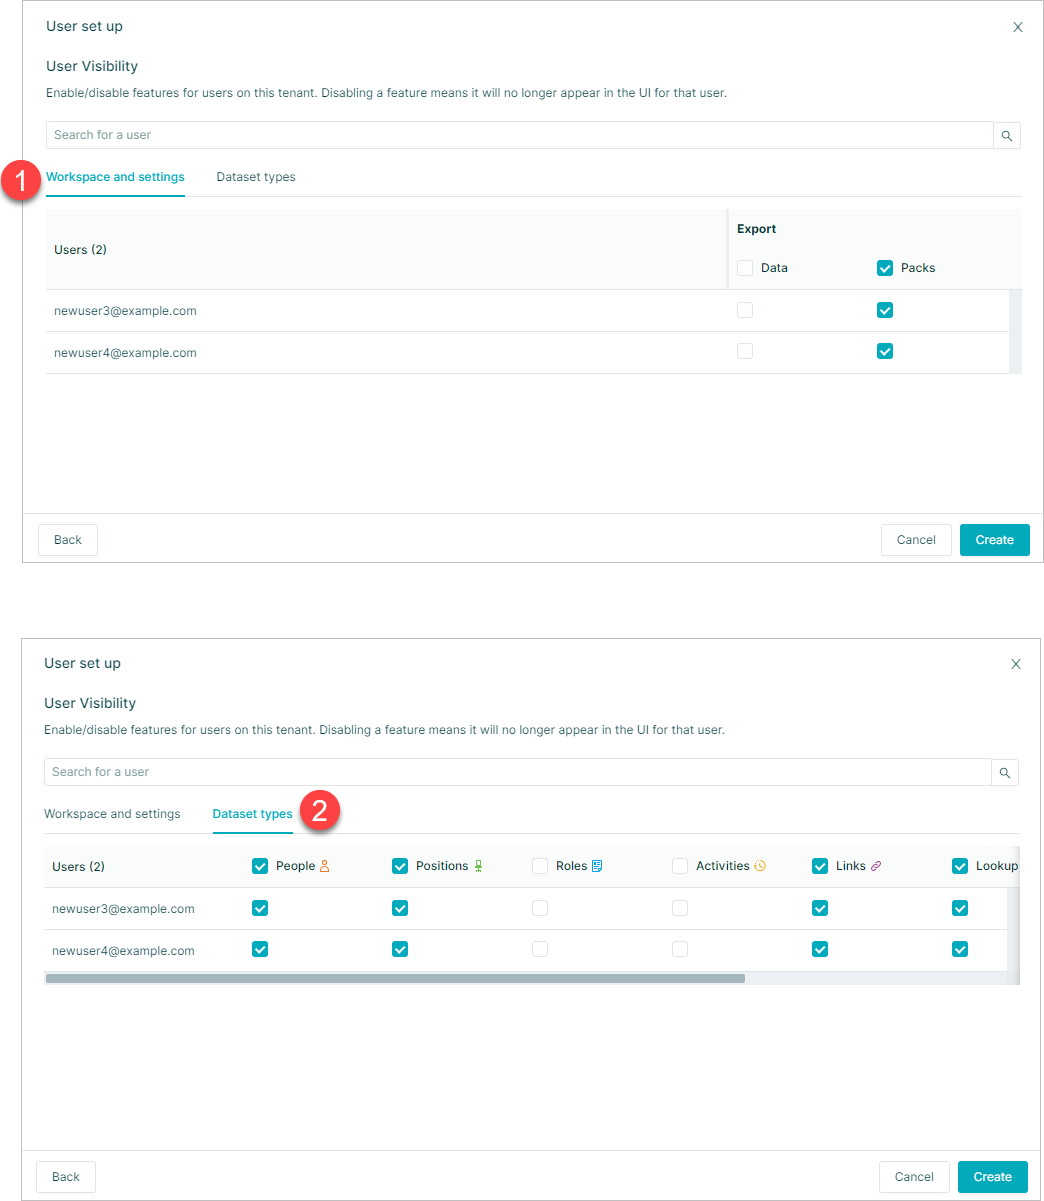
- Details of features disabled in Workspace and Settings
- Dataset types disabled in UI
The selections on this screen will also mirror from the duplicated user
See User Visibility for further details of these options
Select Create to complete the add user process
Bulk User Upload
Tenant admins have the ability to upload users, in bulk, via csv or XLSX file
The file must have the following column headers and values which are case-sensitive:
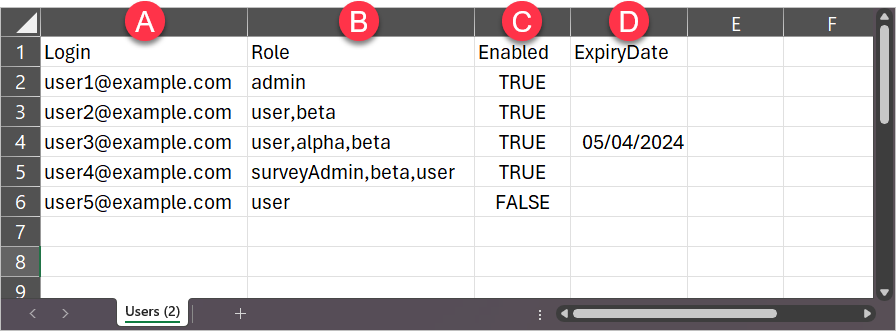
- A.
Loginwith valid email addresses. The upload process will use the Login column to merge - B.
Roleeach user account must have the role of eitheruseroradmin - C.
Enabledwith valid values of eitherTRUEorFALSE - D.
ExpiryDatewith dates in the format DD/MM/YYYY or left blank where no expiry date is required
To start the upload wizard, select the Upload Users button on the Users List
Select File
There are three methods for uploading data into Settings
File may be loaded in .csv or .xlsx format
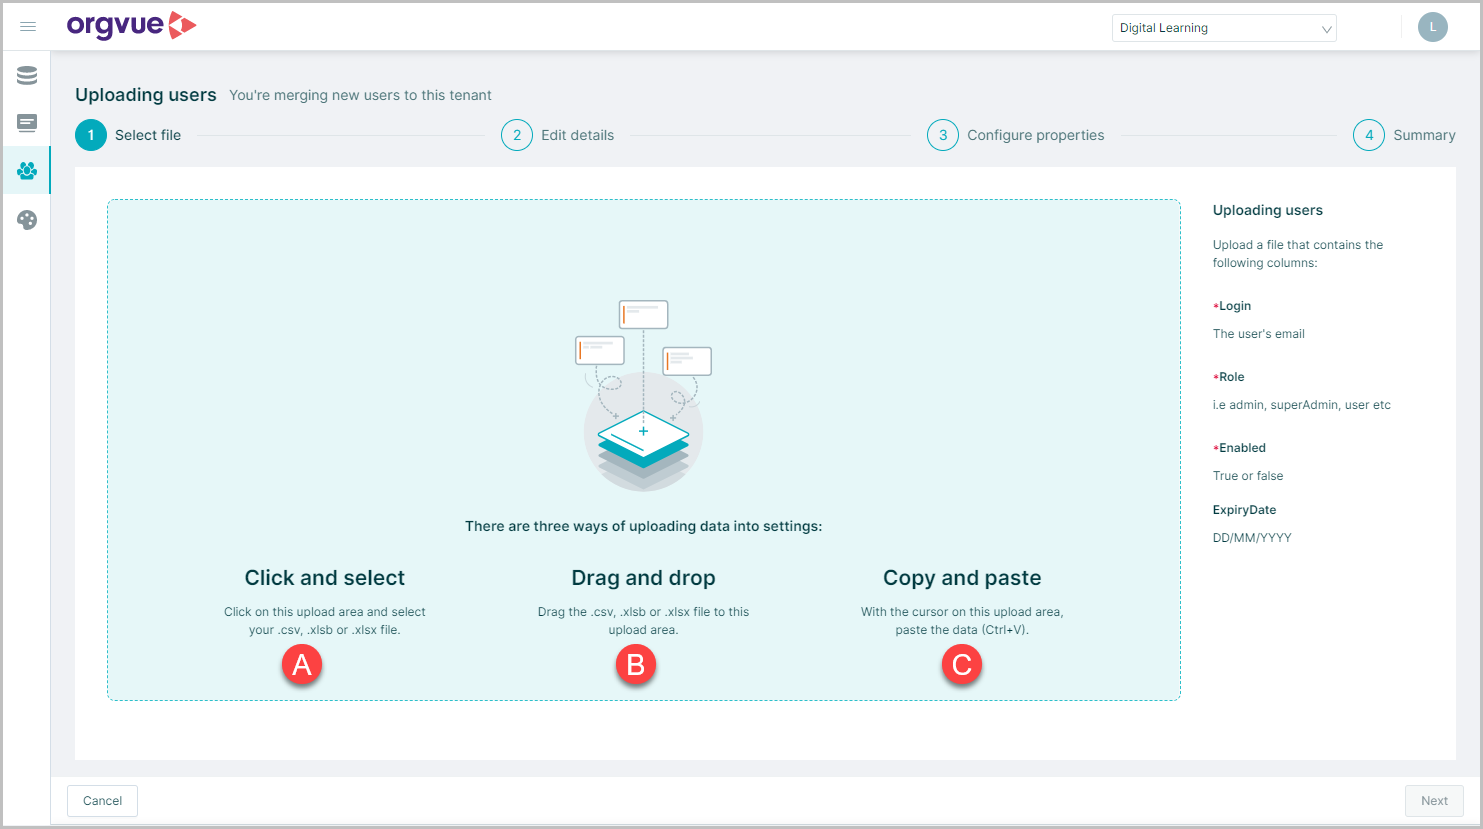
For more detail on the three methods select any of the links
- A. Click and Select
- B. Drag and Drop
- C. Copy and Paste
Select Next to move to Edit Details screen
Edit Details
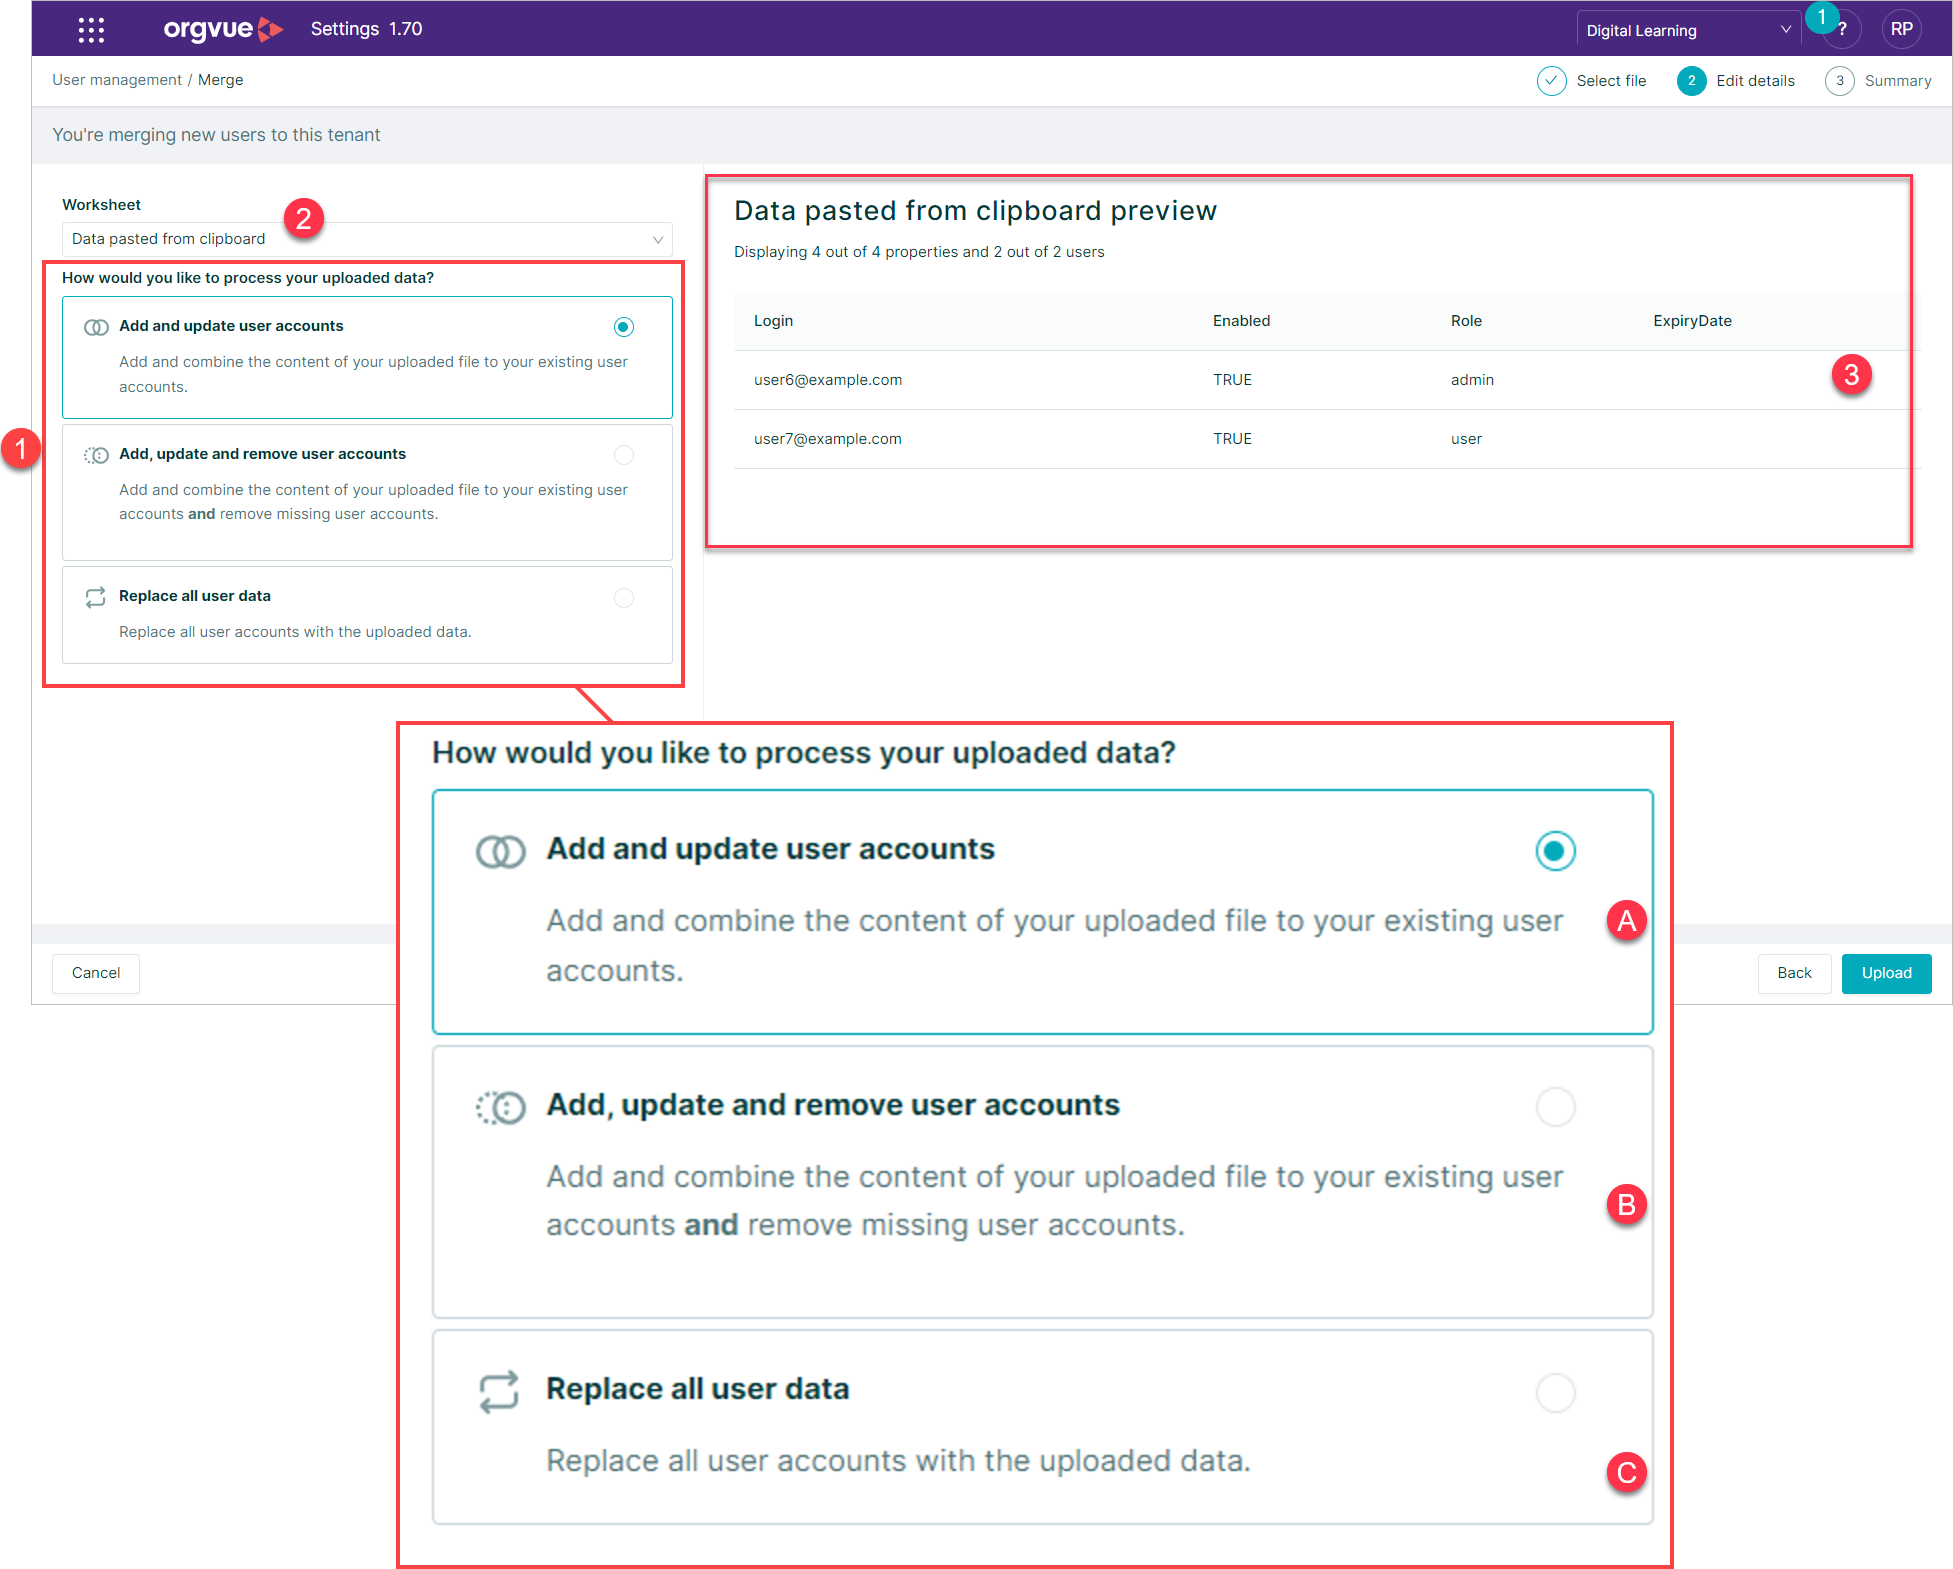
- Select how uploaded data will be processed:
- A. Add and update user accounts: Add and combine the content of your uploaded file to your existing user accounts
- B. Add, update and remove user accounts: Add and combine the content of your uploaded file to your existing user accounts and remove missing user accounts. Any existing user accounts which are not in your uploaded file will be removed.
- C. Replace: Replace all user accounts with the uploaded data. This will delete all existing user accounts and properties
- If file contains more than one sheet the required one may be selected
- The detail from the uploaded file will be displayed showing the number of properties and users in the upload
- Click
Nextto continue
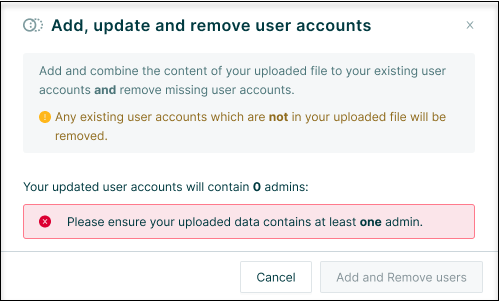
A confirmation message will then be shown which will confirm the number and details of the admins remaining within user accounts once the update is confirmed.
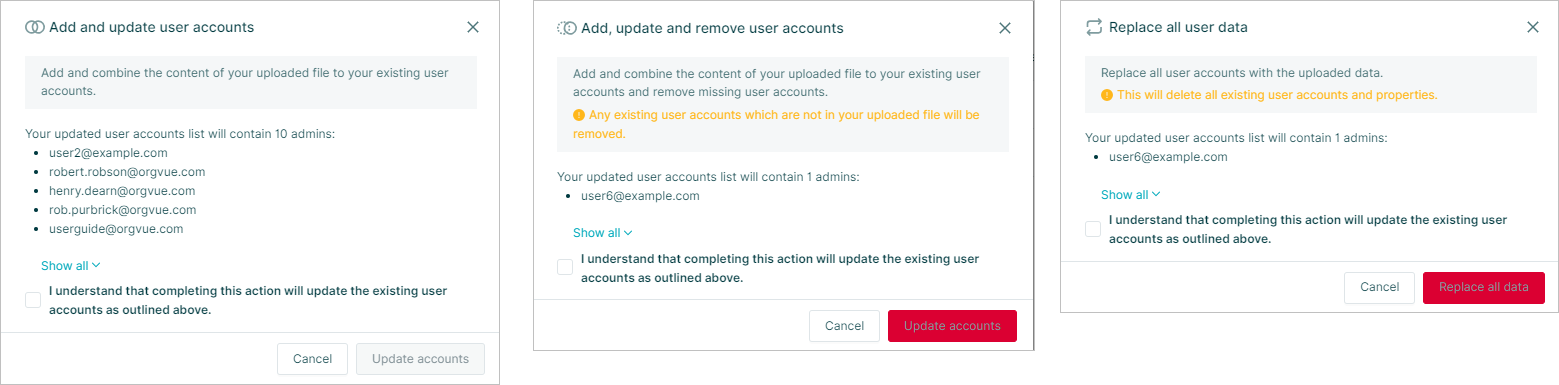
If the selected upload action will result in zero admin accounts in the tenant, Orgvue will prevent completion of the upload and display a warning
User Visibility
- Uncheck any features to be hidden from users
- Uncheck any Dataset types to be hidden from users
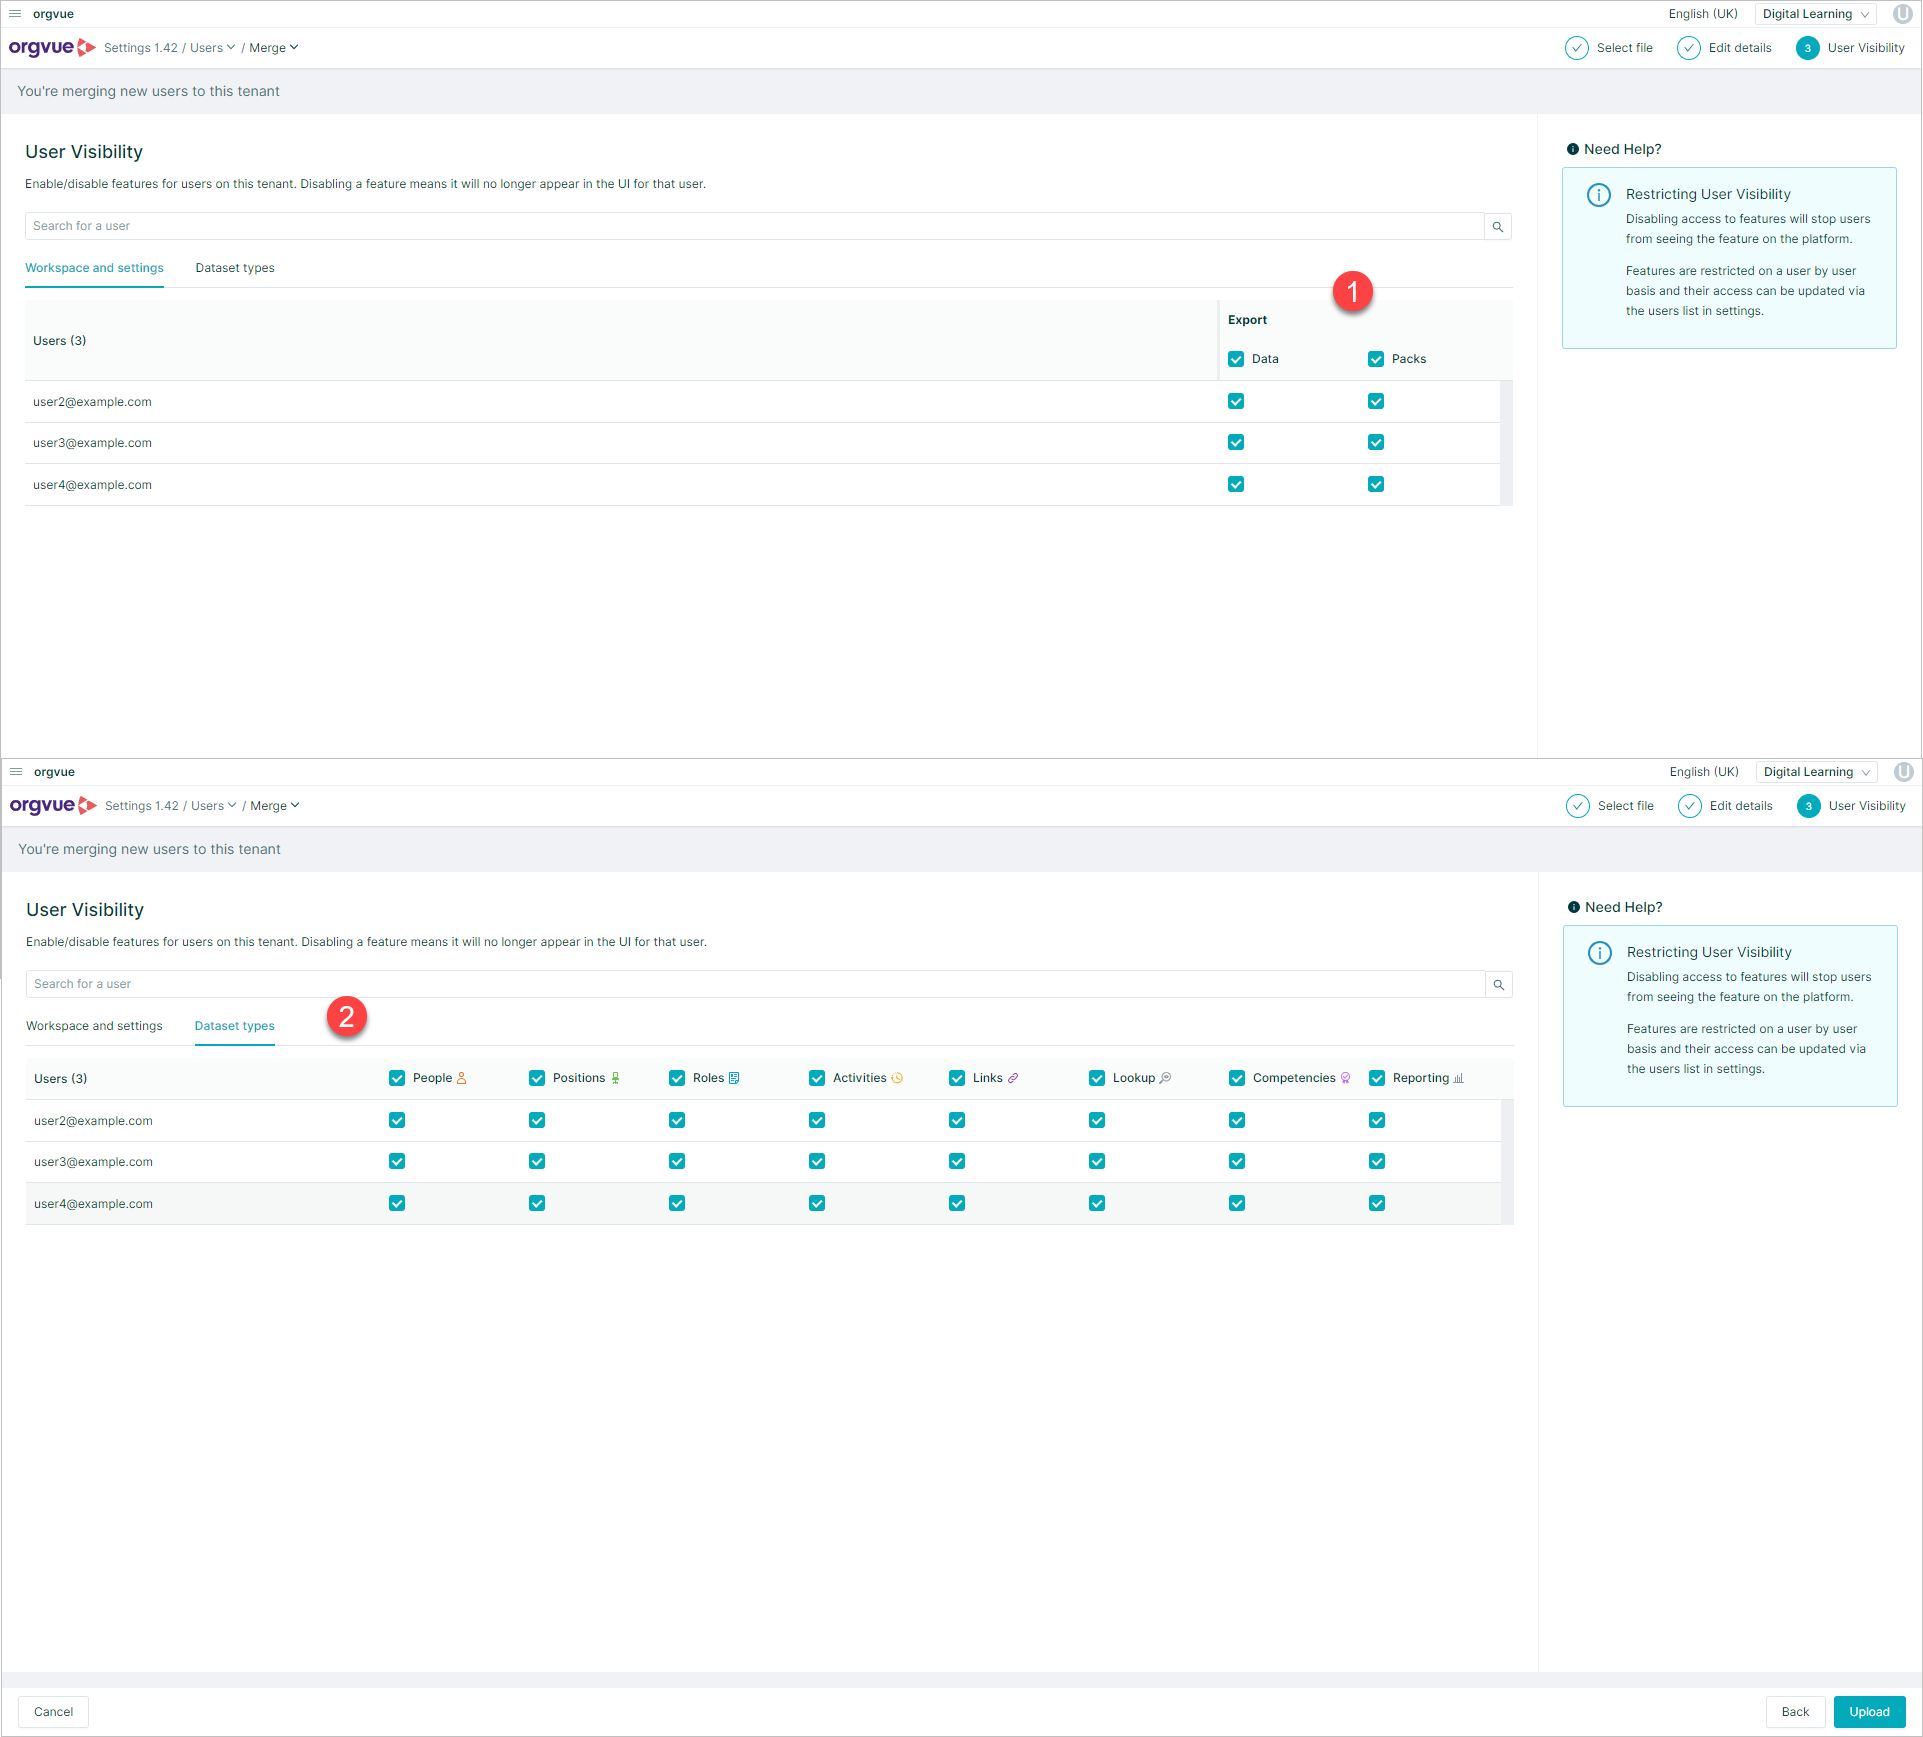
For further detail see User Visibility
Edit Users
Edit single User
To edit an existing user either:

A. Select the checkbox for the required user record and click the
Editbuttonor
- B. Select the
Email Addresshyperlink
This will open the User Dashboard, select the Edit button to open the side panel where the following fields may be edited:
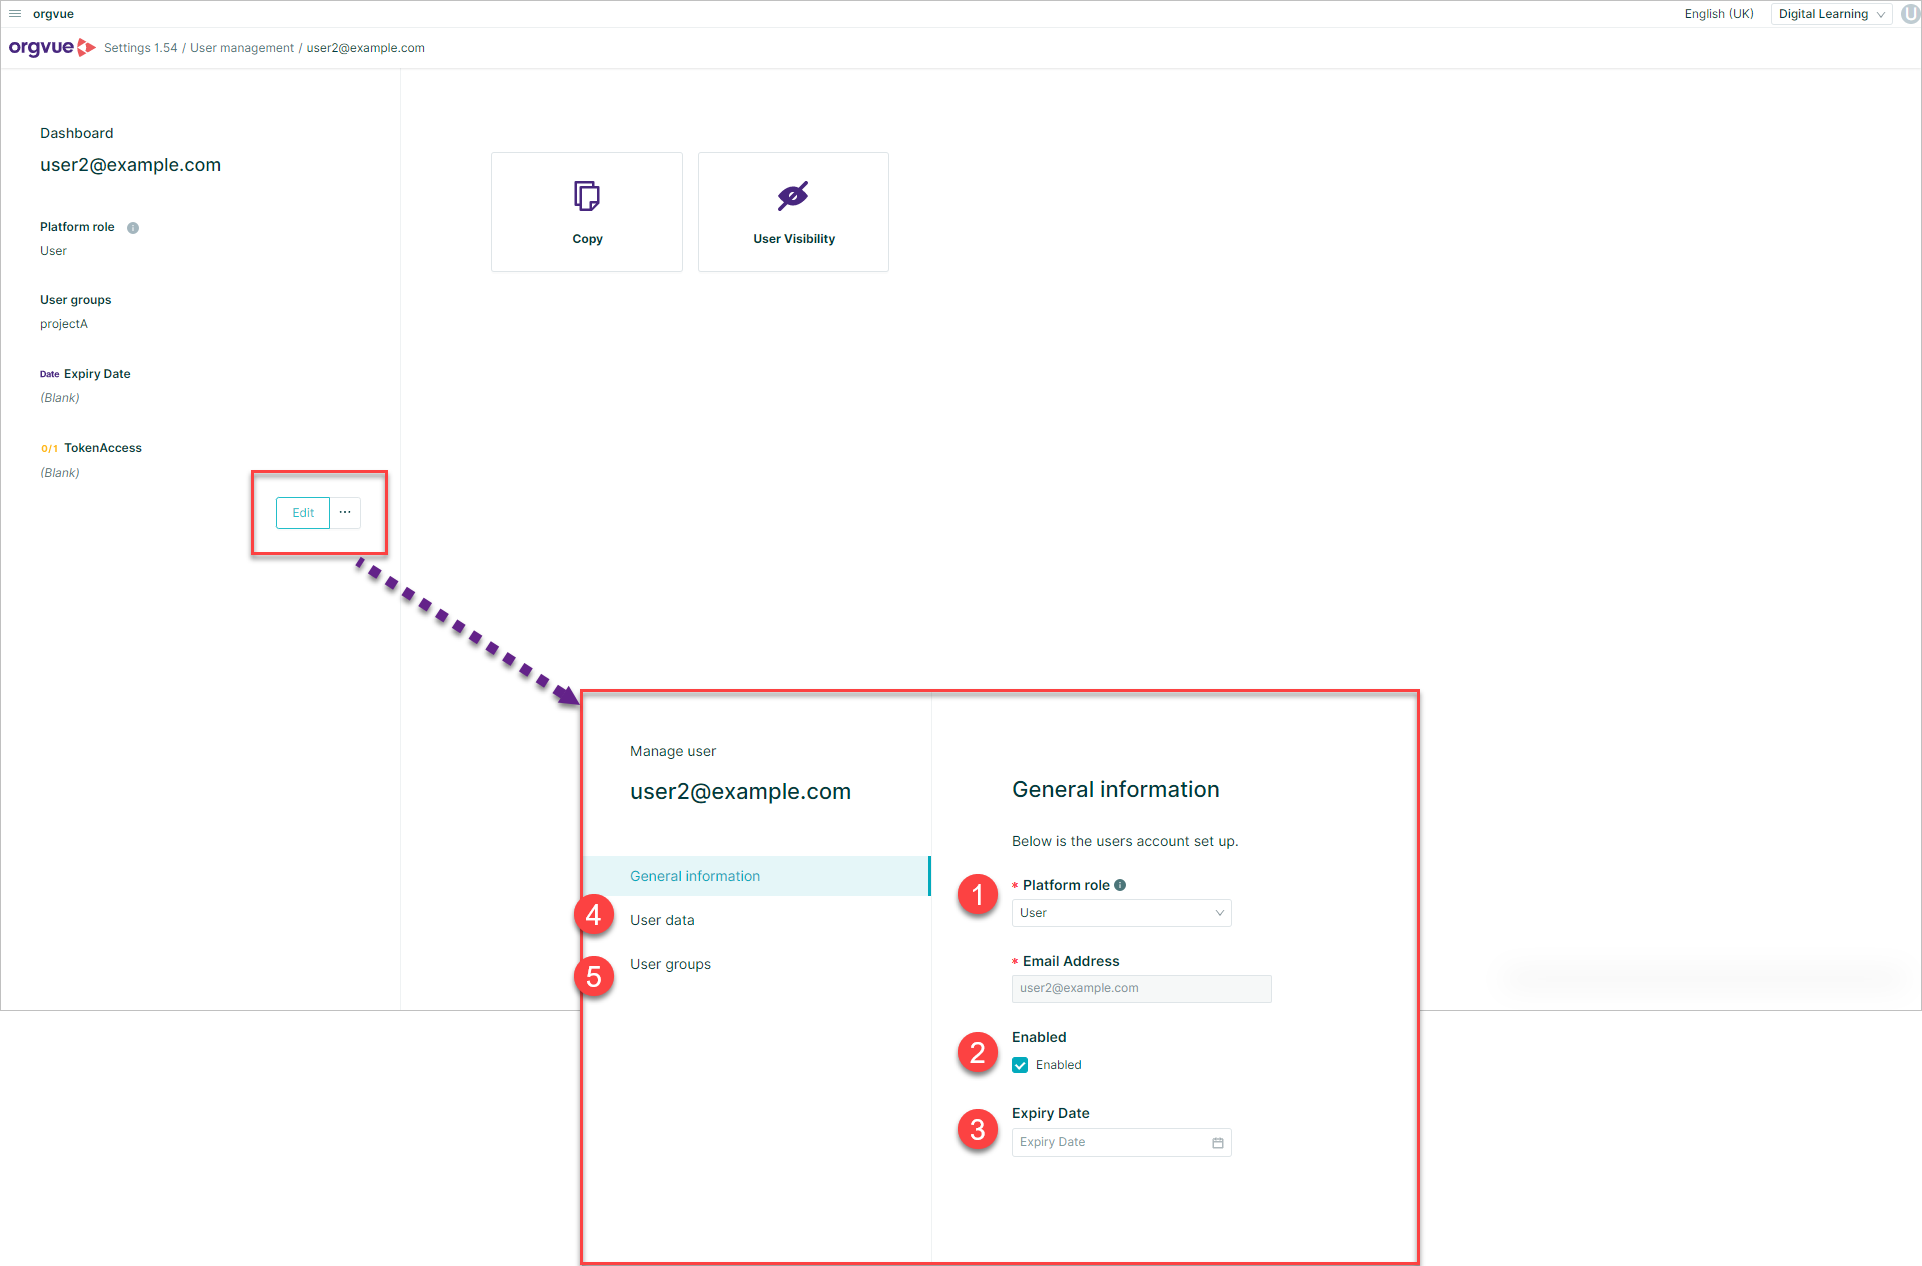
- Platform Role
- Enabled Checkbox
- Expiry Date
- Any additional User Data
- User Groups
Note: Email address is non-editable. If you need to amend email address for a user add the correct email as a new user, then delete the old account
Edit Multiple Users
Multiple User records may be edited at the same time by:
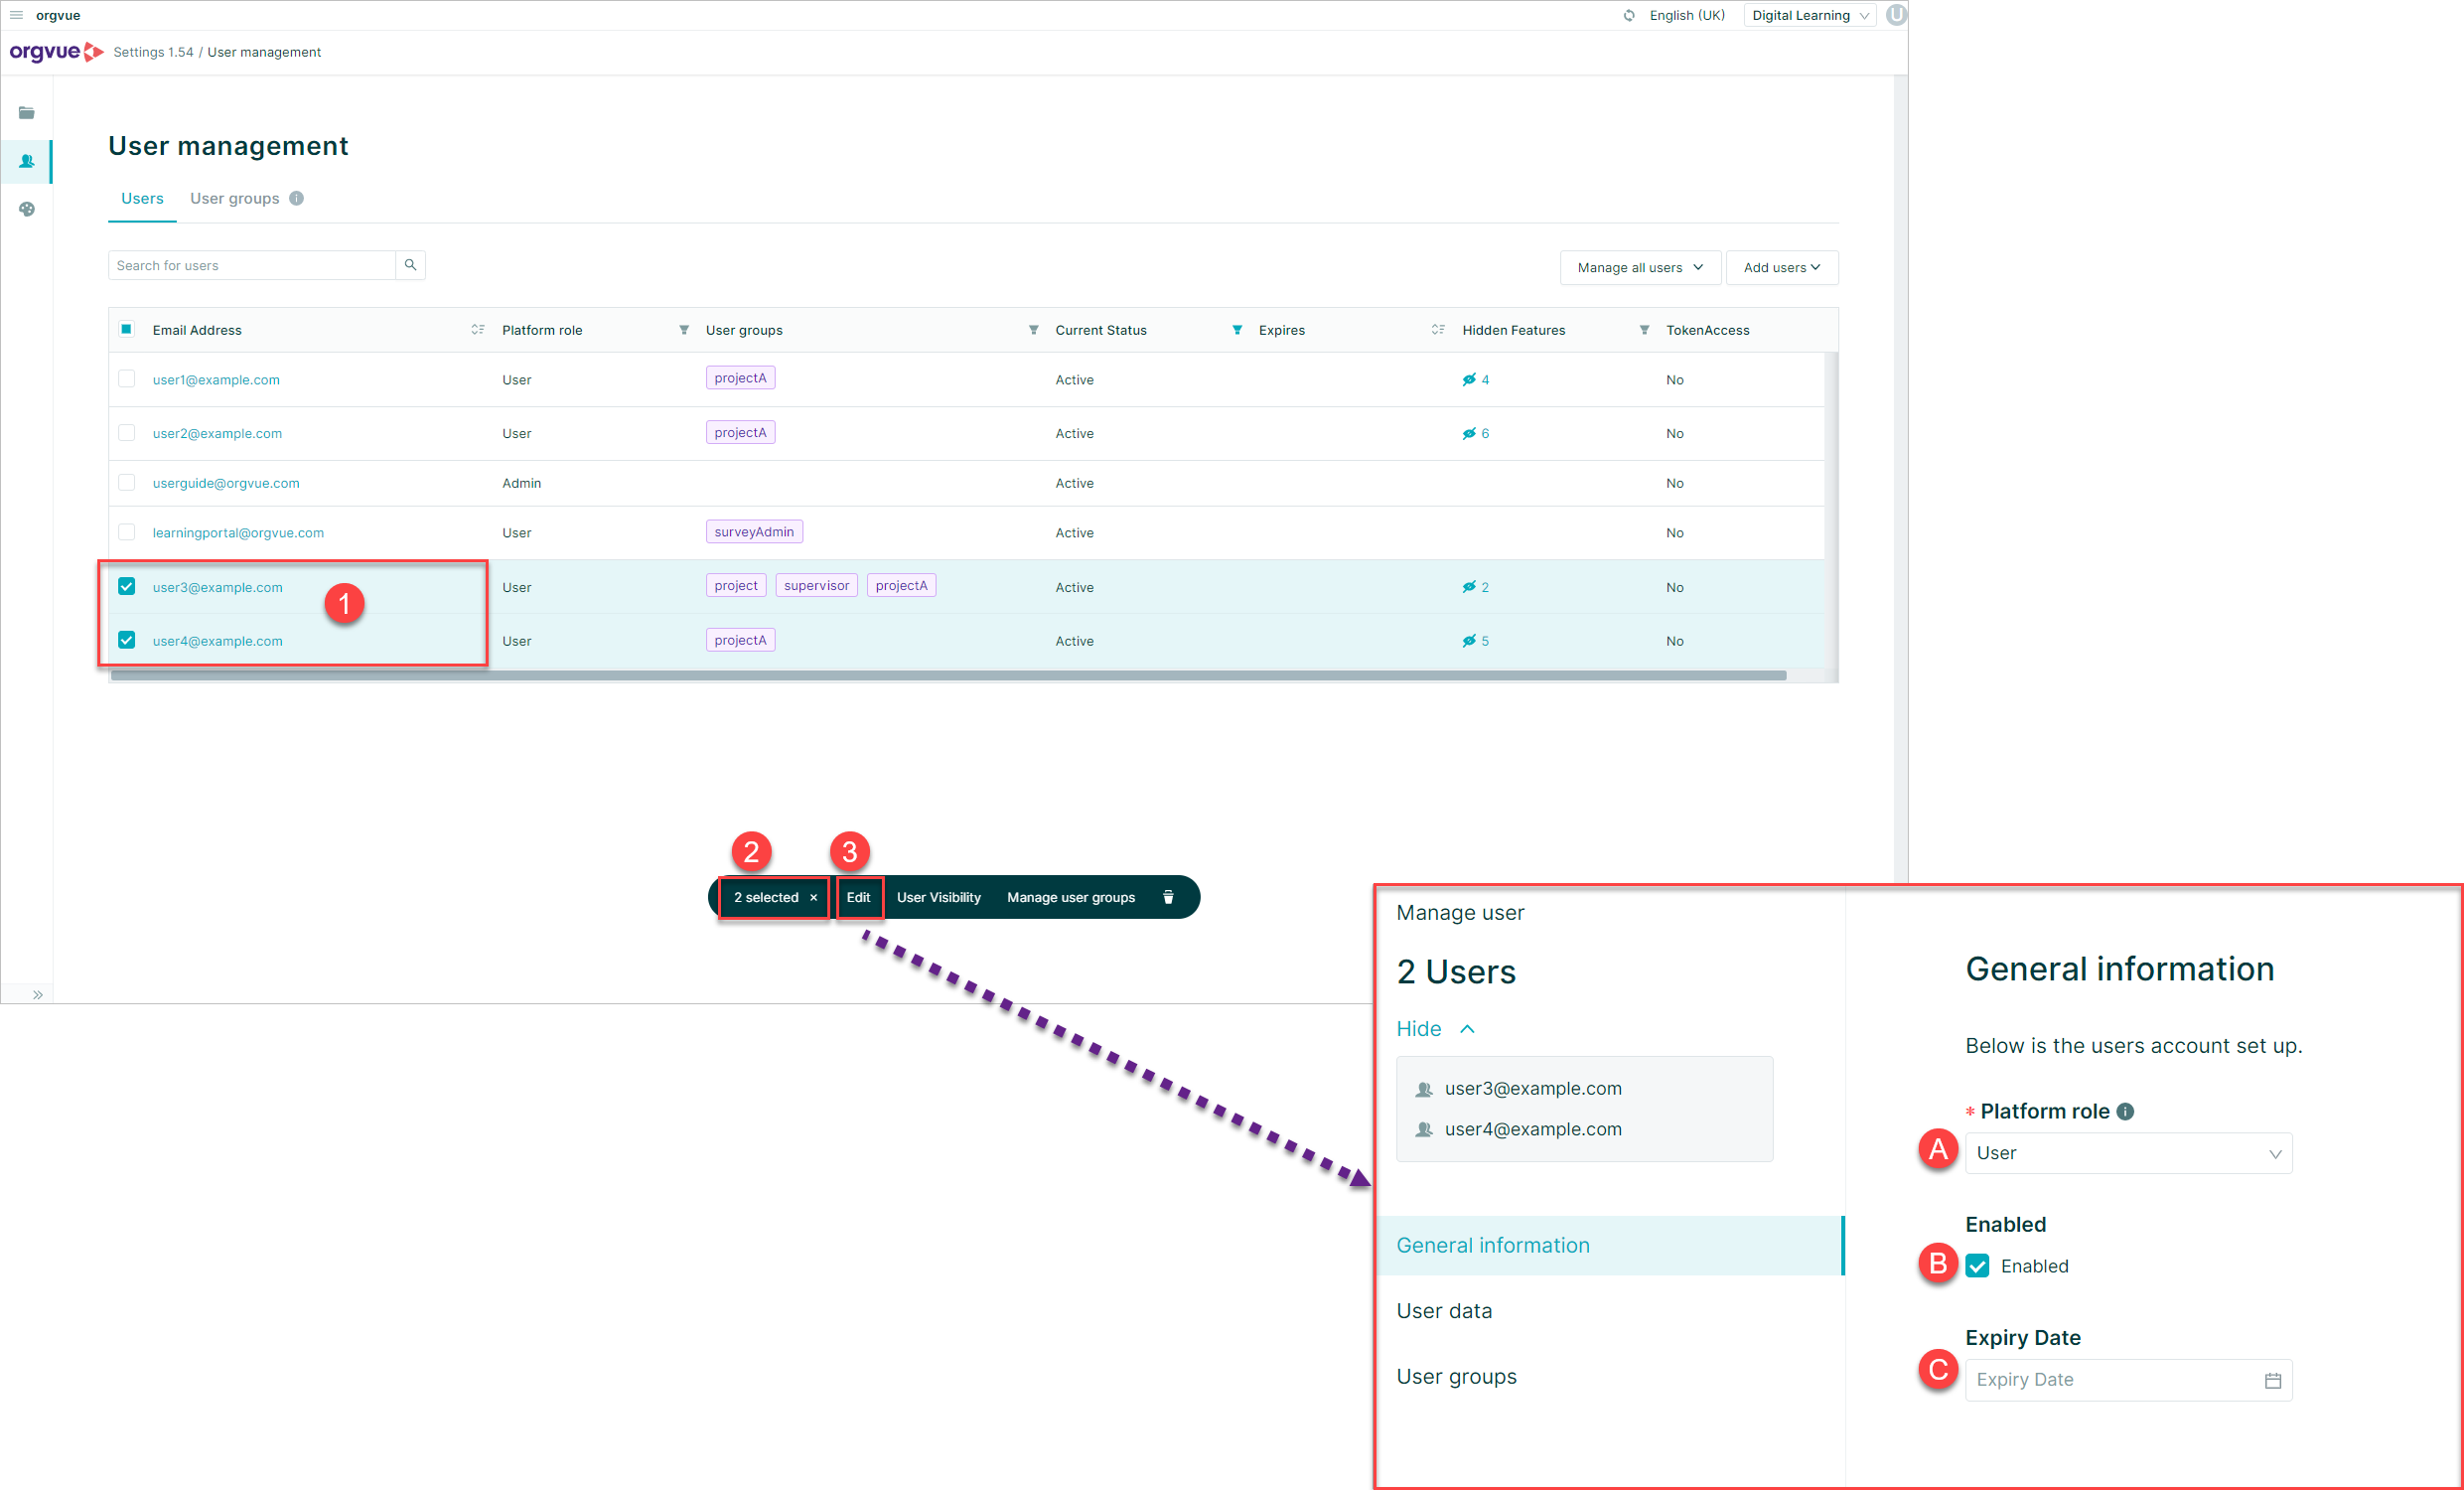
- Select the users to edit
- The number of users selected will be displayed
- Select the
Editbutton This will open the side panel to allow you to edit:
- B. Enable
- C. Expiry Date
Delete a user
WARNING this action cannot be undone
To delete a user account either:
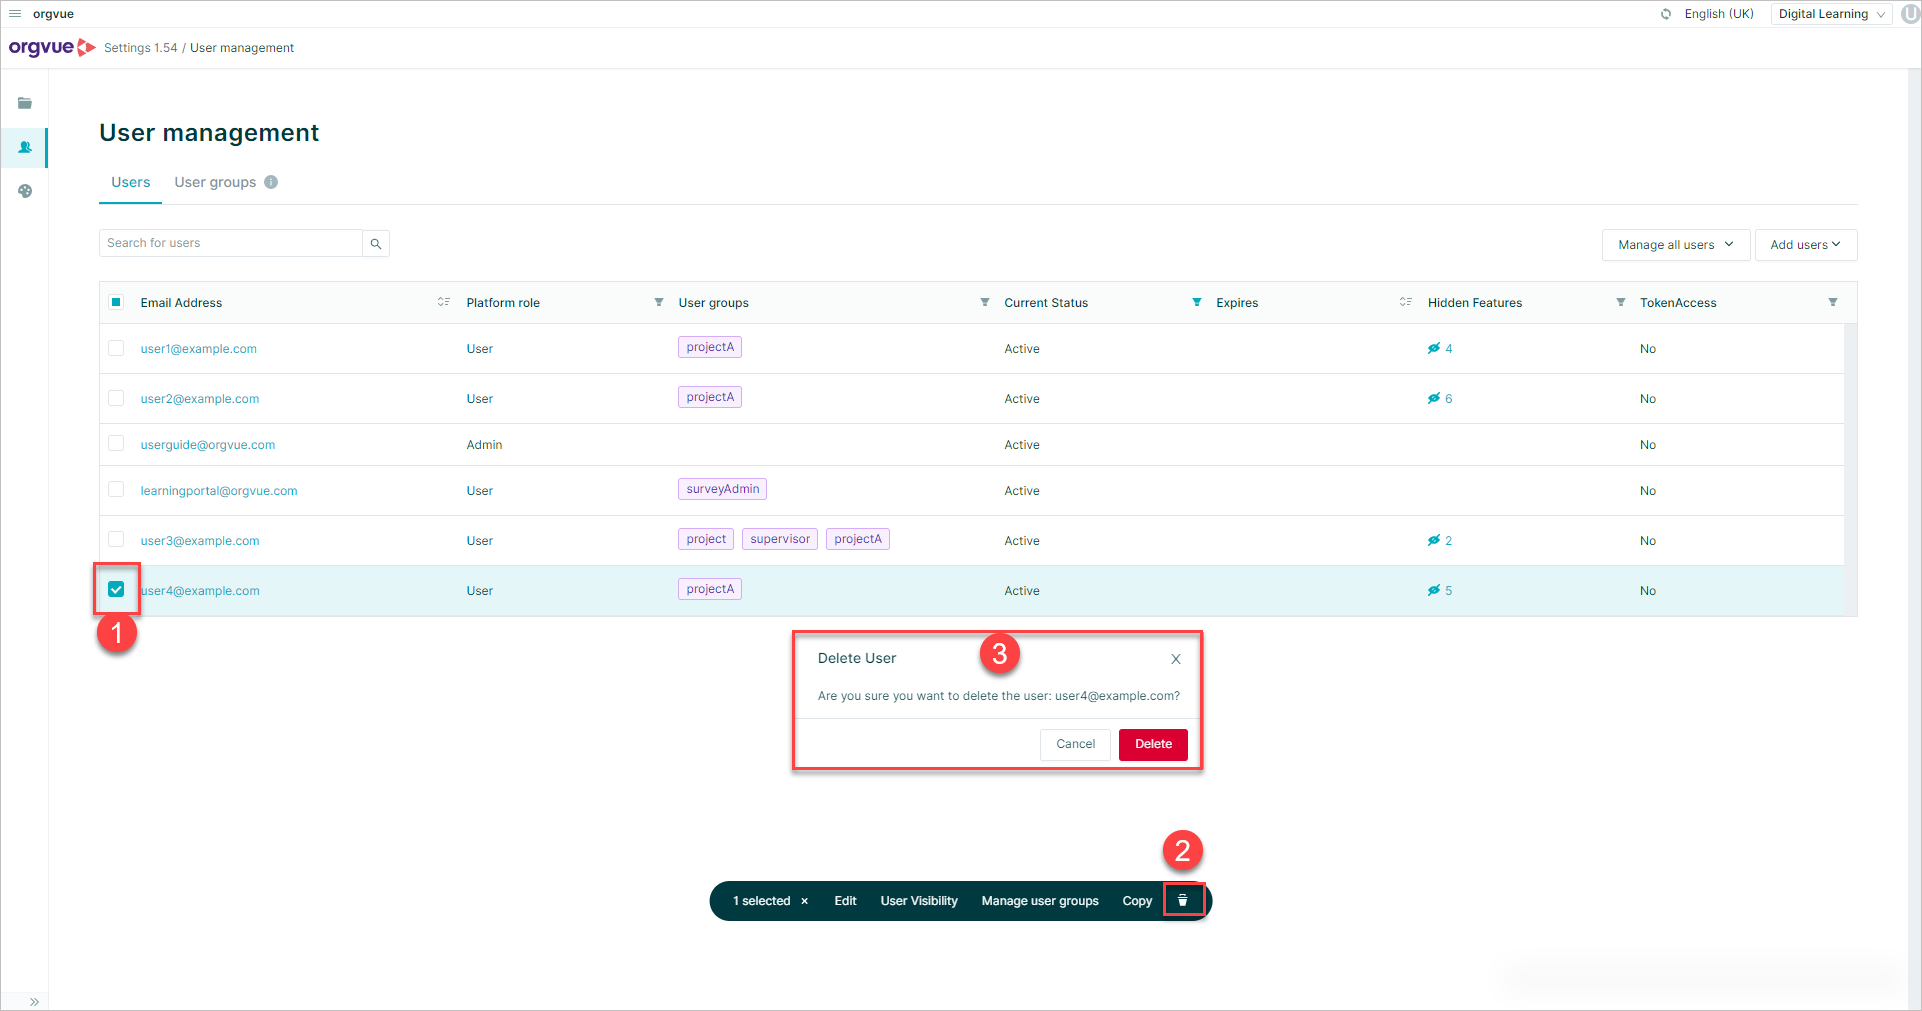
- Select the checkbox for the required user record(s)
- Select the
Deletebutton - A confirmation prompt message will then be displayed, select
Deleteto complete the deletion process
or
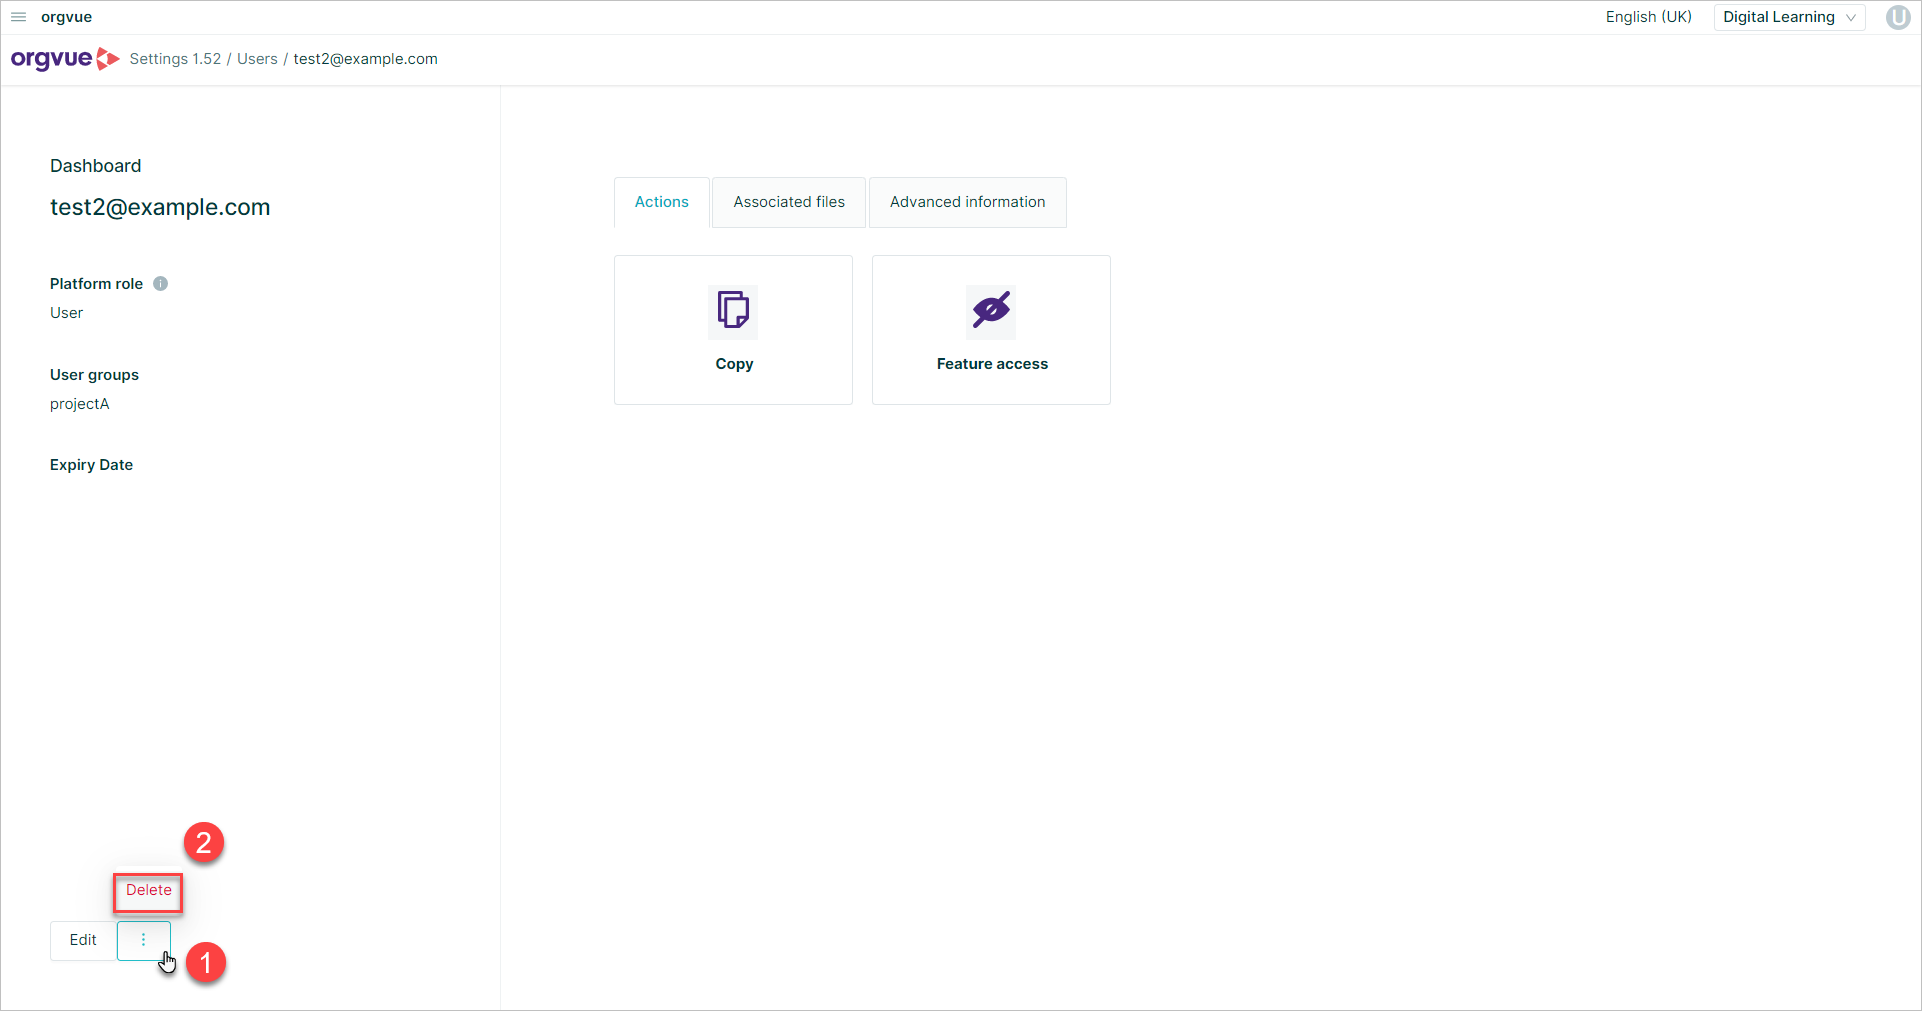
- Select the
Ellipseson the user dashboard - Select
Delete - A confirmation prompt message will then be displayed, select
Deleteto complete the deletion process
View Users Files
The files available to each user may be viewed from the user dashboard by selecting the Associated files tab
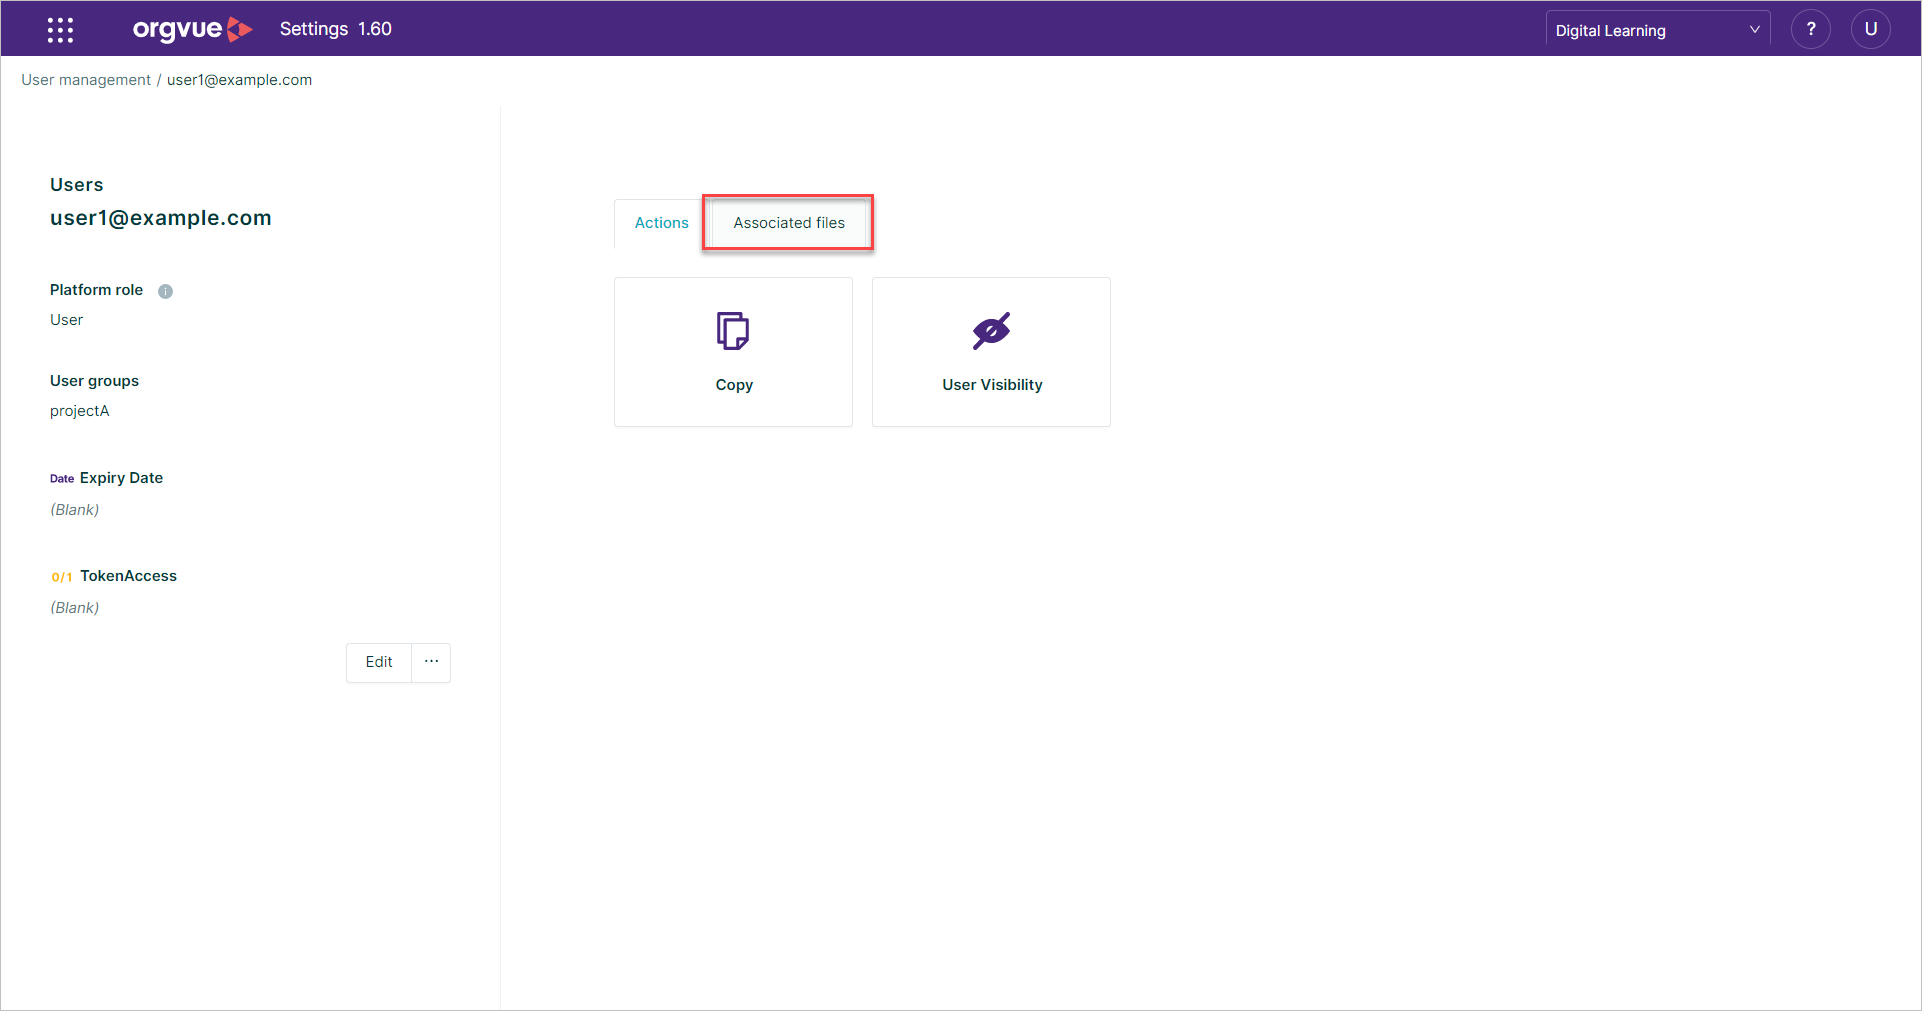
This will display a list of all files that the selected user owns or has access to with the following details:
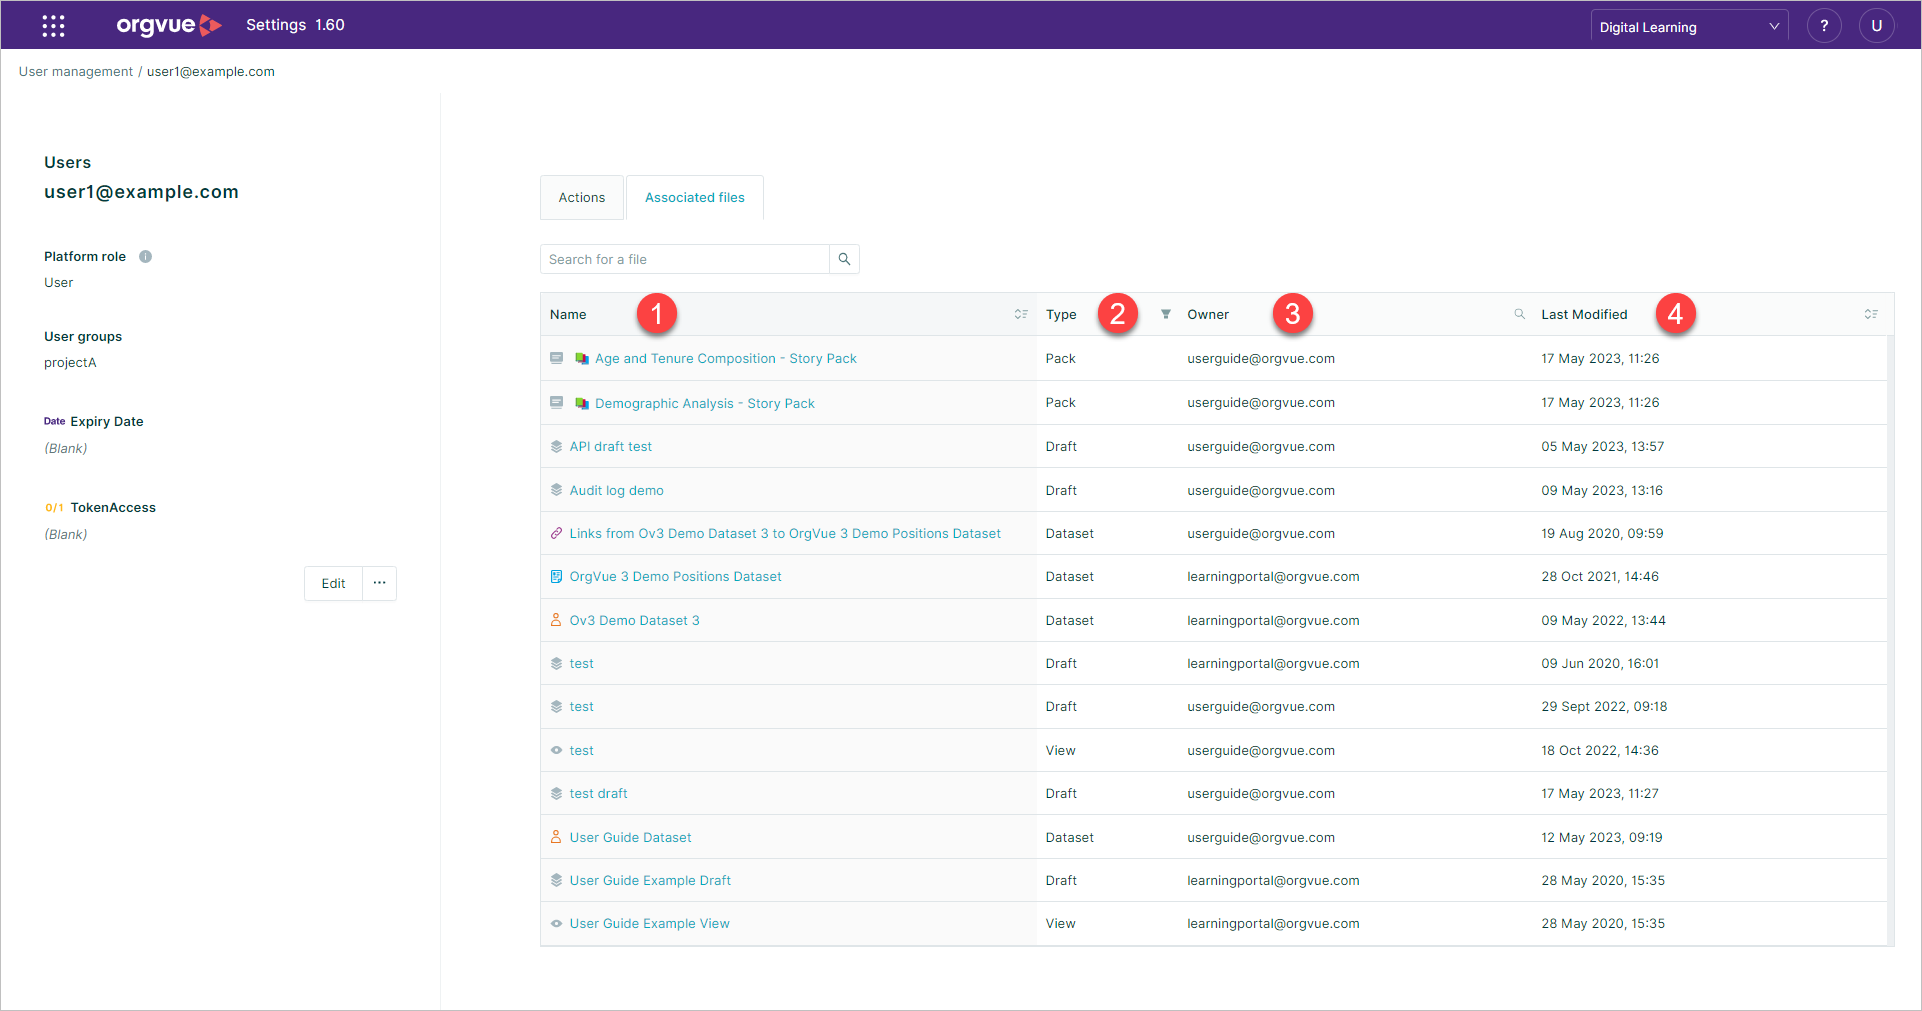
- Name: The name and file type icon will be shown. The name may be selected to open the Dataset Metadata screen
- Type: Dataset, Pack, Draft, or View
- Owner: User Id
- Last modified date and time
Impersonation Mode
When setting permissions for individual users it is useful to be able to verify the access granted meets requirements
To enable this, the option to impersonate a users access is available from the users dashboard
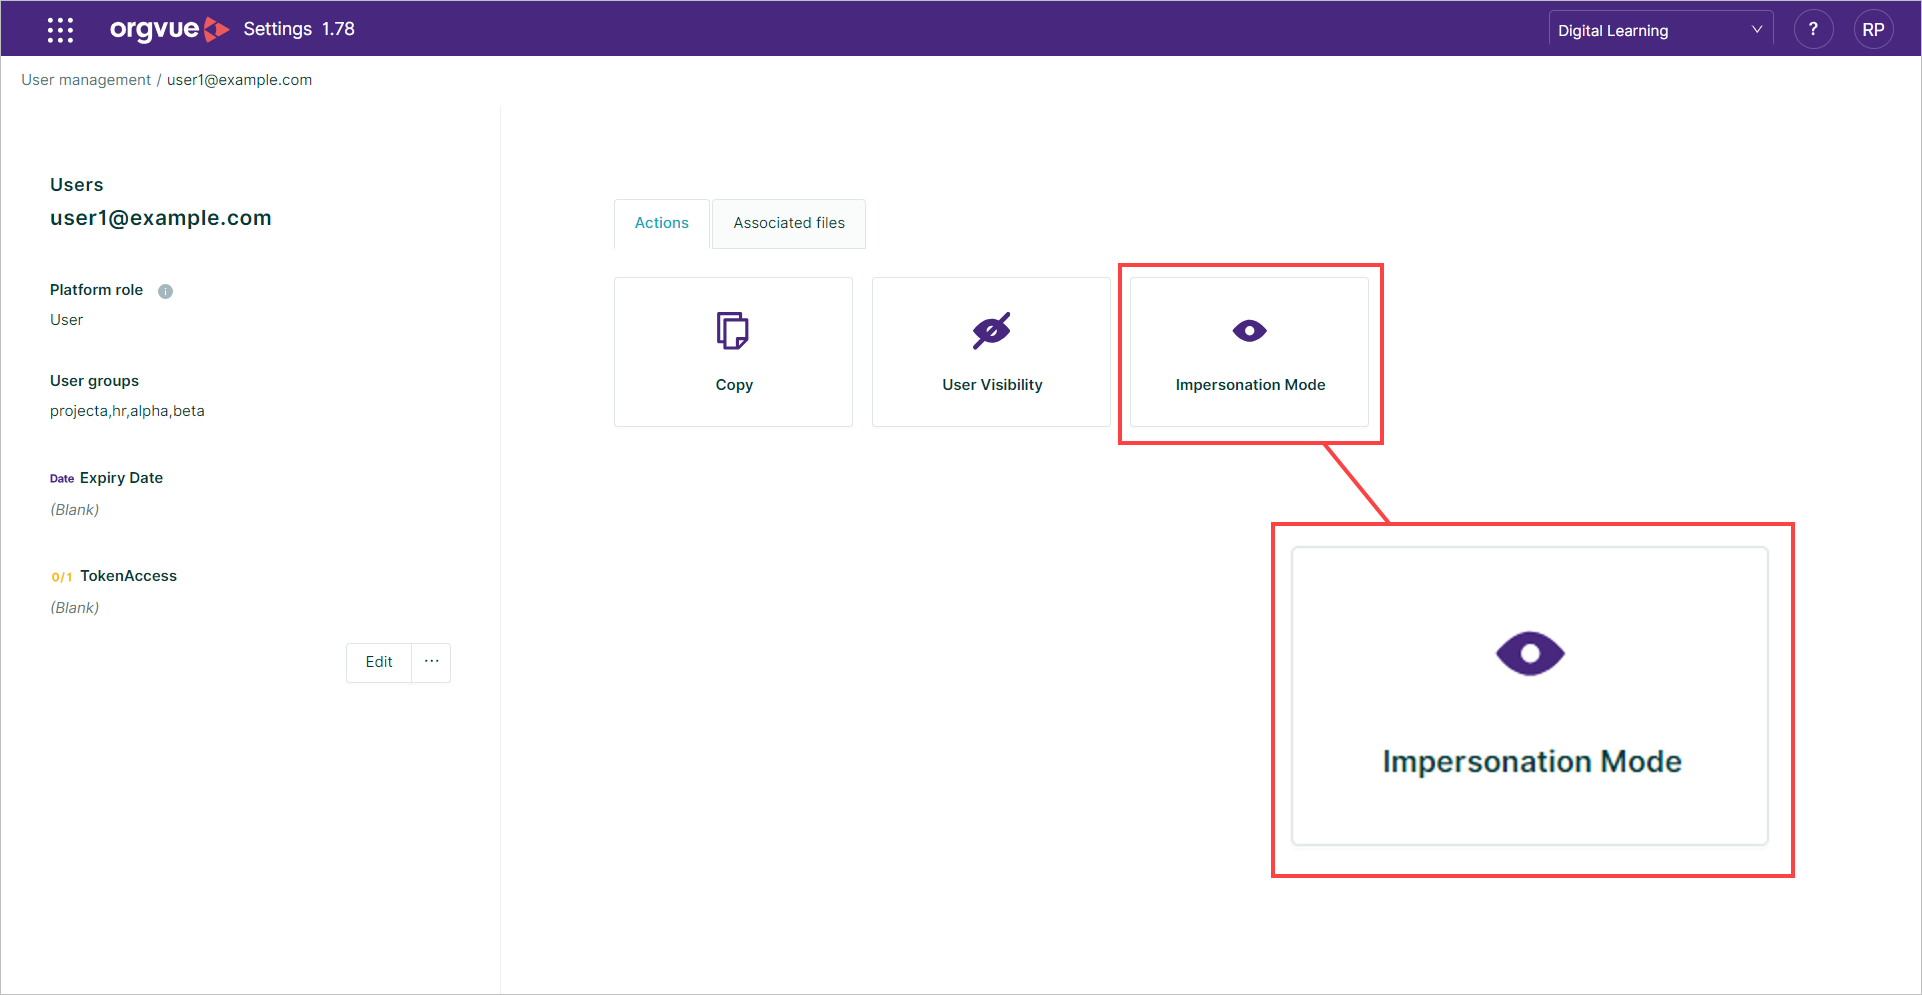
Selecting the Impersonation Mode button for the user account will open the Orgvue Home page as the selected user in a new browser tab
This will enable an Admin to see the files and properties available to this user on the Home page and Workspace but not make any changes to any files
Whilst in Impersonation Mode a banner will be displayed across the top of the screen to indicate that you are viewing the Orgvue platform as the chosen user but no changes are possible

To exit Impersonation Mode for the selected user simply close the browser tab to return the the settings user dashboard
Users Audit Log
It is possible to download an Audit Log from the users dataset by selecting the Audit Log button on the Users List
This will open the Audit Log screen which shows:
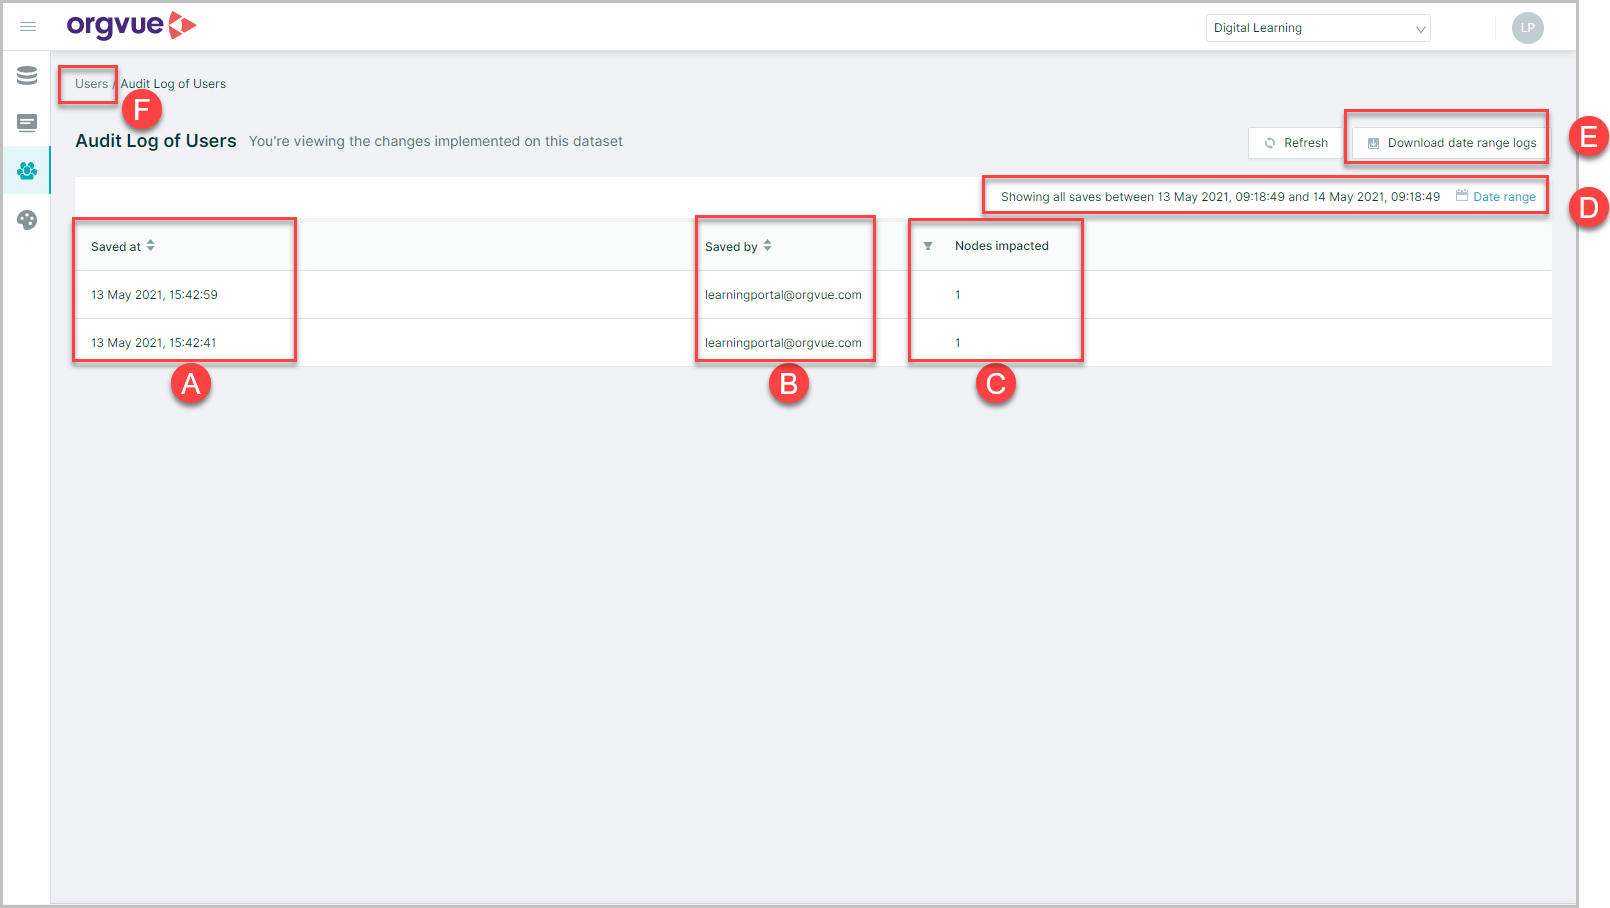
- A. The date and time the save was made
- B. The user ID that conducted the save
- C. The number of nodes impacted in the save action
- D. Confirmation of the date and time range being displayed. Select the
Date rangehyperlink to amend - E. Select the
Download date range logsbutton to download the login .CSV format - F. Select
Usersin the crumbtrail to return to the Users List
Note: Impacted nodes are defined as those which have been created, updated or deleted
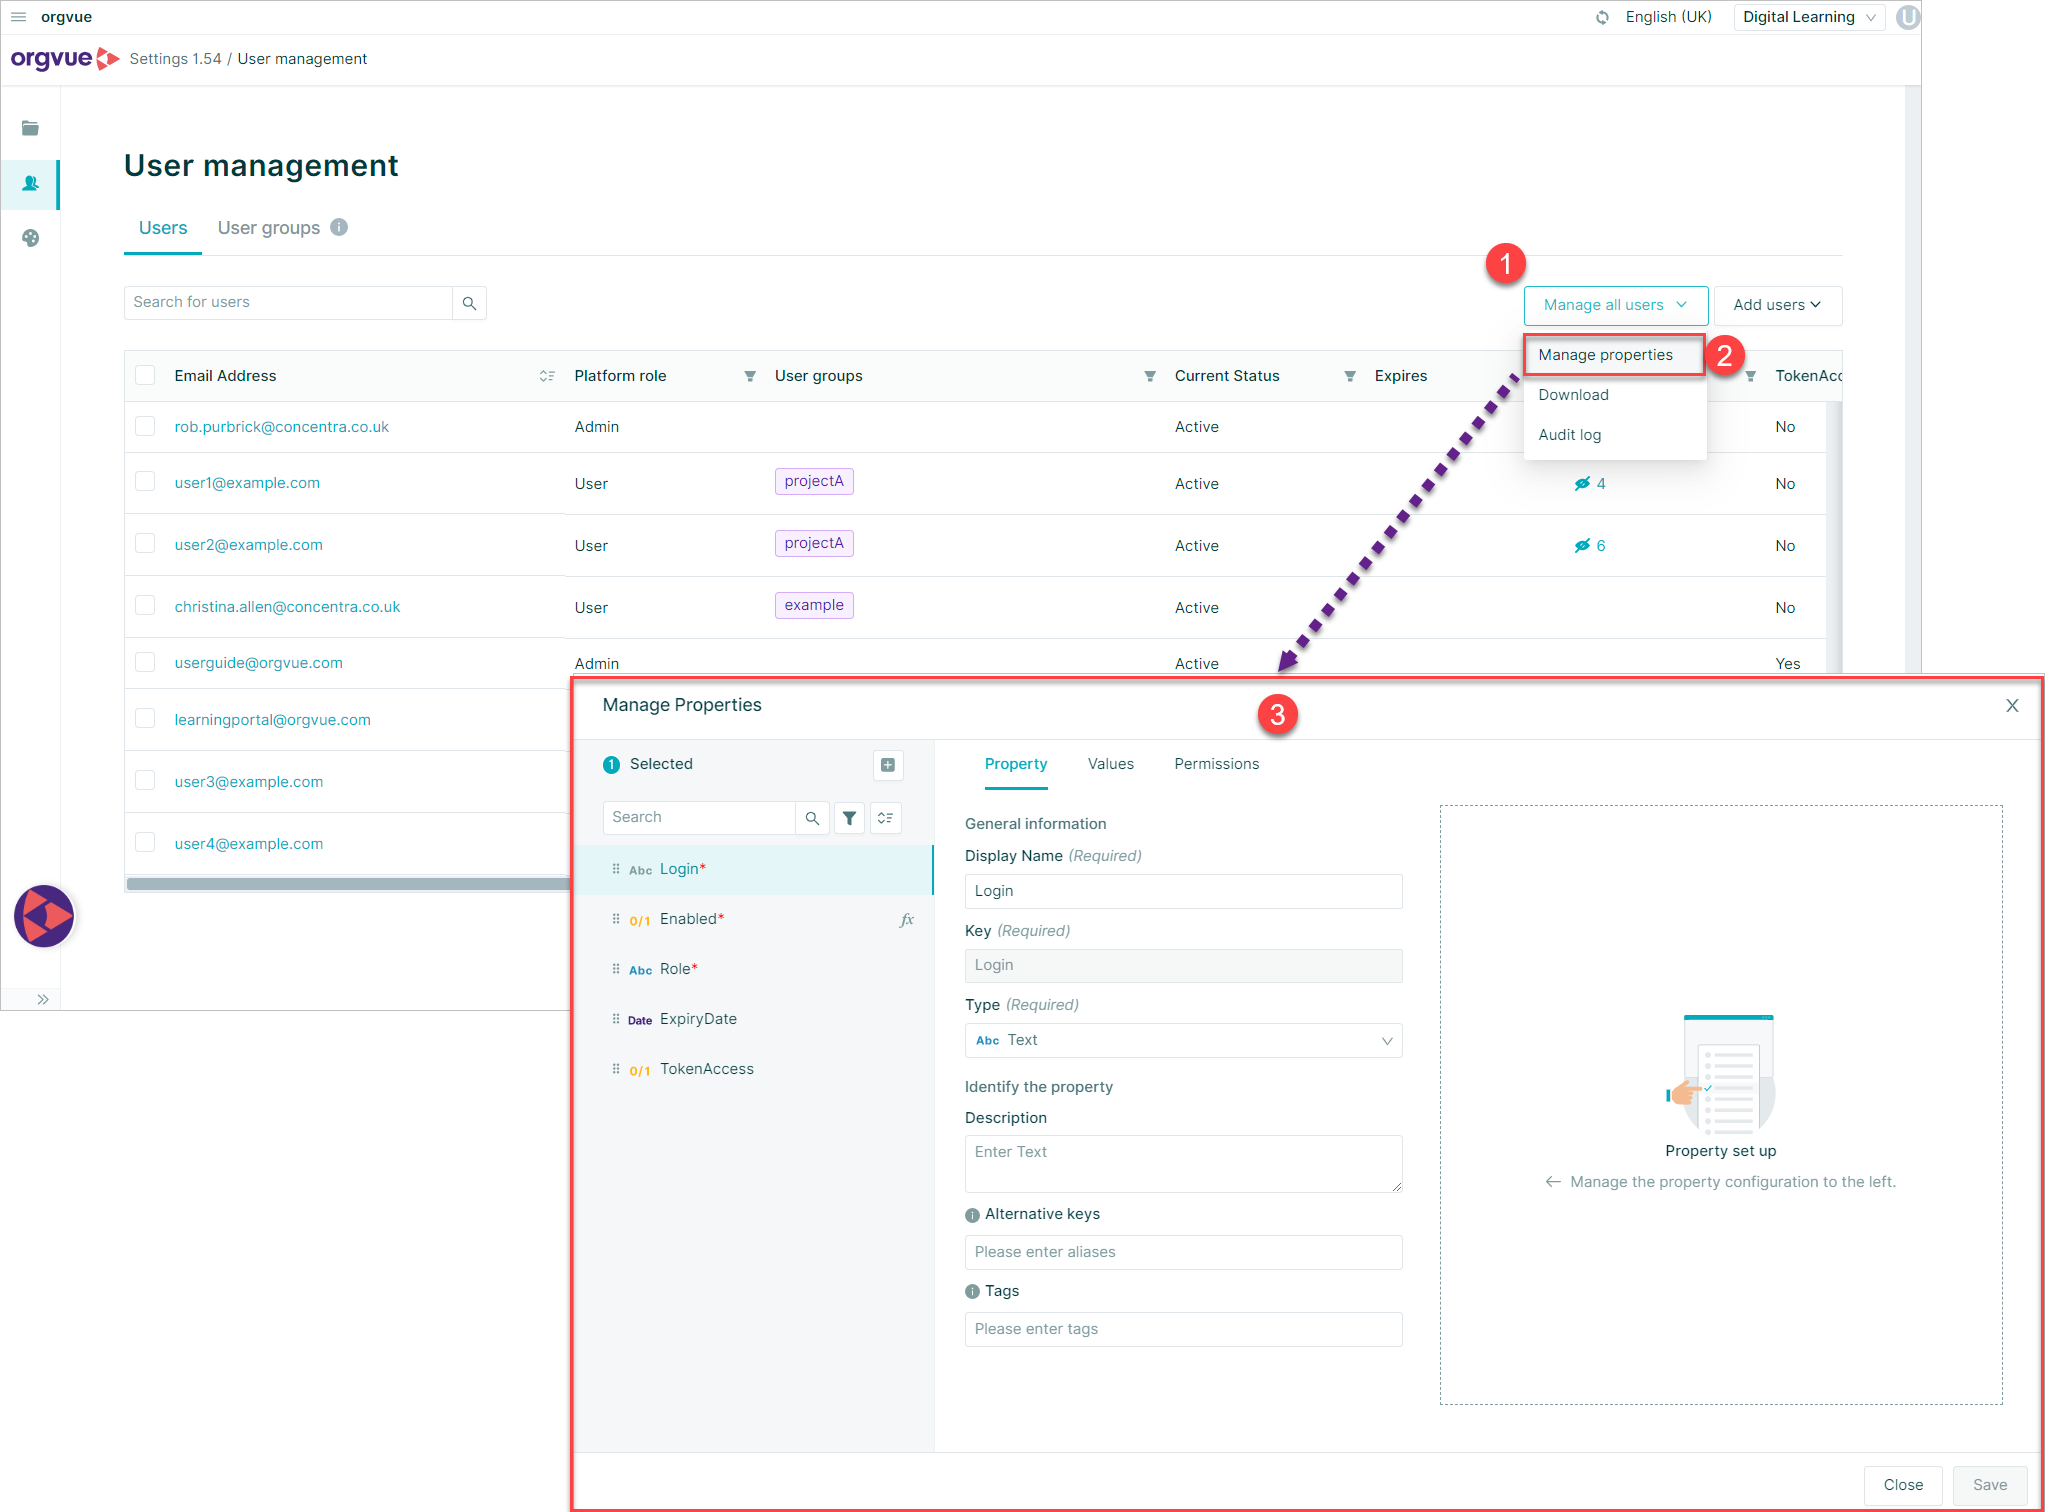
Users Property Manager
The Property Manager for the user list can be accessed from the Users List by:
- Selecting
Manager all users - Selecting
Manage Properties - This will open the Users Property Manager which has the same features as the Dataset Property Manager
Download User List
It is possible to download the users list by selecting Download from the Users List screen
A Download pop up message will be shown with the options for:
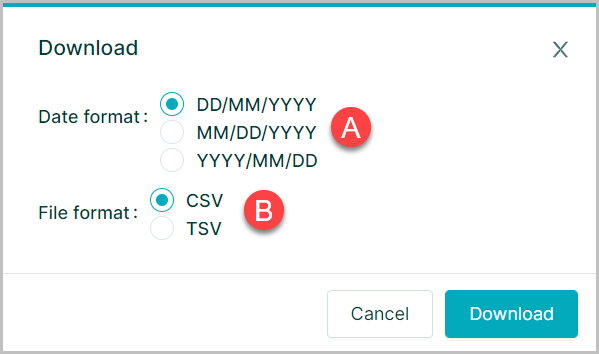
- A. Date format
- B. File format
Selecting the required formats and then Download will commence the download and the file will be available in your browser window and the download directory of your PC
Roles
Roles are used in combination with Permissions to control access to resources in Orgvue
Platform Roles
There are two standard roles user and admin and every user account must have one of these two roles assigned
userThis role provides access to the Orgvue tenant and allows the account holder to manage any resources they own
It can also be used with permission tags to provide access to a resource to all account holders
adminThis role is used by tenant administrators and provides access to view and edit all resources that exist in a tenant and manage other user accounts
Additional standard roles also exist:
surveyAdminwhich may assigned in addition to the standarduserrole to allow access to the Survey Admin applicationwfpadminwhich may assigned in addition to the standarduserrole to allow access to the Workforce Planning
These should be entered as User Group
User Groups
User groups may be created as required to enable different levels of access to specific resources in Orgvue
View User Groups
To view existing user groups:
- Select the
User groupsfrom the Users List - The existing user groups will be shown
- The email of the members of group will be shown
- If group contains more than one user hovering the mouse over the number hyperlink will display a pop up with list of group members
Create User Group
New User Groups are entered as text strings into the User Groups field on a users account details while existing User Groups may be assigned to a User by selecting from the dropdown list
To create a user group and add it to an account:
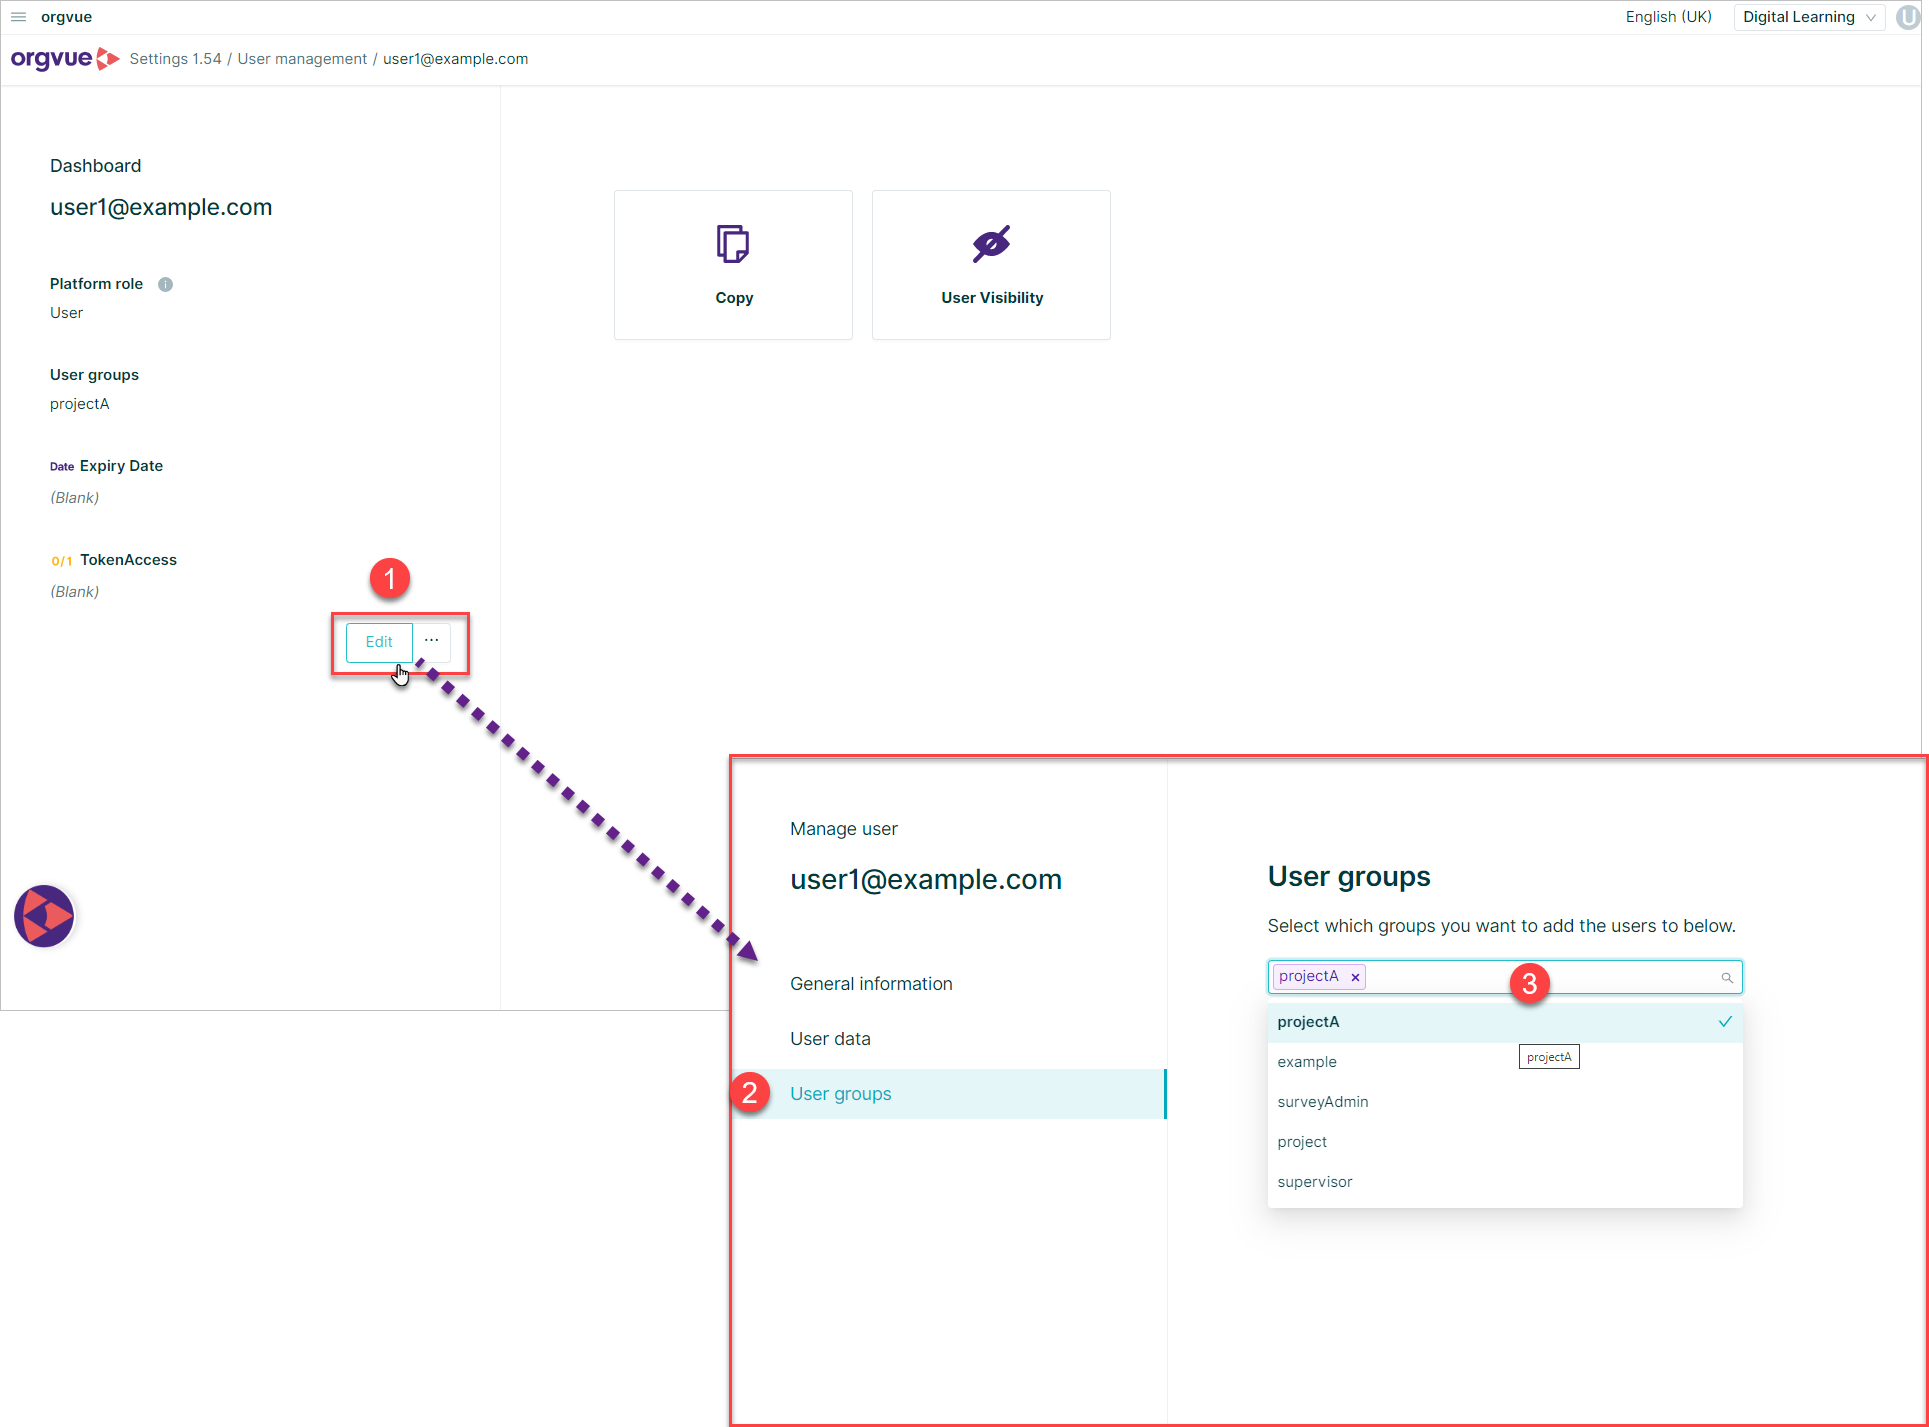
- Select
Editon user dashboard - Select
User groups - Enter the new user group into the
User Groupfield and press enter or select from an existing User Group in the dropdown