
Files Tab
The Data tab displays a list of the Datasets available to you as the default view and is indicated by the dataset icon highlighted in teal
It allows the management of the data documents within the tenant that the user has access to split between five selectable lists
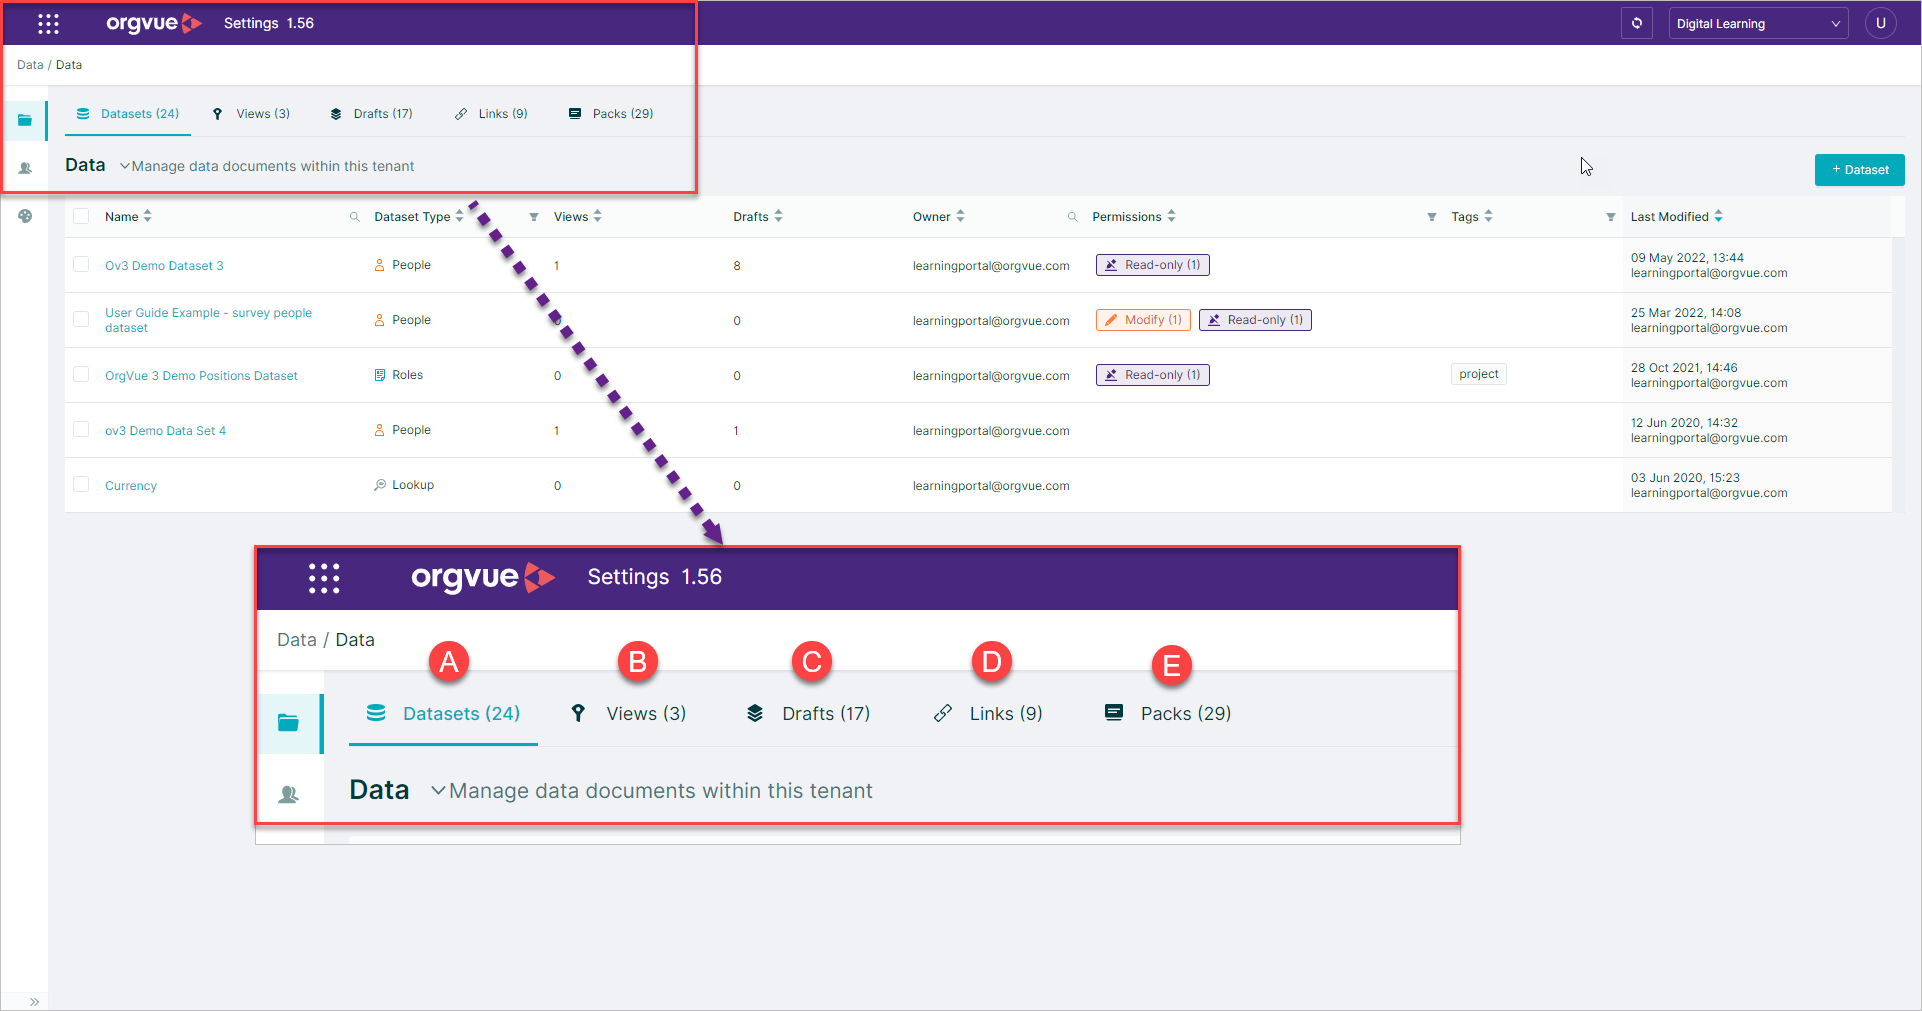
Dataset List
Available Datasets will be based on permissions for user role
It contains:
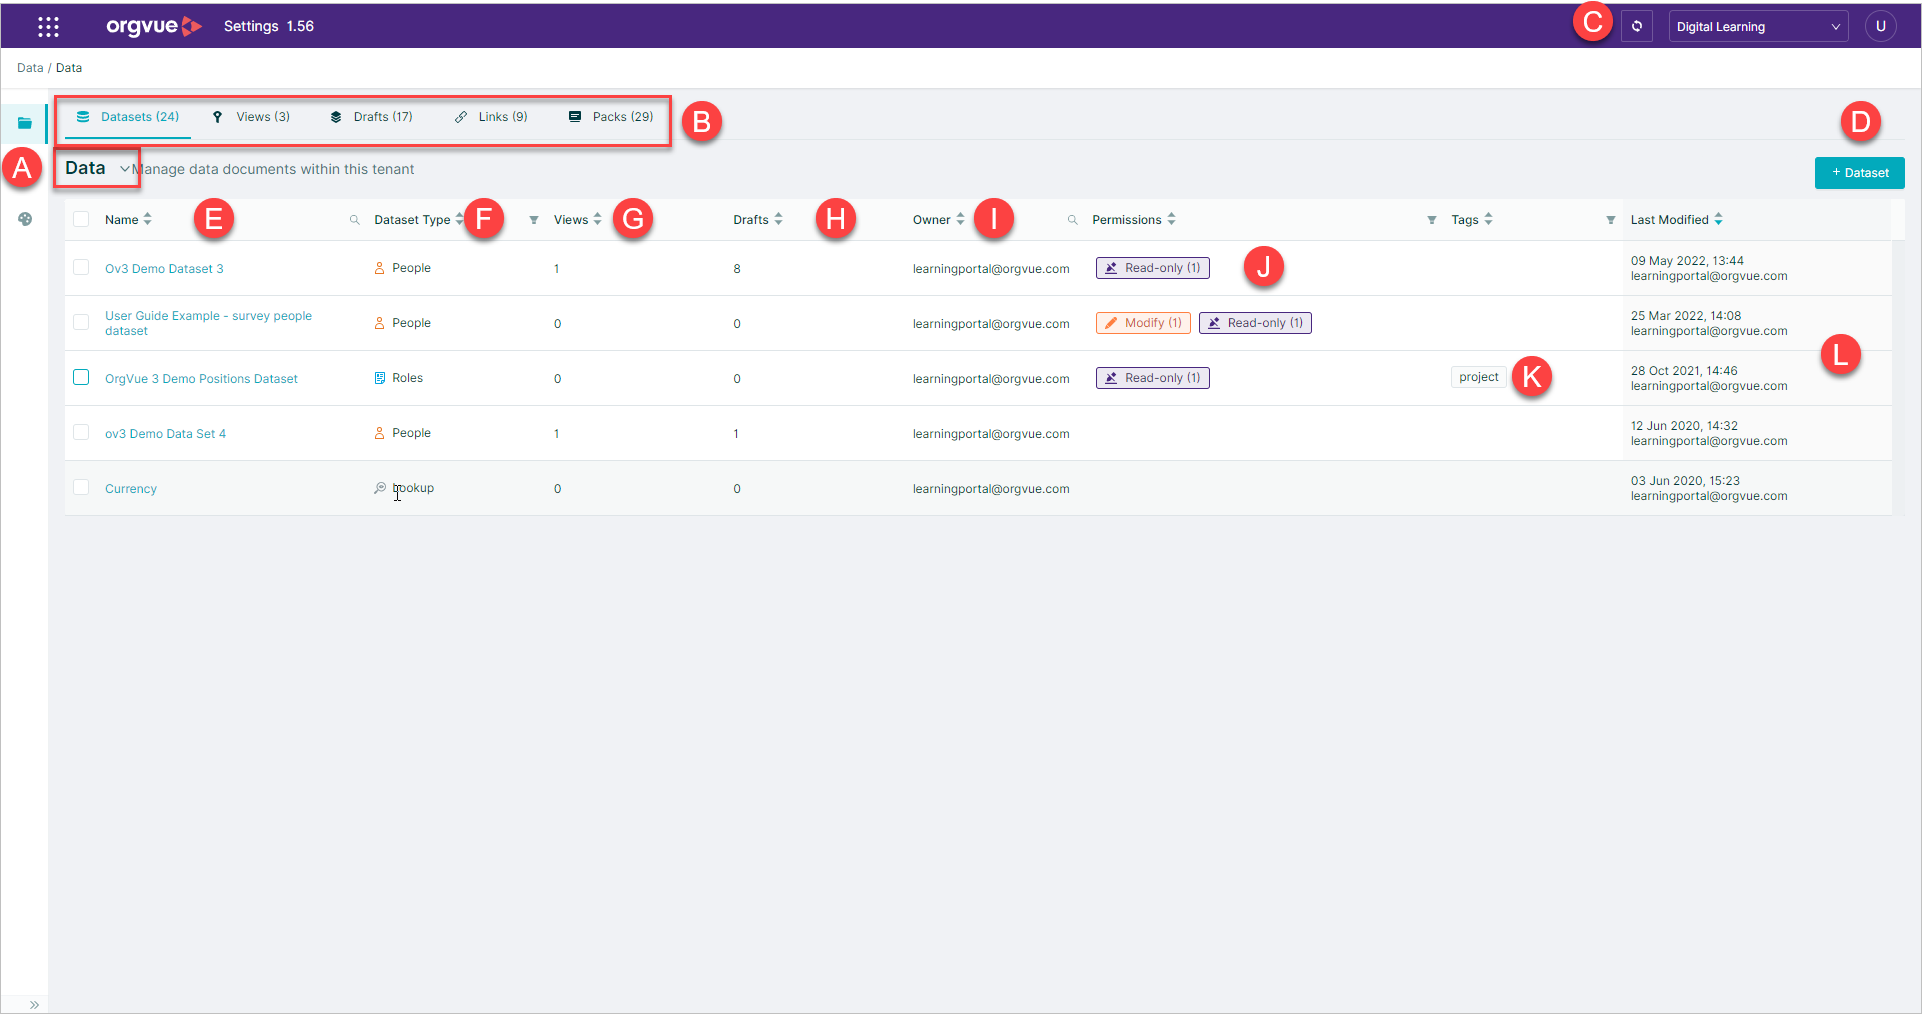
- A. Dropdown menu to select Filtered Dataset List
- B. Select the data document type to display Data Document Type
- C. Refresh: Refreshes the view of the available Datasets with updated detail
- D. Add Dataset
- E. Name: Select Dataset name to open Dataset Metadata page
- F. Dataset Type: Type of Dataset shown with color code icon
- G. Views: Number of views created from dataset
- H. Drafts: Number of Drafts created from dataset
- I. Owner: Login ID of Dataset owner
- J. Permissions: Hover over the permission icon for details of roles with permission level applied
- K. Tags: Any tags added will show here
- L. Last Modified: Shows date, time and login ID to last modify the Dataset
Dataset List Filtering
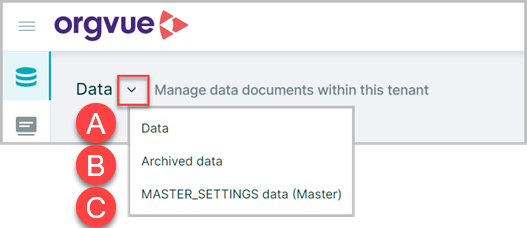
From the dropdown menu on the data tab it is possible to define which Datasets are displayed on the Dataset list:
- A. Data: All Datasets that exist in the tenant that are not archived (default option)
- B. Archived: All Datasets that exist in the tenant that have been tagged
archived
See Archive a Dataset - C. Tenant ID data (Master): Only exists for users who have access to a master tenant. Lists all non-archived Datasets in the master tenant. Users will not have access to all functionality
This feature will provide performance improvements when opening the Dataset tab by only loading the Dataset lists as they are selected from the dropdown
For detail on archiving a Dataset see Archive a Dataset
Active Survey Dataset Warning
Any dataset being used in an active survey should not be edited due to the risk of breaking the survey.
To safeguard against this possibility attempting to edit any dataset currently being used by a live survey will produce a warning

- Select the link to open the Survey Admin homescreen to track survey progress
- Select
Cancelto abandon the change - Select
Continueonly if you are sure you wish to make changes
Dataset Permissions
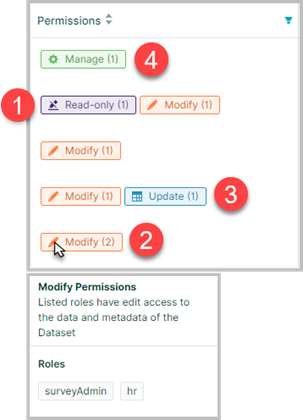
Any permissions applied on the Dataset metadata screen will be displayed in the permissions' column of the Dataset listing
The tag will display the permission level along with the number of roles that have this permission level applied for the relevant Dataset
Hovering the cursor over the permission icon will reveal a pop-up window displaying the role(s) with this permission set
Dataset permissions:
- Read Only: Listed roles have view only access to the data of the Dataset
- Modify: Listed roles have edit access to the data and metadata of the Dataset
- Update: Listed roles have view and update access to the data of the Dataset
- Manage: Listed roles have modify access and the ability to create Views from the Dataset
Note: Update is defined as the ability for a user to create, delete or change a node
For more detail on Role Based Permissions see permission's
Add Dataset
To add a Dataset click the + Dataset button to start the process
Select files
There are three methods for uploading data into Settings
File may be loaded in .csv or .xlsx format
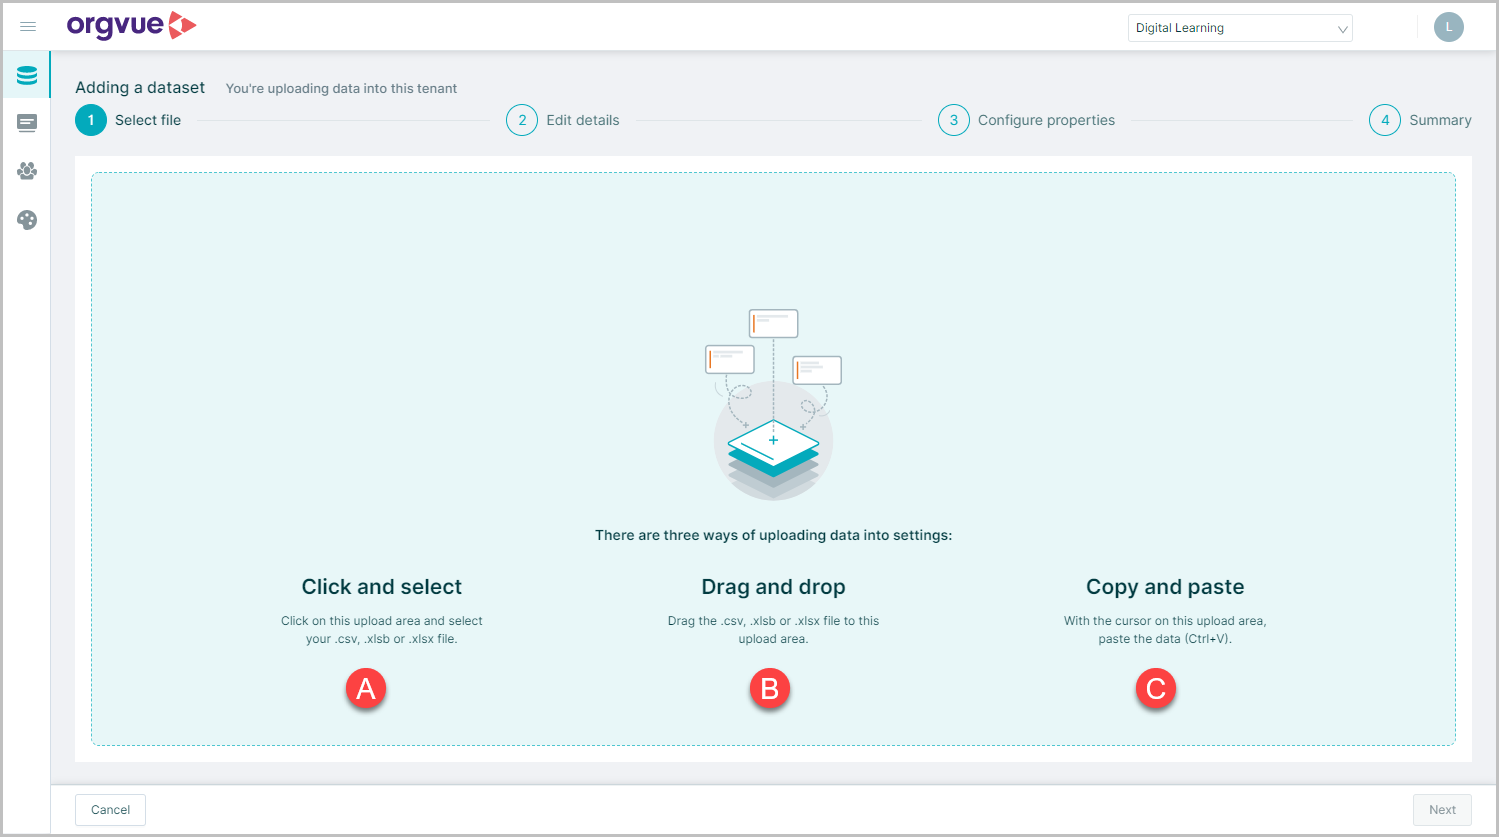
- A. Click and Select
- B. Drag and Drop
- C. Copy and Paste
Important Date formats: When uploading data containing dates from csv files they must be entered in ISO format YYYY-MMM-DD, if uploading from XLSX then any Excel date format is acceptable
Click and Select
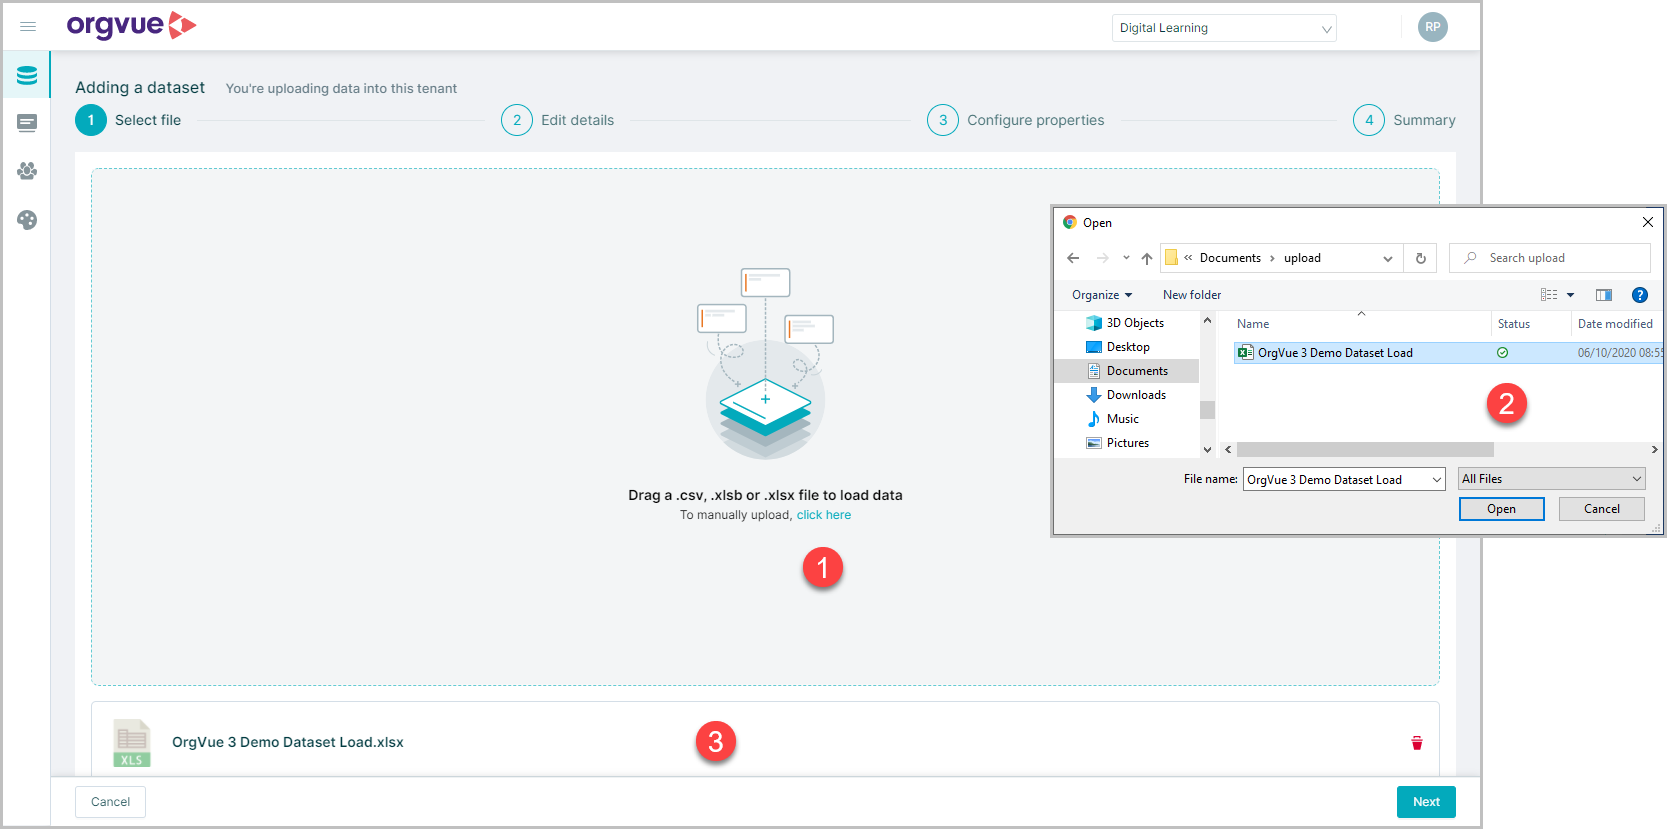
- Click on the upload area to open a file selection window
- Select the upload file on PC and click
open - Loaded file will display, click
Nextto progress to Edit Details
Drag and Drop
- Drag file onto the upload area
- Loaded file will be displayed
- Click
Nextto progress to Edit Details
Copy and Paste
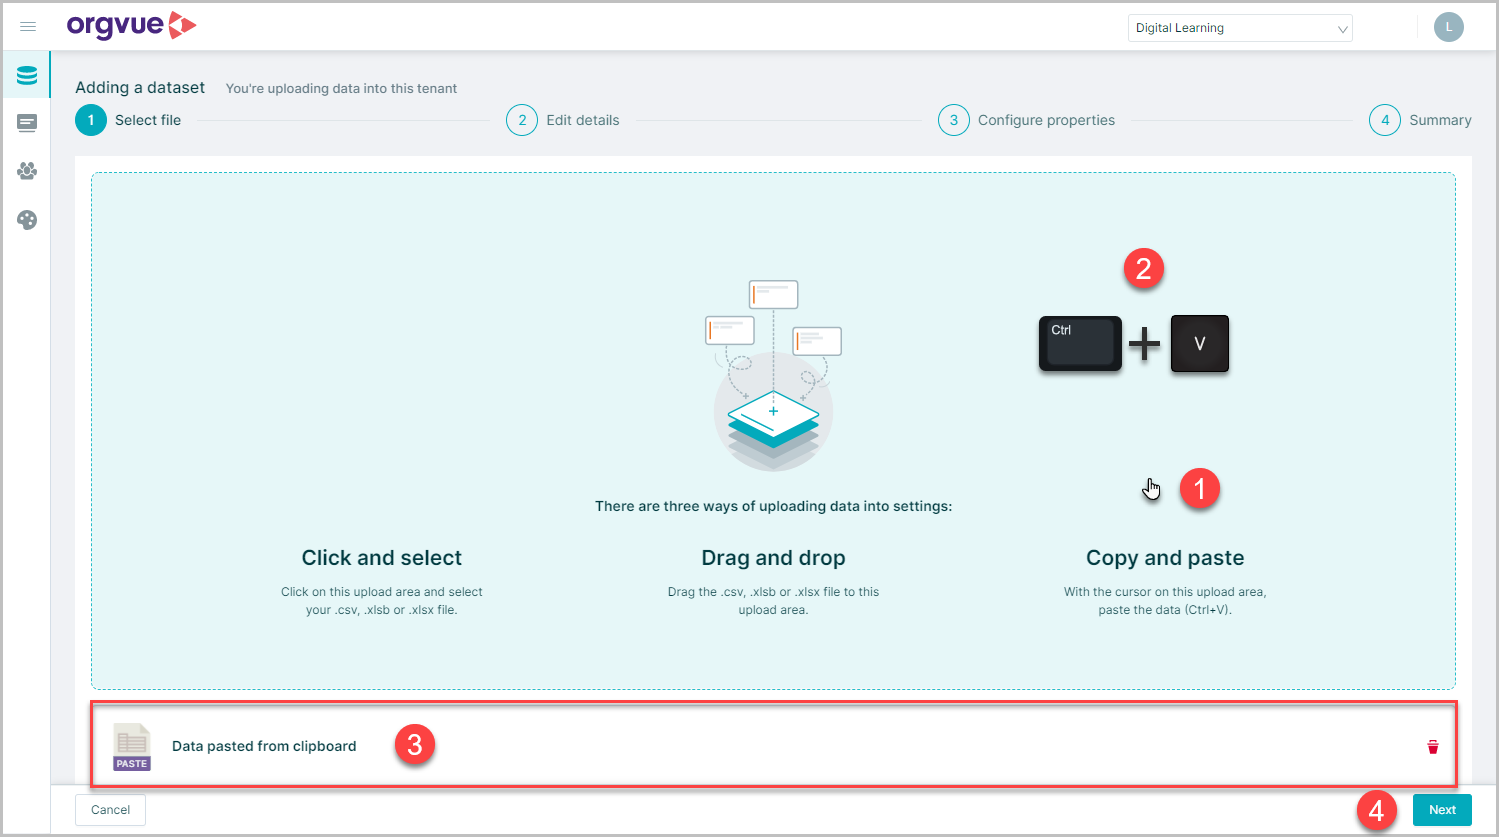
- Copy data to clipboard from source file and place cursor on upload area
- CTRL + V to paste data
Data pasted from clipboardicon will be shown- Click
Nextto progress to Edit Details
Edit details
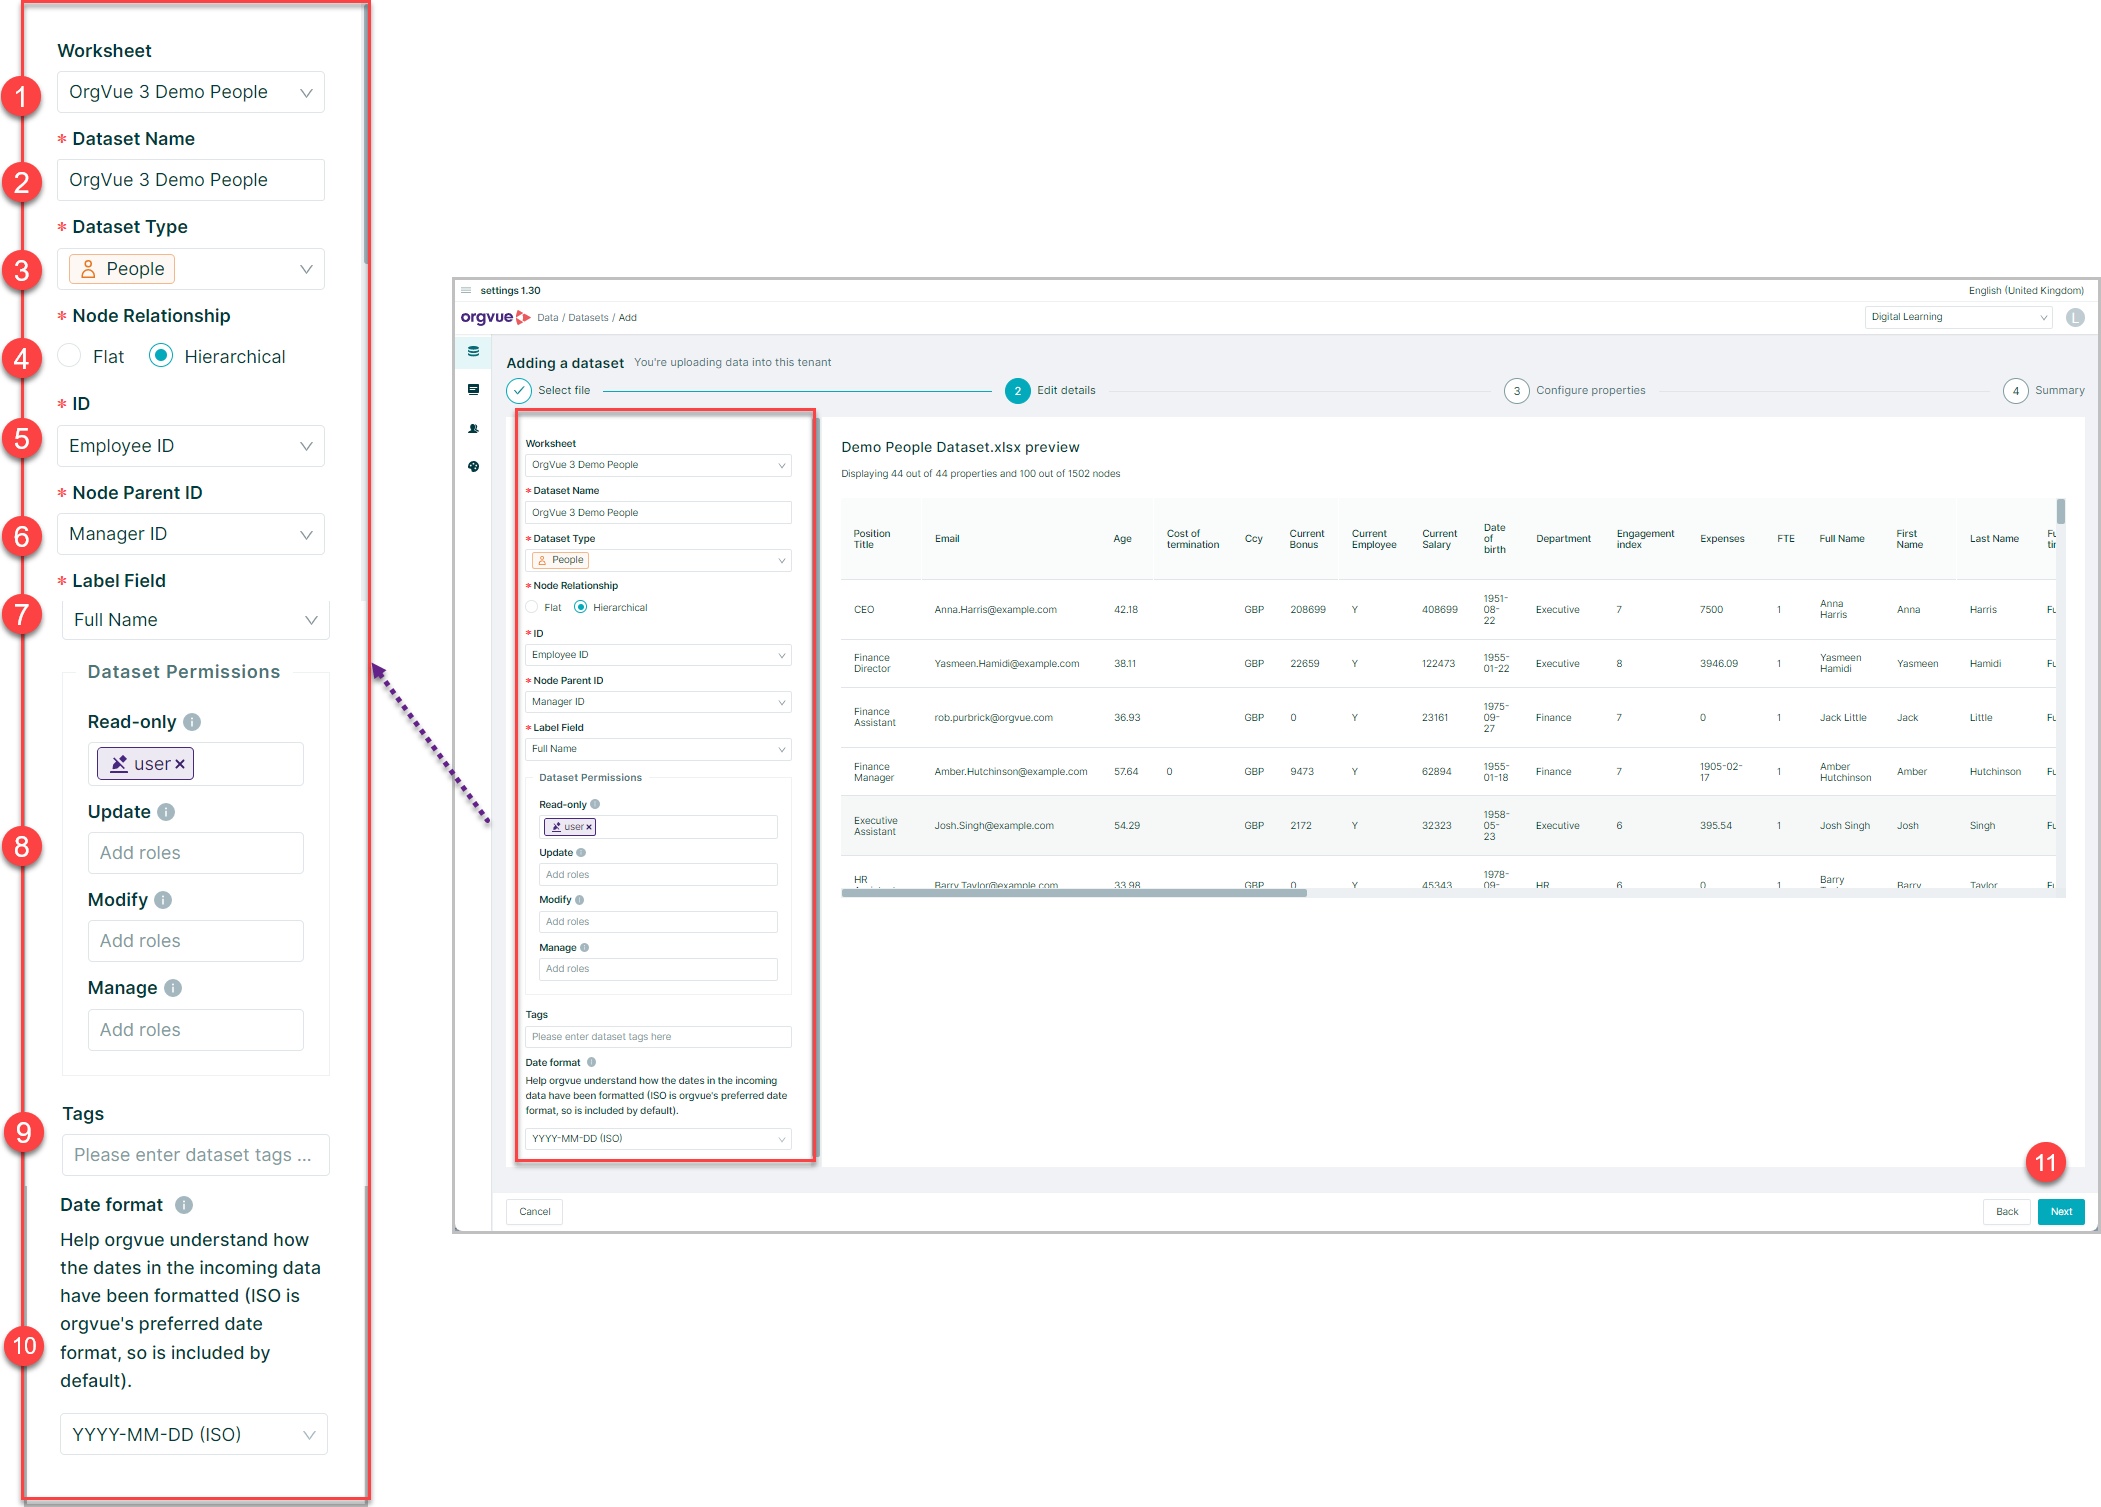
On this screen the following details are entered or selected:
- Worksheet: If the loaded file has more than one worksheet, select the required worksheet
- Dataset Name: This will default to the filename being loaded but may be edited as desired
- Dataset Type: Dropdown selection box for Dataset type being uploaded See Dataset Types for more detail
- Node Relationship: Radio selection buttons to choose between Flat Dataset and Hierarchical
- ID: Dropdown box to select data property in upload file containing unique identifier e.g. employee ID or position ID
- Parent ID: Dropdown box to select data property upload file containing Parent identifier e.g. manager ID
Note:
Parent IDonly available when Hierarchical Node Relationship is selected - Label Field: Dropdown box to select data property to be used as Label field. This will default to first column in data upload until alternative is chosen
- Dataset Permissions: Applied by adding the
roleof the user or group affected into the relevant permission field. See Dataset Permissions - Dataset Tags: Free text box to add any Dataset tags. See Tags for more details
- Date format: Select the format of any dates present in the upload file from the dropdown list
- Select
Nextto continue
Configure Properties

- Use the checkboxes on the left to unselect any properties in the source file not to be imported. By default, all properties will be initially checked
- Orgvue will automatically apply a type to each property being imported, but this can be changed using the dropdown selection box for each property
- Use the scroll bar to view full property list
- Once all property types have been selected, the data can then be uploaded by selecting the
Uploadbutton
Summary
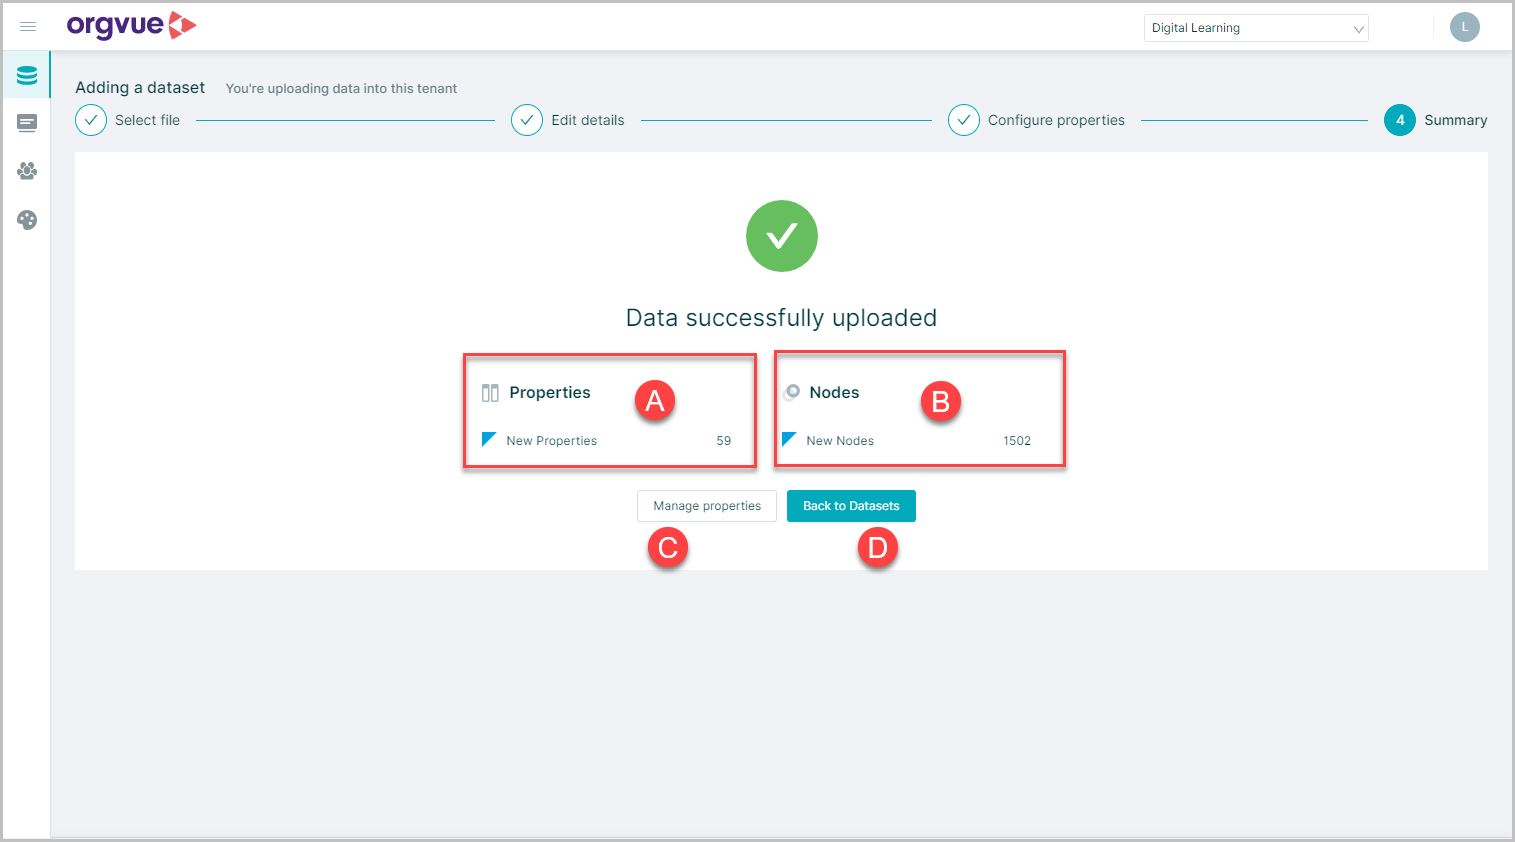
The final summary screen has message confirming successful upload and:
- A. The number of new properties loaded
- B. The number of new nodes added
- C.
Manage Propertiesbutton: To make any further changes to properties - D.
Back to Datasetsbutton: To view the Dataset list with new Dataset added
Delete Dataset
To delete a single Dataset either:
- Select the Dataset on the Dataset List, then select
Delete - From the Dataset Metadata screen of the Dataset, open the menu and select
Delete
To delete multiple Datasets at the same time:
- Select the Datasets on the Dataset List, then select
Delete
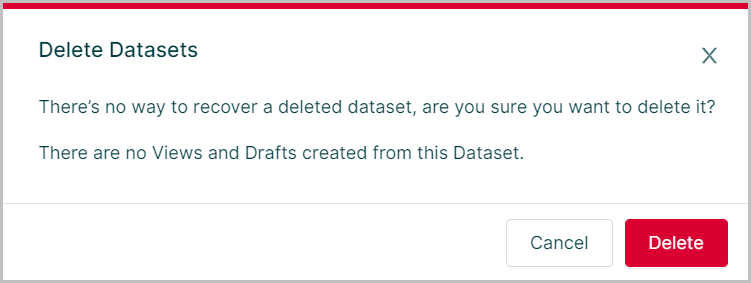
If no Views or Drafts have been created from the selected dataset, a pop-up message will ask you to confirm the deletion
Select Delete to confirm
this action cannot be undone
If a dataset has Views or Drafts created from it, they will be displayed in the Dataset List
When deleting any dataset that has a view or draft, additional options are then displayed on the deletion confirmation window
It contains:
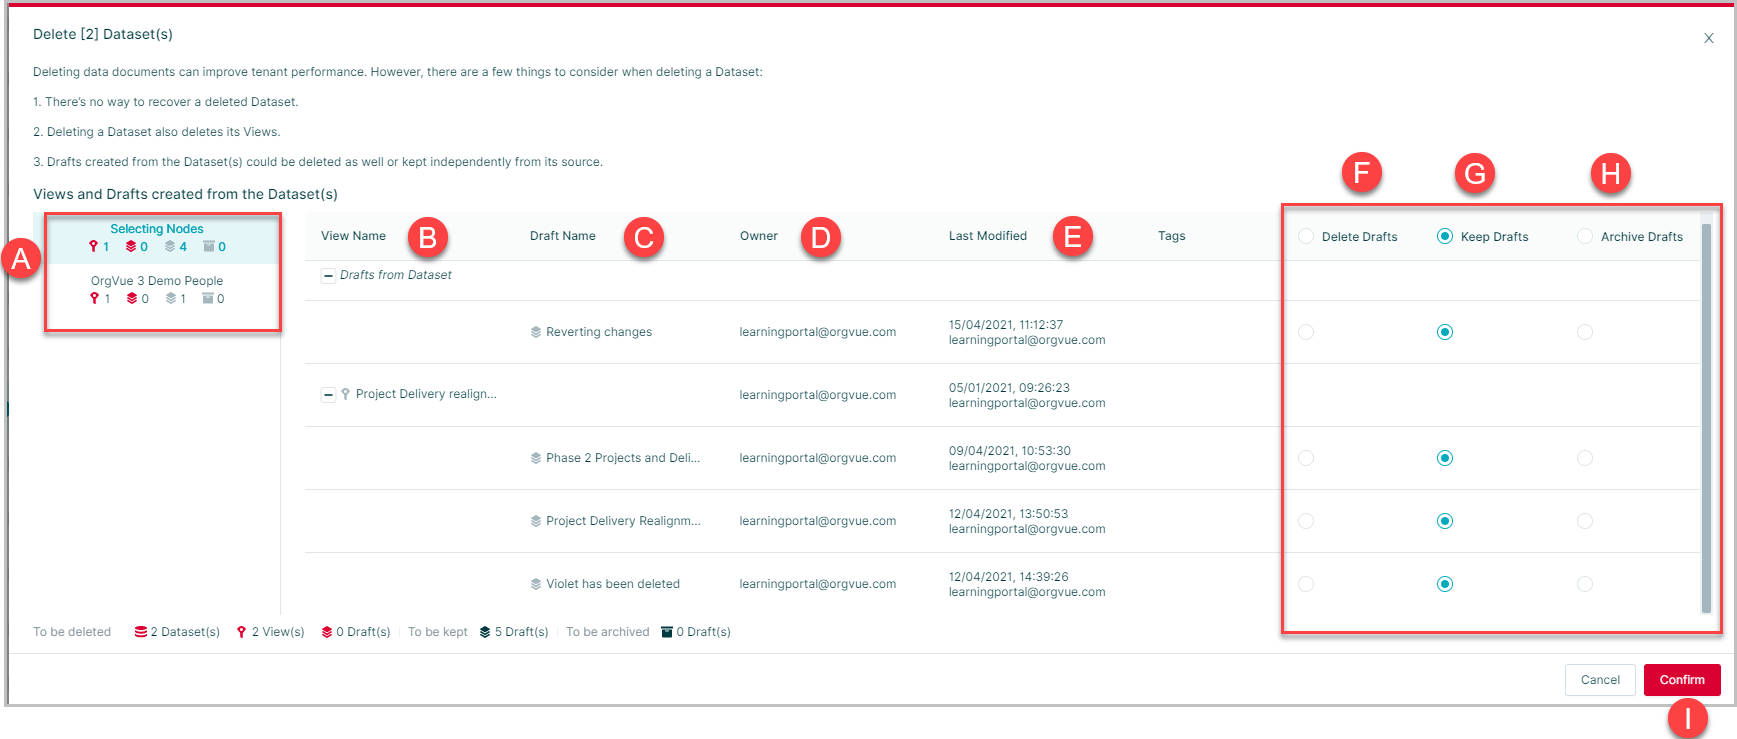
- A. Dataset name selected only shown if deleting multiple datasets
- B. View Name: Each view created from the dataset will be listed and these will be deleted with the selected Dataset
- C. Draft Name: Each draft is also listed, but a choice should be made for action using the radio buttons F, G or H
- D. Owner: Login ID of owner
- E. Last Modified: Date / Time / User ID for last modification
- F. Delete Drafts: This option will delete the draft along with the dataset
- G. Keep Drafts: This option will keep the draft available to import into other datasets
Note: Drafts retained using this option are no longer attached to the parent dataset and will not be visible on homescreen
- H. Archive Drafts: This will move the draft to the Archived Data List
- I.
Confirmbutton to complete deletion process
Archive a Dataset
When opening the data tab, the system must load all the Datasets Views and Drafts listed
The more of these there are, the longer it will take to display the list
If there are items that are not currently being used, an alternative to deleting is to archive them
This keeps them available for future use, but keeps the list smaller which will improve the speed of loading
To archive a Dataset, View or Draft either:
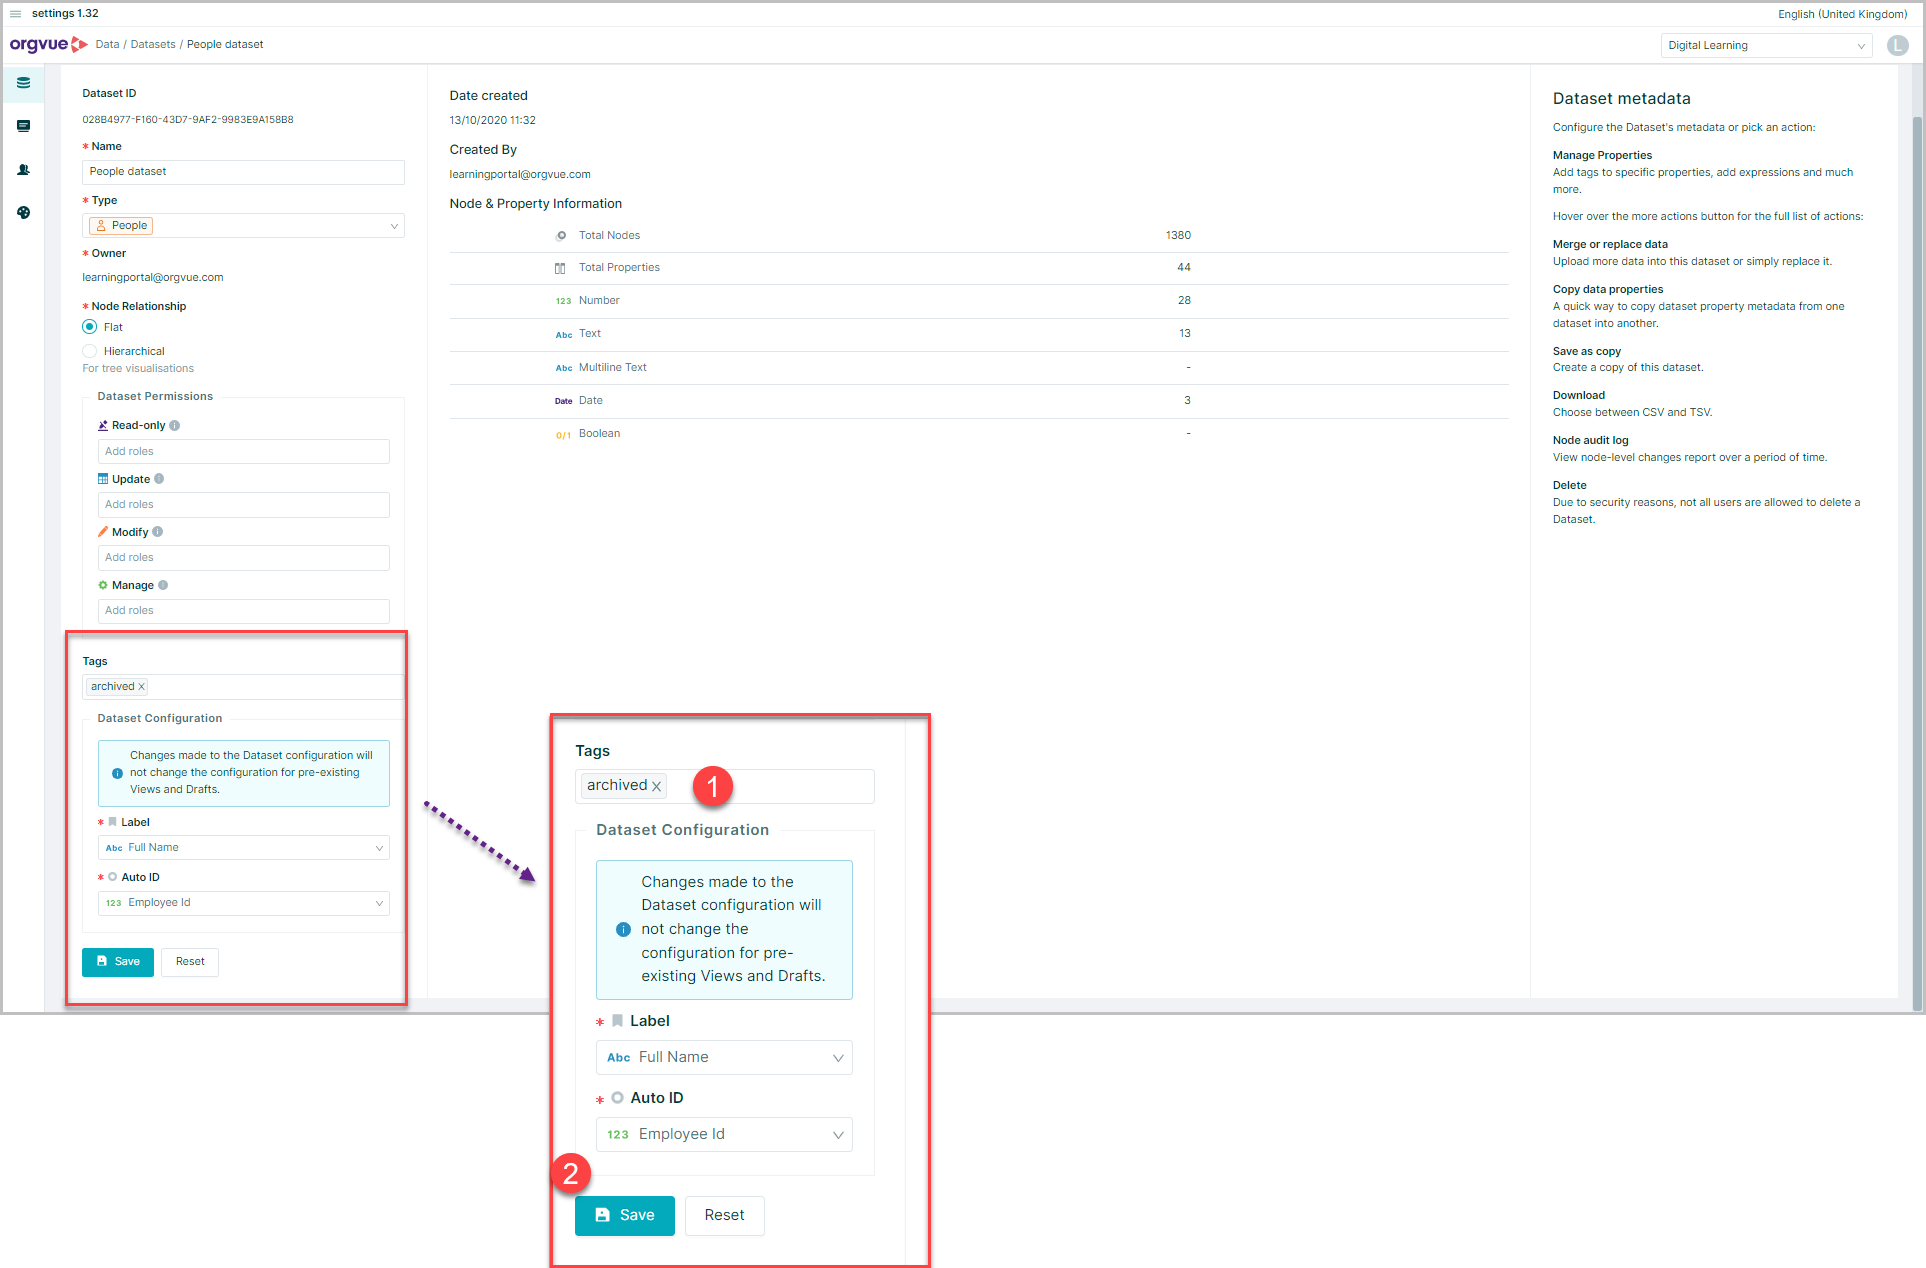
- Add the tag
archivedinto the tags on the Dataset Metadata screen for the required Dataset - Click
save
Or:
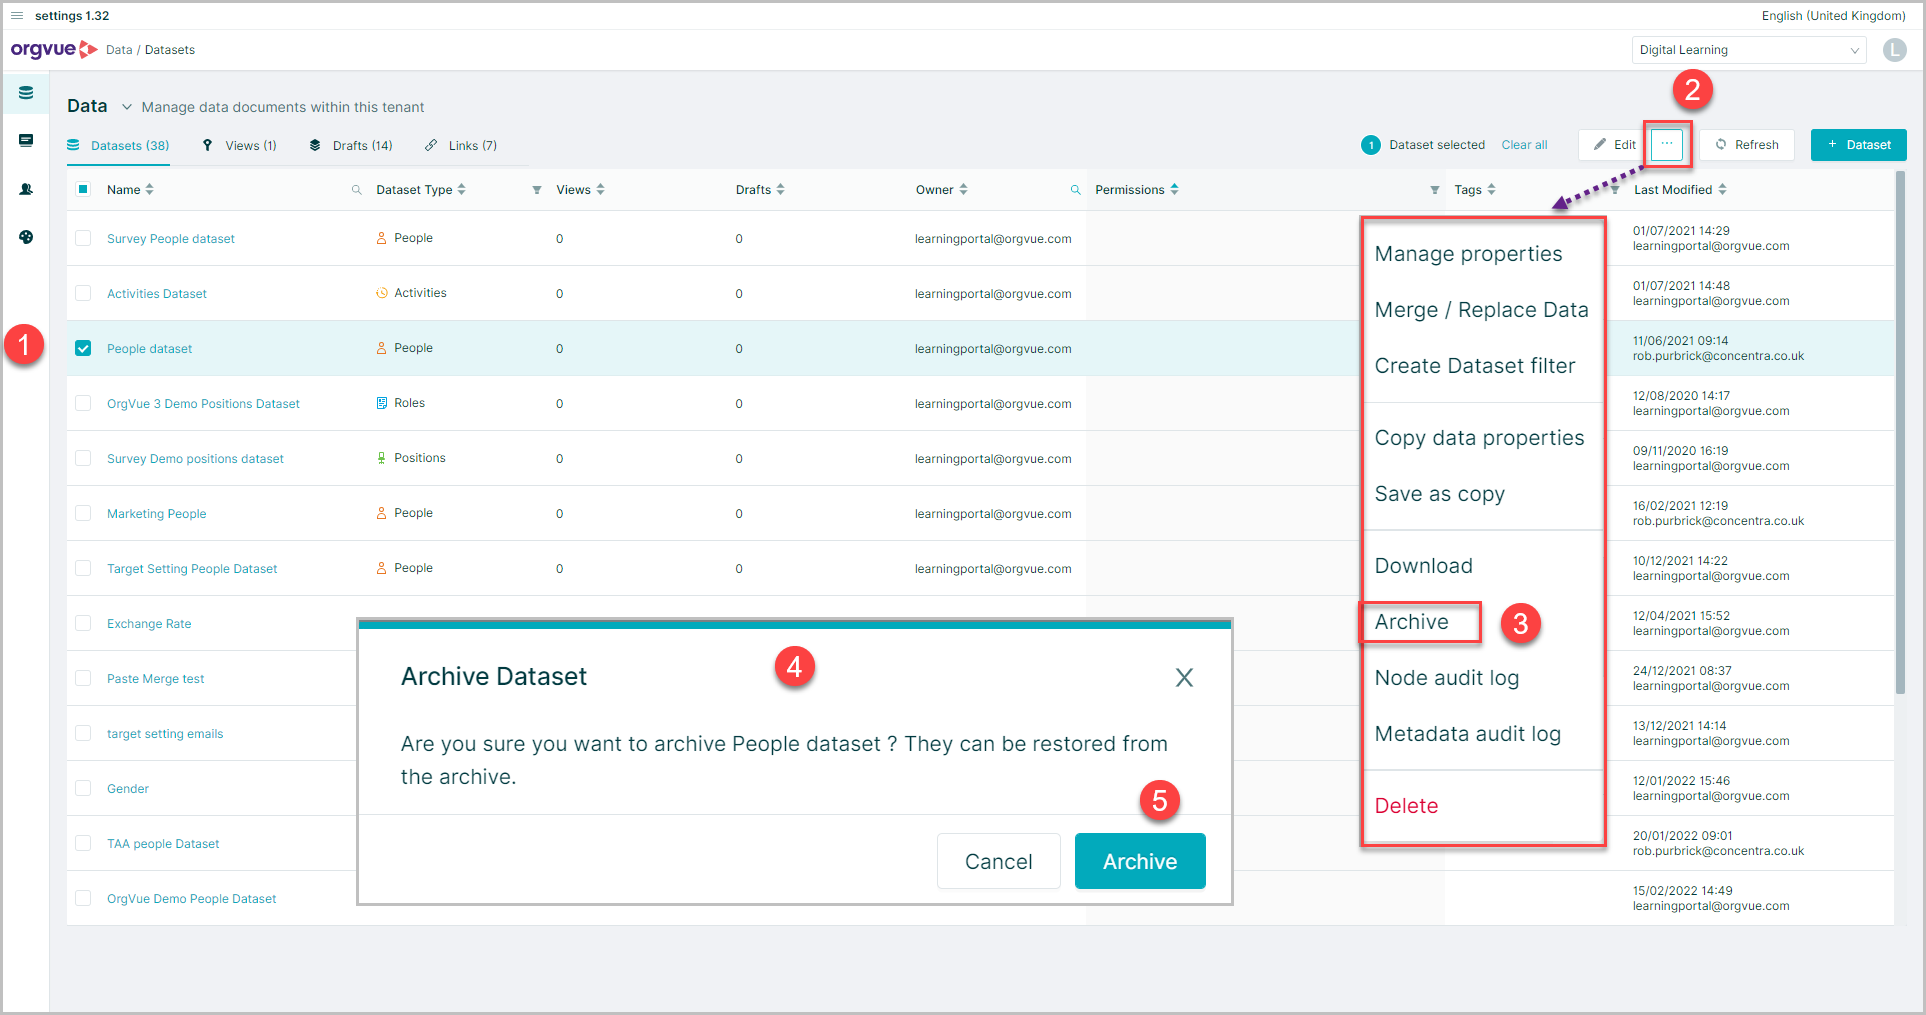
- Select the required dataset on the Dataset List
- Open the menu using the ellipsis button
- Select
Archive - A confirmation message will be displayed
- Select
Archiveto confirm the archiving of the dataset
This Dataset will then be shown on the archived Dataset list, see Dataset List Filtering for more details
To un-archive a Dataset, delete the archived tag or select the un-archive option and the Dataset will reappear on the main Dataset list
Any Datasets tagged
archivedwill not be visible in workspace
For details on other tags see Tags
Archive Multiple Datasets
It is also possible to archive multiple datasets at the same time by:
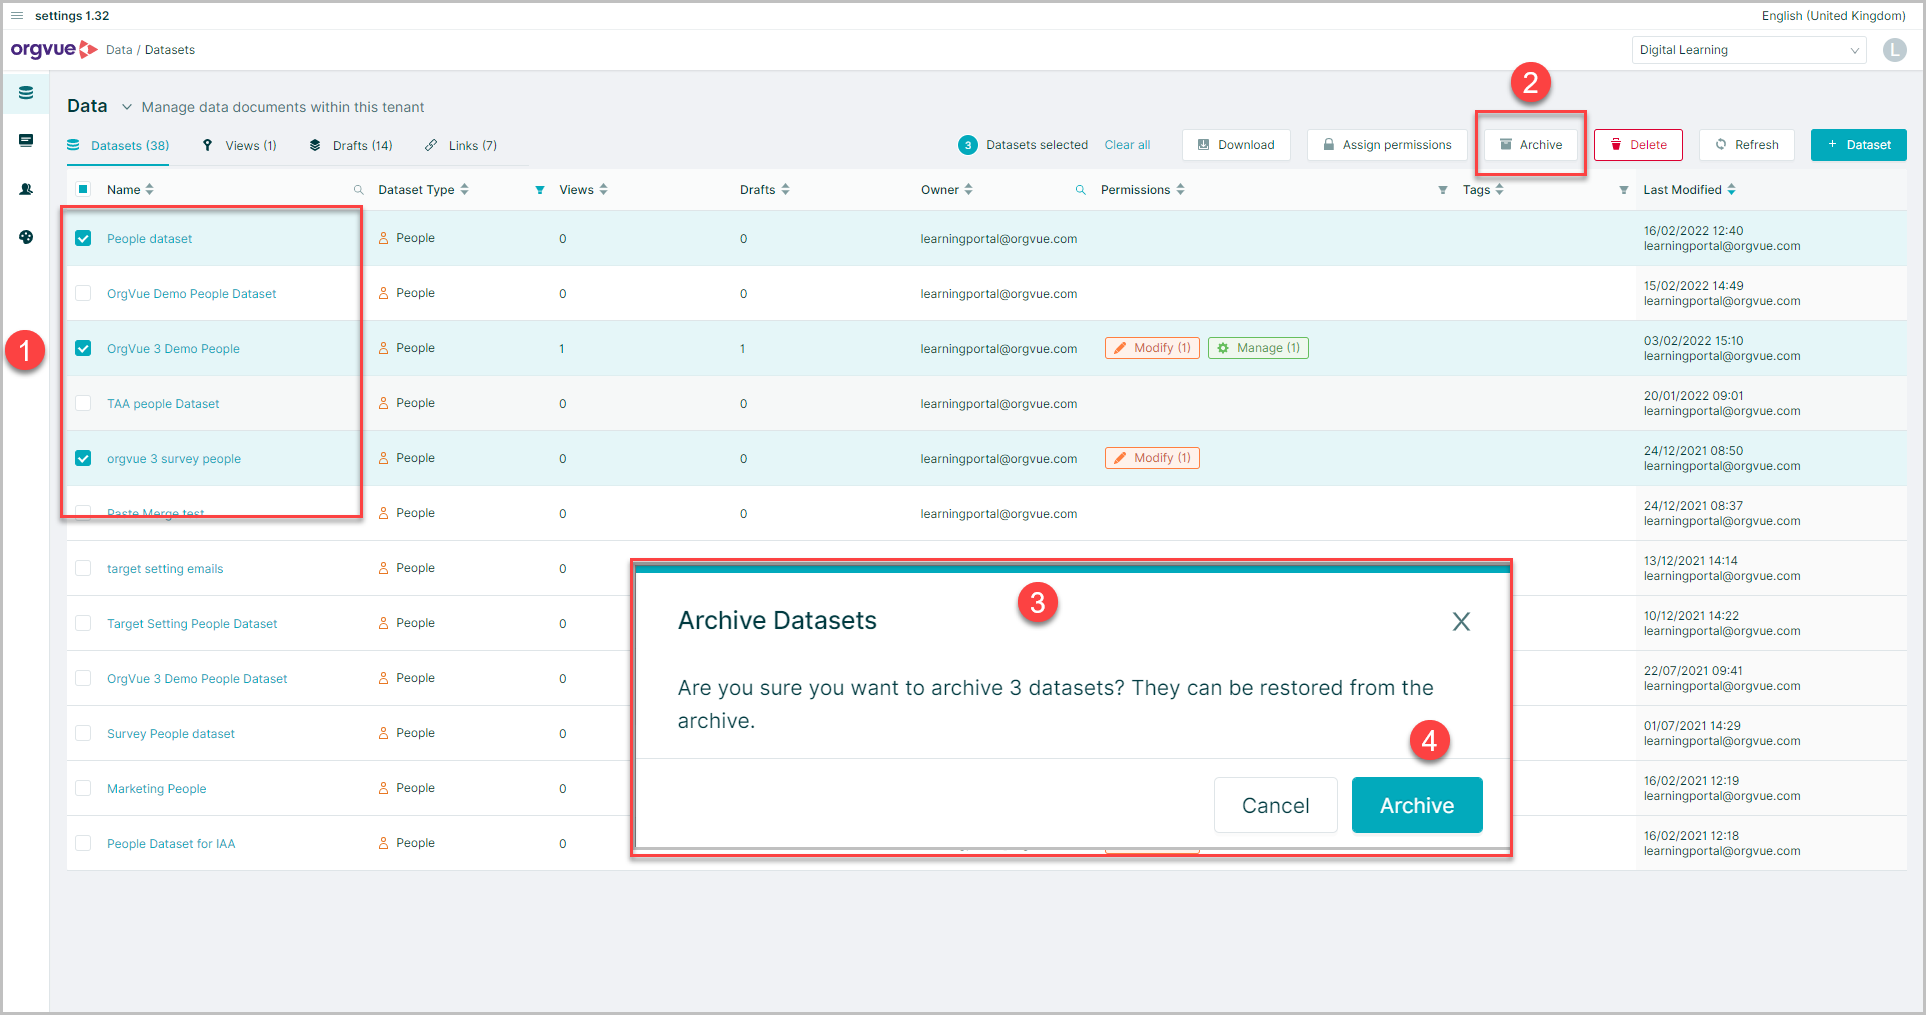
- Selecting the required datasets on the Dataset List
- Select the
Archivebutton - A confirmation message will be displayed
- Select
Archiveon this message to complete the process
Download Dataset
To download a Dataset either:
- Select the Dataset on the Dataset List, then open the menu and select
Download - From the Dataset Metadata screen of the Dataset, open the menu and select
Download
A pop-up window will allow you to select:
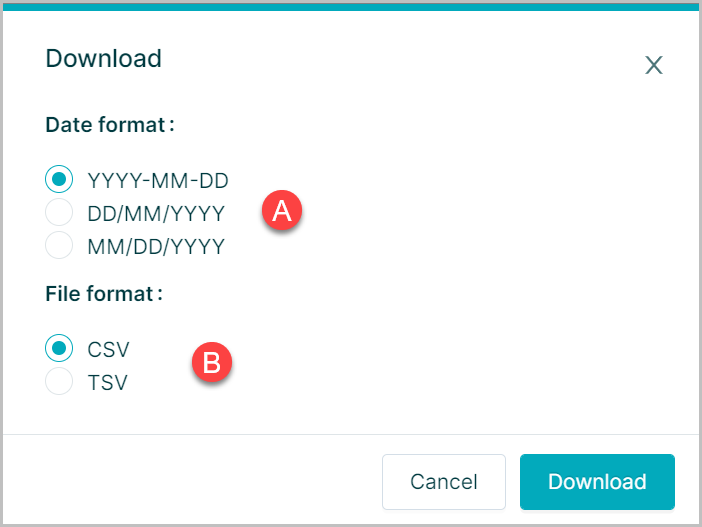
- A. The format of any date fields in your Dataset when downloaded
- B. The file format of the download in either CSV or TSV
Make the selections and click Download to proceed
A confirmation message will appear at the top of the screen to show completion of download
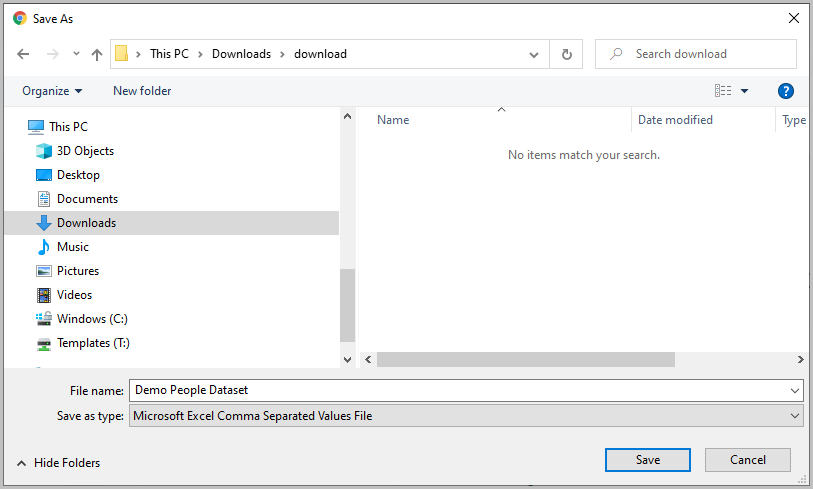
Followed by a 'Save As' dialogue box allowing you to select where to save the download
Properties will appear in the downloaded file in the same order they appear on the Property Manager
To amend this order see Reorder Properties
Download Datasetoption to export your dataset. To include expression property values in your data export use the Export Canvas to CSV option from Workspace
Save as Copy
To duplicate an existing Dataset by creating a save as copy either:
- Select the Dataset on the Dataset List, then open the menu and select
Save as copy - From the Dataset Metadata screen of the Dataset, open the menu and select
Save as copy
A pop-up window will be shown:
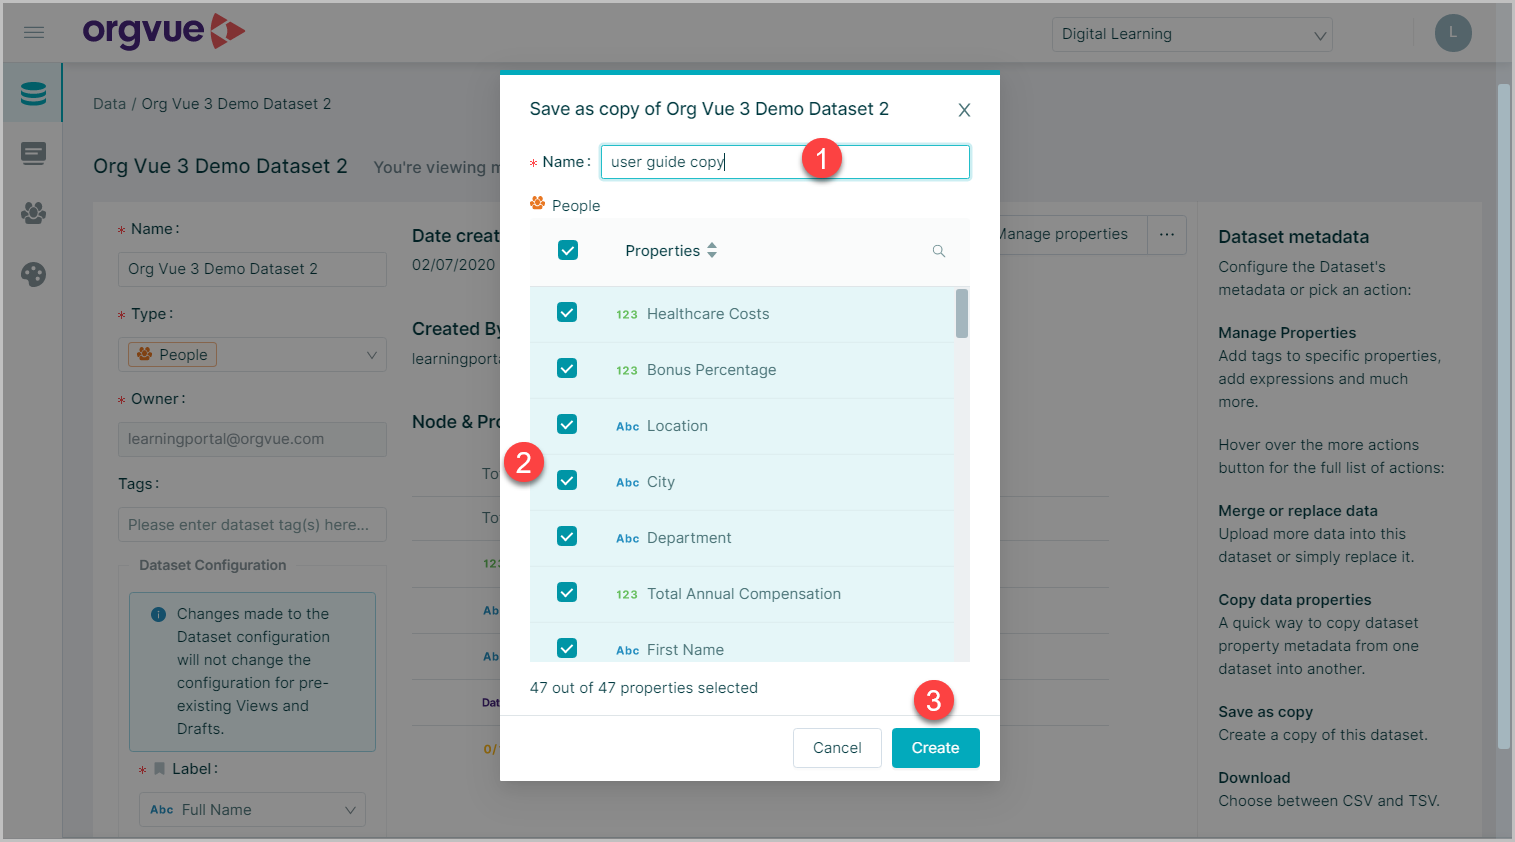
- Enter a name for the copied Dataset
- Deselect any properties in the source Dataset that are not required in the copy
- Click
Create
When creating a save as copy of a Dataset the following points should be noted:
- Users will only be able to create a save-as of the properties that they have access to
- Dataset name must be unique, and the user will be prevented from saving if the name is not unique
- The user cannot de-select required fields. Required fields are defined as the Unique ID, label and the parent ID (if the Dataset is hierarchical)
- Property tags and alternative property keys will be brought across into the new dataset
- Dataset permissions, property permissions and Dataset Tags will not be copied
- All formats, expressions and lookup configuration will be copied into the new copy of the Dataset
Once the Dataset has been created the Dataset Metadata of the newly copied Dataset will be shown allowing further edits to the Dataset and properties if required